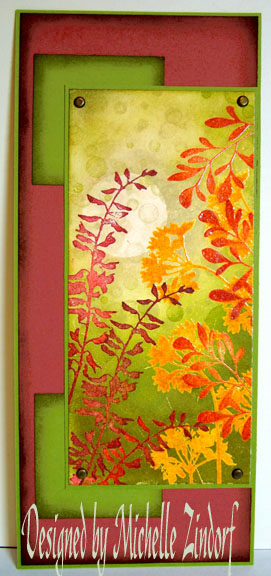
This is what I ended up with while trying to create the look of dappled light with my Stampin’ Up set – Simply Circles. I think I will continue to practice this. 🙂
Ready for the tutorial? Let’s get started.
Supplies:
| Stamps: See D’s Silhouettes, Stampin Up Simply Circles |
| Paper: Whisper White, Old Olive, Brovo Burgundy |
| Ink: Stampin’ Up True Thyme, River Rock, Old Olive and Bravo Burgundy, Distress Inks Walnut Stain & Old Paper, Adirondack Butterscotch, Rust & Oregano
Accessories: Versmark Pad, Brads, Sponges, 1 3/8″ circle punch, post it note, Clear embossing powder, heat gun |
On Whisper White card stock stamped the first set of silhouettes, on the left hand side, by loading my stamp first with Versamark and then with Bravo Burgundy ink. Heat embossed each image as I went along using clear embossing powder and a heat gun.
Stamped second set of leaves, on the right side of card, by first loading stamp with Versamark and then with Rust ink. Heat embossed each image as it was stamped with clear embossing powder and a heat gun.
Note: When creating a scene with emboss resist you will want to work from the foreground toward the background.
Stamped third set of images by loading the stamp with Versamark and then Butterscotch ink. Each image was heat embossed as I went along using clear embossing powder and a heat gun.
Sponged on Old Paper ink lightly with a circular motion on upper left hand corner of card stock.
Cut a mask for the sun out of the sticky part of a Post it Note with a 1 3/8″ circle punch. Put it on my card stock where I want the sun to be.
Sponged on more Old Paper ink over and around the mask to give the sun definition. Removed mask.
Stamped circle with Old Paper ink and stamping off once on my scrap paper before stamping on my card stock, for a lighter image.
Sponged on River Rock ink working into the Old Paper ink area, but not covering it entirely.
Sponged on Old Olive ink working into the River Rock ink, but not covering it completely.
Sponged on True Thyme ink, working over some of the Old Olive ink, but not covering it entirely.
Getting even darker yet by sponging on Oregano ink at the bottom of the card stock using a pouncing motion with the sponge. This looks really dark, but it will all dry lighter in color.
Stamped some more circles around the top half of card stock with Old Paper ink and some with Old Olive towards the middle of the card stock.
I thought my Sun looked a little faded so I put my sun Post it Note mask back on and sponged more Old Paper ink over the area to define it even more.
Sponged Oregano ink around edges of my two square layers and Walnut Stain ink around the edge of my Burgundy card stock layer.
Cropped image on the right side to make the left side more interesting. It’s amazing what a little cropping can do to highlight your main subject. Main subject here is the plants on the left and then sun.
Assembled the card and here it is finished!
Glad you could follow along with this tutorial. Now you give it a try!
Hope your day is filled with soft filter sun and peaceful gardens.
Until tomorrow. . . . . .


28 responses to “Dappled Light Garden – Tutorial”