Apr 06 2008

Back to the Beach – Tutorial

Published by zindorf at 5:00 am under Tutorials

dsc03217.jpg

I wanted to give my brayer and embossing powder a little break today.   So this card was created using direct to paper for the background. 

Here we go.. . . . .
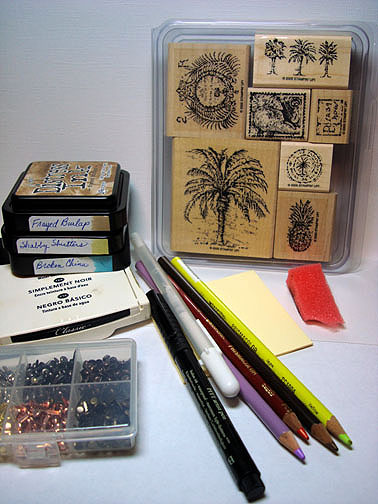
Supplies:

Stamps: Stampin’ Up Balmy Breezes
Paper: Stampin’ Up Whisper White, Real Red, Always Artichoke
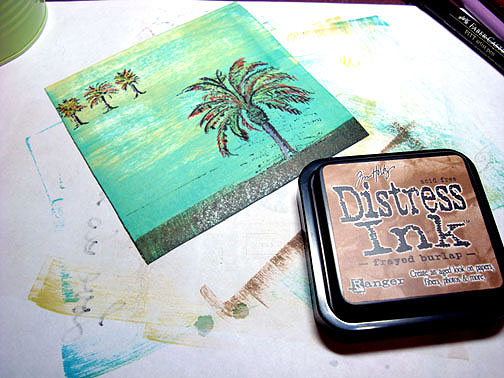
Ink: Stampin’ Up Black, Tim Holtz Distress Ink Frayed Burlap, Shabby Shutters, Broken China
Accessories: White Gel Pen, Primsacolor pencils, Post it Note, Black marker

dsc03222.JPG

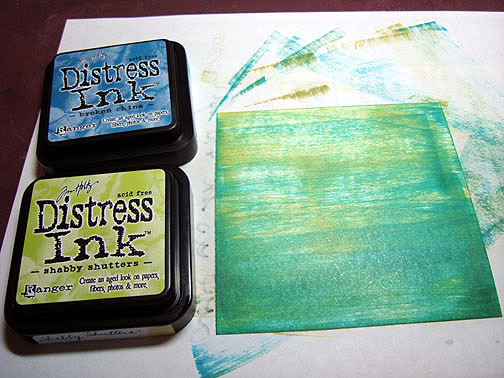
Drug Shabby Shutters ink pad edge across Whisper White card stock using a light touch.  You want to leave some white showing through.   Next, I drug a Broken China ink pad edge across the card stock being heavier toward the bottom of the card stock.

Note:  I used the entire edge of the ink pad, not just a corner and drug it from the left side of the card stock toward the right.  Trying to drag it all the way across the card stock before lifting the pad up.

dsc03203.JPG

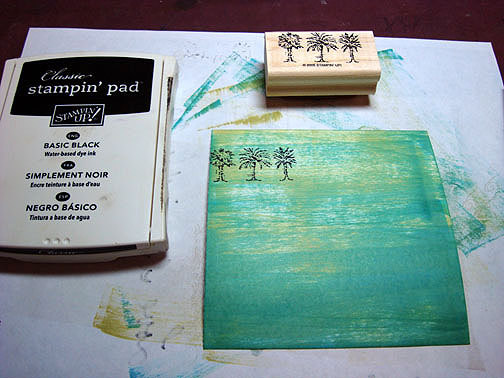
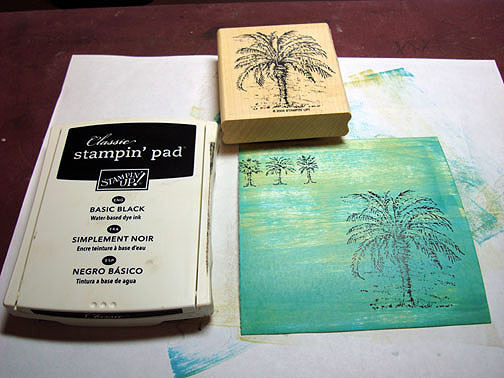
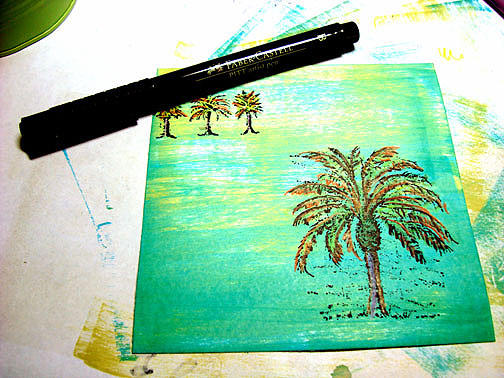
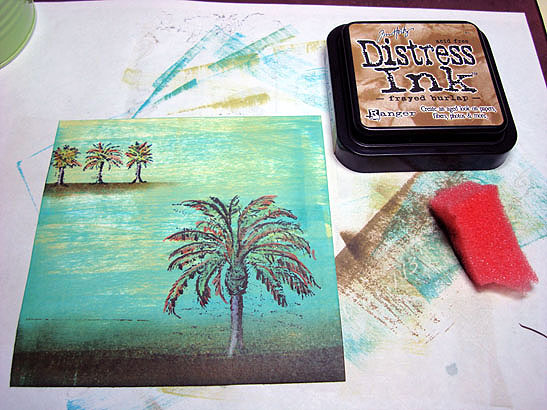
Stamped small palm trees and large palm tree using black ink.

dsc03204.JPG

dsc03205.JPG

Colored the palm tree leaves with a Yellow Chartreuse Prismacolor Pencil.

dsc03206.JPG

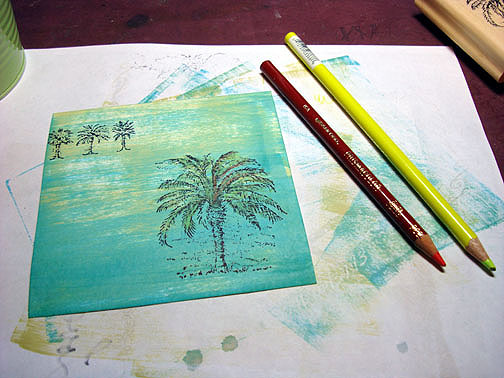
Add some (red) Rouge Chamois pencil to the leaves randomly.  Colored the Coconut with Dark Brown Pencil and the trunk with Lilac pencil.

dsc03207.JPG

Traced a few of the black ink lines with a black marker to give a little more depth.

dsc03208.JPG

Used direct to paper technique again by applying Frayed Burlap ink to the bottom of the card stock.  Once again I used one entire edge of the ink pad and drug it in a downward motion.

dsc03209.JPG

Used a Post it note to created a horizon line and small beach where the small trees are.

dsc03210.JPG

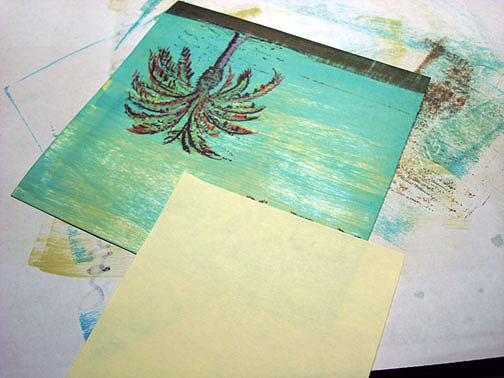
Sponged Frayed Burlap ink at the edge of the post it note in a small circular motion.

dsc03211.JPG

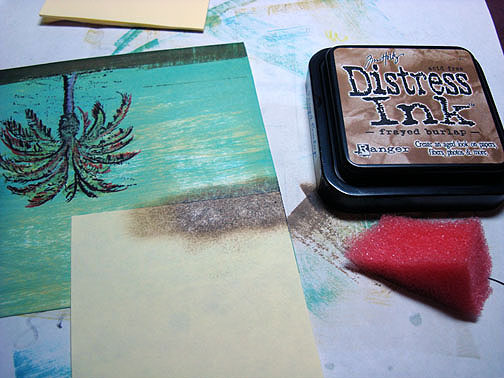
Sponged Frayed Burlap in a small circular motion at bottom of the card stock, getting lighter in color towards the top.

dsc03212.JPG

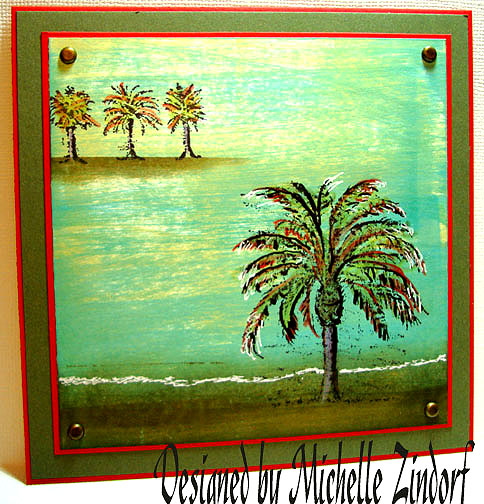
Added White gel pen highlights to the leaves of the tree.  Drew in the waterline with the white gel pen using very small strokes.

dsc03214.JPG

Assembled card and here it is finished.

dsc03217.jpg

Hope you enjoyed this tutorial and will give the direct to paper technique a try.

I’m wishing you a day filled with Balmy Breezes.

Until tomorrow. . . . . . .

33 responses so far

33 Responses to “Back to the Beach – Tutorial”

  1. Debbie S says:

    I just love this card!!! I have this stamp set, so I am going to give this a try. I live in Florida, so this will be perfect. Thank you for taking the time to create these wonderful tutorials. I enjoy visiting your blog on a daily basis.

    Debbie S

  2. Kathy says:

    Um…(speechless)..WOW! This is so gorgeous! It just amazes me to read your step by step and see how you’ve created this. I’m in awe of your creative process. This is just lovely Michelle. Thank you for giving a beautiful start to my day!

  3. Conniecrafter says:

    How Awesome, love the waves coming up on the beach and the way you made a little island out there, Love watching your creation come to life!

  4. Tamara says:

    Michelle, you are amazing. I just found your blog and you are my favorite.
    I just recently took a watercolor class. It was fun, but I think I can learn more from your tutorials than the class. When I have a blank piece of paper, I see a blank piece of paper…really sad. I am not sure why God gave me such a love for painting but no talent….lol I can follow directions…that is a good thing.
    Thanks for blessing us with your work and for giving me the opportunity to try and be an artist.

  5. Annapurna says:

    Did you used to paint or still do? These are like little paintings on your cards. Superb!

  6. HB says:

    Michelle, I just can’t find the words to expess how blown away I am every time I visit your blog. You have a gift and I sincerely appreciate that you share it with us.
    This card is beyond amanzing!!!!!!!!!!!!!!!!
    HB

  7. Denise says:

    Michelle,
    I think this is one of my most fave cards you have done lately! It actually looks like water! You are amazingly talented; you should be so proud. This is absolutely delightful.

  8. Terri says:

    AMAZING! Enough said.

  9. Diana says:

    Michelle your work is amazing. I look forward to seeing what you’ve come up with on a daily basis. I love this stamps set but have never been able to do it justice. I will definately be giving this one a try. Thanks for the great tutorials and the imspiration to give them a try myself.

  10. Charlene says:

    You are amazing! I’m just in awe over your cards and great tutorials!!

  11. MSBetsyZ says:

    Michelle…words fail! I came across your blog last week and immediately put it on my daily “have to” rounds, lol. Stunning work, all of it! I really, REALLY appreciate the time you take to post tutorials. Thank you so much!

    Betsy

  12. Michelle, you really should have a tip jar because you deserve to get paid for these amazing lessons! You have such a gift for these tutorials.

    I love the rippled look of the water and the water’s edge you made with the gel pen. Gorgeous card!

  13. Cindy H. says:

    Another absolutely gorgeous card!!!! I’ve run out of adjectives to tell you how wonderful your art is…so, I’ll be repeating myself – a lot!!! Thank you for sharing your art and your *artistic secrets* with us :)

  14. Kathy says:

    I have a question on your direct to paper technique. I’m trying to figure out how to drag the ink pad…lol. You said that you use the entire edge of the ink pad and you drag from left to right. Is the ink pad face down on the paper, or are you holding it at an angle where the side of the ink pad is touching the paper? You did such a beautiful job of leaving the white showing like light on the water. I love that effect.

  15. Eileen M says:

    Stunning! And you make it look so easy! What an excellent teaher you are!
    Thnak you for the inspiration…..

  16. zindorf says:

    Kathy asked “I’m trying to figure out how to drag the ink pad…lol. You said that you use the entire edge of the ink pad and you drag from left to right. Is the ink pad face down on the paper, or are you holding it at an angle where the side of the ink pad is touching the paper?”

    Kathy, I hold the ink pad at an angle so just the edge of the ink pad is touching the paper. :)

  17. Kathy says:

    Thank you for answering my question Michelle. I guess I should have been able to figure it out since you said to use the edge of the ink pad. :) I’m just a little behind the learning curve today. Thanks for the help…I need all I can get!

  18. Jola says:

    Amazing. I always leave your site inspired. TFS

  19. Velta says:

    OMG this is just beautiful!! You certainly have a talent with brayering. You have inspired me to try something like this…although it had to have taken you years to accomplish this wonderful techinique. TSF

  20. Jennifer says:

    Oh Michelle, this is gorgeous!! Another wonderful card – I always go to your blog first when I’m jonesing for eye candy! Thank you!

    I have given you an award – your projects are always absolutelly STUNNING, I check your blog every day and you are a great inspiration! Details are on my blog:

    http://glitterinmyhair.blogspot.com

  21. Evelynn Saddler says:

    omg this is amazing, it looks like I could just walk down to the waters edge. Michelle I join the above you are so talented. Thank you so very much for sharing. I have been doing a lot of watercoloring wish I had you to give me pointers. I really like this card a lot.
    Ks.stamper

  22. Sue (Snellybelle) says:

    I have to repeat.. again… you are incredible!
    The water looks real…. totally awesome scene.
    I have a room decorated with a tropical theme, I am going to try to do this and if I can even get a third the look you have achieved here, I will frame it and put it on the wall. Thank you so much for your tutorials and inspiration!

  23. Shelly Schmidt says:

    Wow- Michelle!!! I am so in awe of the cards you make……I LOVE this card the colors are wonderful and the looks you achieve blow me totally ‘out of the water…….. well, I am going to give this a try- have all of the supplies except for the shabby shutters…..will have to find a substitute for it…….. Thanks so much for sharing your wonderful talent!!!

  24. Gorgeous, just gorgeous! I really think you are an amazing artist!

  25. Ying says:

    I really enjoy your blog. The cards you made always look like a picture of art. You are such a talented, gifted, and awesome artist. I especially like your blog becuase you always do a tutorial for your cards, not just a list of supplies you used.
    Thanks so much.

  26. Becky says:

    another great card, how many ink pad’s do you own?

  27. Dawn says:

    fab as usual Michelle!!

  28. Sue (suen) says:

    Wow, this is just an absolutely fabulous scene! I can almost feel the ocean breeze!

  29. Sara in WI says:

    You are an amazing artist, Michelle. I am in awe of all of the techniques you come up with card after card. Thanks so much for sharing your talents with us.

  30. Karen says:

    I love your tutorials! You make your art so approachable. I would have never been able to think in terms of these layers. Thank you so much for sharing with us!

  31. Deborah B says:

    Hi Michele

    I am simply blown away by your creative genius. I am hooked on stamping and brayering thanks to you and your wonderful tutorials

  32. mary says:

    Another awesome card and tutorial. You are a creative, talented artist who is not afraid of thinking outside the box.
    -mary

  33. Karen Barber says:

    Michelle – this is one of my all time favorites with the beach and the light across the water…..now I see that you didnt’ brayer this background……that’s how you could get the back and forth color variation – I absolutely love this card – :) It’s the bomb!! :)