Apr 24 2008

Landscape floral - Tutorial

Published by zindorf at 4:16 am under Tutorials

dsc03434.jpg

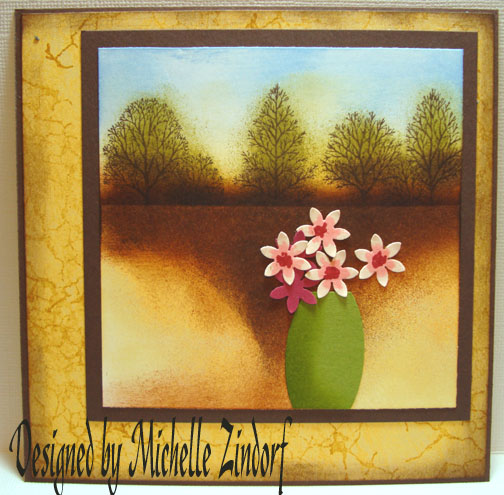
Hello fellow stampers!   We have had such beautiful weather here in Ohio, but I’ve not had a chance to be outside this week, so this card represents that feeling.  Let’s start with the tutorial.

Supplies:

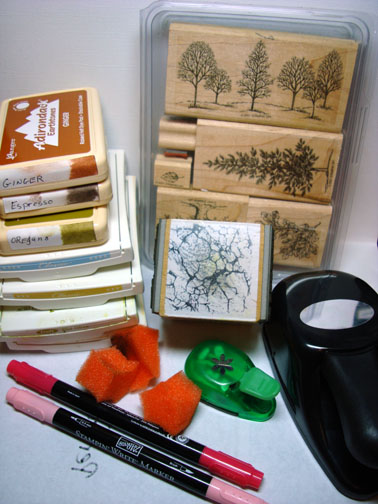
Stamps: Stampin’ Up Lovely as a Tree, Marble Texture Cube
Paper: Whisper White, Chocolate Chip, Blush Blossom, Purely Pomagranate & So Saffron
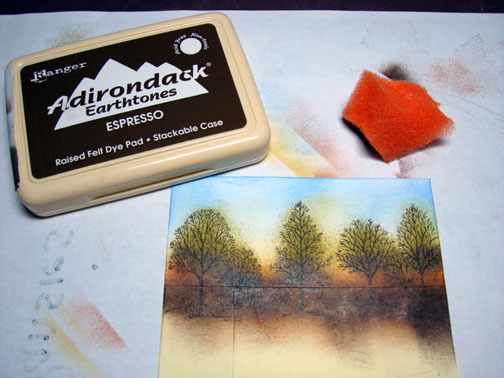
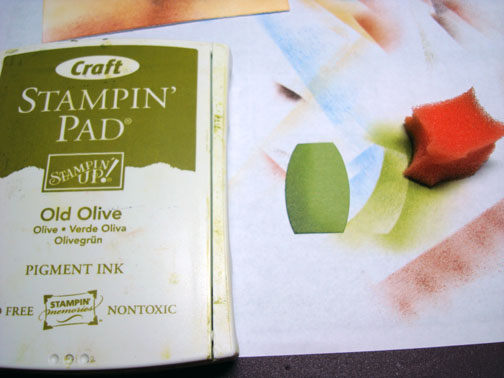
Ink: Stampin’ Up So Saffron, Old Olive, Bashful Blue, More Mustard, Adirondack Espresso, Ginger & Oregano
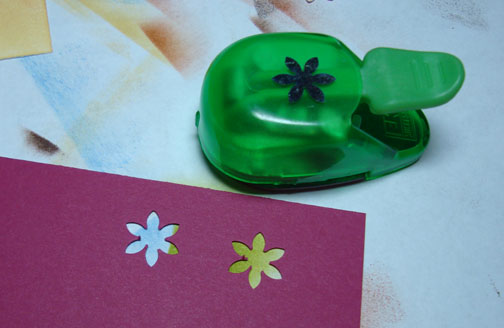
Accessories: Stampin’ Up Markers, Sponges, Large Oval Punch, Flower Punch

dsc03437.JPG

I’ve put away my brayer for today and decided to do this scene all in sponging. :)

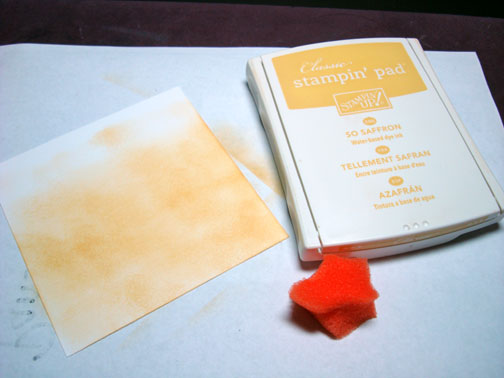
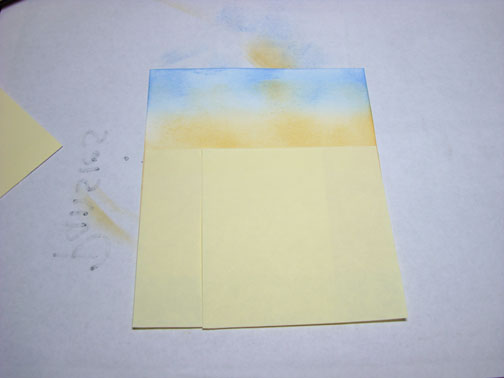
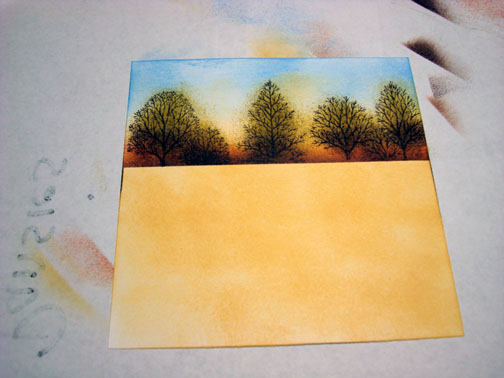
Sponged So Saffron ink on 2/3 rd’s of a piece of Whisper White card stock.

dsc03410.JPG

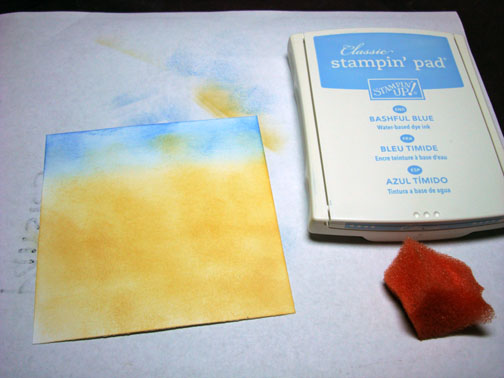
Sponged Bashful Blue ink at top of card stock.

dsc03411.JPG

Used Post it notes as a mask to cover part of the card stock.

dsc03412.JPG

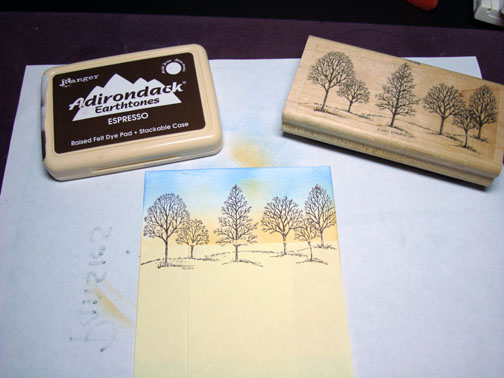
Stamped trees with Espresso ink.

dsc03413.JPG

Sponged Oregano ink on the trees to represent leaves.

dsc03414.JPG

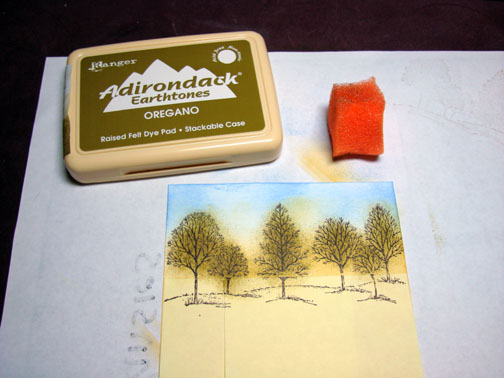
Sponged Ginger ink under the trees.

dsc03415.JPG

Sponged Espresso ink at the horizon line (top of post it notes) and at the bottom of the leaves on the tree.

dsc03416.JPG

Removed post it notes.

dsc03417.JPG

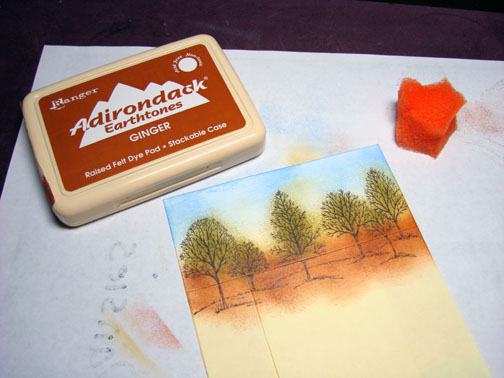
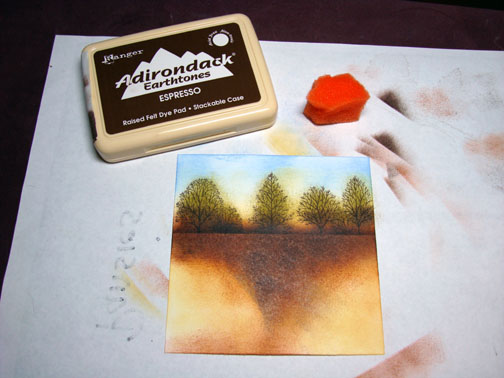
Sponged on Ginger ink over some of the field.

dsc03418.JPG

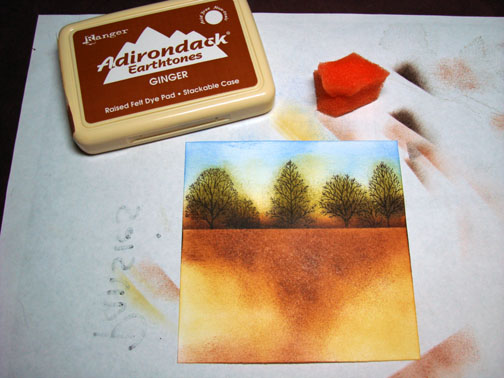
Sponged Espresso ink over some of the ginger ink.

dsc03419.JPG

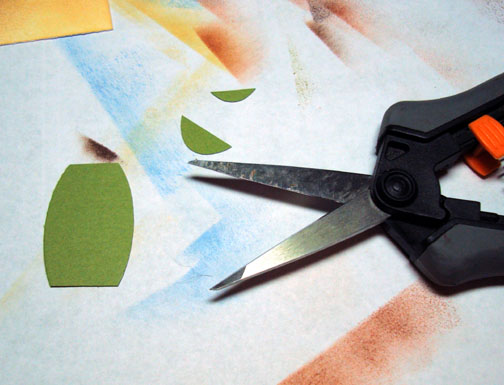
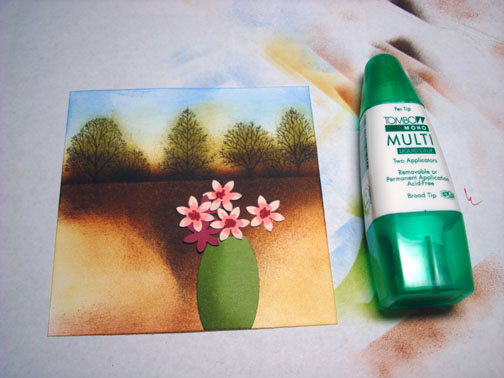
Punched an oval out of Old Olive card stock using the large oval punch.   Cut the top and bottom off of the oval.

dsc03420.JPG

dsc03421.JPG

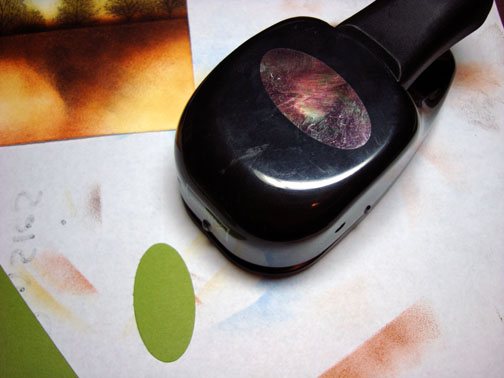
Sponged Old Olive ink on left side of vase to create a shadow.

dsc03422.JPG

Punched flowers out of Blush Blossom and Purely Pomegranate card stock.

dsc03423.JPG

dsc03424.JPG

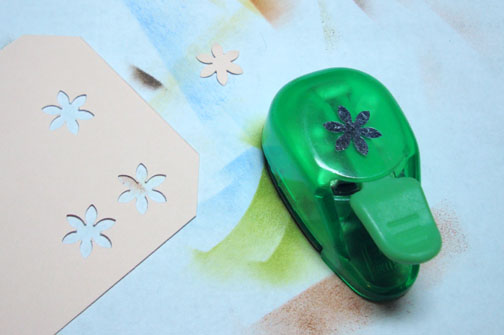
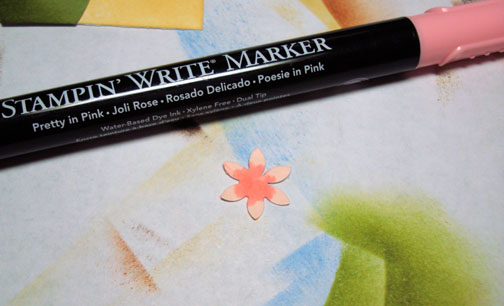
Colored the centers of the Blush Blossom Flowers with a Pretty in Pink marker.

dsc03425.JPG

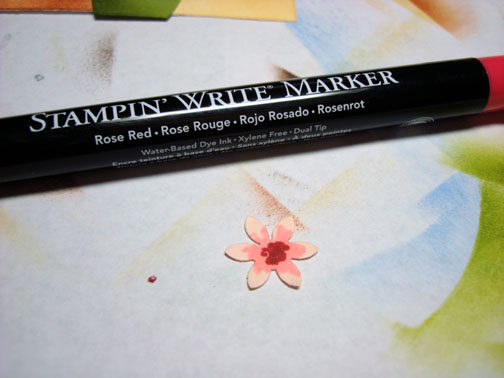
Made dots in the very center of the flowers with a Rose Red marker.

dsc03426.JPG

Glued the vase and flowers to the scene.  I put the vase just off center in the scene.  This is more please to the eye.

dsc03427.JPG

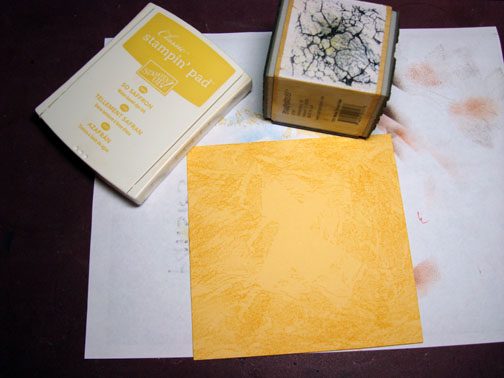
Stamped side “A” of the marbling cube on So Saffron card stock using So Saffron ink.

dsc03428.JPG

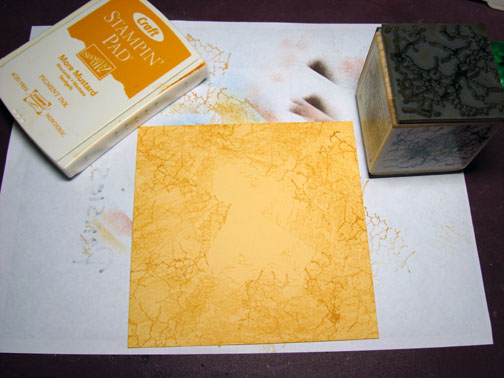
Stamped side “C” of marbling cube with More Mustard ink.

dsc03429.JPG

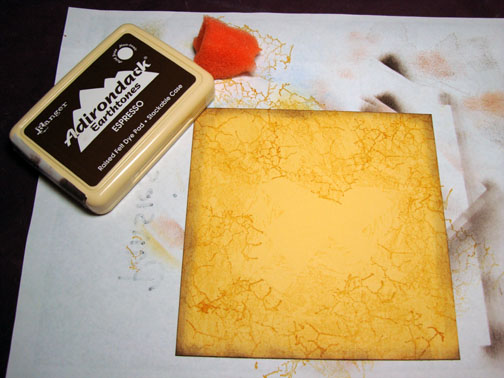
Sponged Espresso ink lightly around edge of card stock.

dsc03430.JPG

Assembled card and here it is completed.

dsc03434.jpg

Hope you are able to go outside and enjoy some wonderful weather today.

Until tomorrow. . . . . . . . . .

26 Responses to “Landscape floral - Tutorial”

  1. Joanneon 24 Apr 2008 at 5:39 am

    I love that your cards come with a tutorial! I really enjoy them. This card is beautiful, and I find it fascinating that by cutting off the bottom of the tree stamp, it really pushes the trees back further into the horizon. Learning so much from you! Thank you very much.

  2. Tamaraon 24 Apr 2008 at 5:43 am

    awesome…
    I actually have this stamp set so will be trying this one soon.
    Thanks.

  3. Theresaon 24 Apr 2008 at 6:10 am

    Amazing as usual. Thank you so much for sharing all your techniques.

  4. Beckyon 24 Apr 2008 at 6:45 am

    This is beautiful, I can do this :), sponges - I must try this . Thanks for such great work and taking the time to show us all, and in such great detail. Your the best :).

  5. Christineon 24 Apr 2008 at 9:07 am

    so beautiful, you make it look so easy. Where do you get all your inspirations from. TFS

  6. KellyRaeon 24 Apr 2008 at 9:37 am

    Ohmigosh! Your creativity is just awe-inspiring. I’m so thankful that you share the “how” of what you do, that gives me hope that some day I’ll be able to create a similar look. You rock!

  7. Ks.stamperon 24 Apr 2008 at 11:17 am

    Michelle
    Wow you amaze me how you can bring everything to life. How do you do that???? I try your tutorials and mine never look like yours. boo hoo. Oh well I’ll keep trying, and someday I will post one.
    Ks.stamper

  8. Ritaon 24 Apr 2008 at 11:39 am

    This is gorgeous as always, I luv it! You are amazing, & I’m learning so much from you, thanks so much for these tutorials!

    Where do you get the Marble Texture Cubes? I have never seen these before.

  9. Cindy H.on 24 Apr 2008 at 2:06 pm

    Stunning, as always!!! If I didn’t stamp at all, I’d still want to come here just to look at your masterpieces! Of course, I do stamp and my hope is to become a better stamper just by visiting your blog and learning. Thank you!

  10. Cathyon 24 Apr 2008 at 2:18 pm

    Love that this tutorial uses sponging. I am a little brayer challenged. So I definitely will be trying this one. You do extraordinary work and it is so nice of you to share your techniques. I for one really appreciated this because I know it takes time for all of this. So from me to you Thank You. :0)

  11. zindorfon 24 Apr 2008 at 2:22 pm

    Rita asked “Where do you get the Marble Texture Cubes?”
    Rita I got my “Stampendous Marble Texture Cube” from Michael’s. :) I just love that cube!

  12. Laurie Helgasonon 24 Apr 2008 at 2:34 pm

    I love the card.

    I never thought of shading a stamped image to create a shadow. And the Ginger Adirondack ink pad is a great color.

    You make the cards look easy to make with the clear directions and step by step photo’s. Thank you.

    Laurie in MN
    Where is spring hiding?

  13. Melissa (SCS: stampin_melissa)on 24 Apr 2008 at 2:41 pm

    So lovely Michelle! I find it interesting how I don’t even realize some of what you have done until I read the tutorial. Example, I didn’t realize you had masked off the tree trunks and had to scroll up to see the finished card and said, “sure enough, she sure did leave them off!” LOL! One thing I have realized with this card, not only did you put aside your brayer, but you also left out embossing!

    Perhaps your lovely weather there in Ohio will be here for the week-end. We have rain today and more forecasted for tomorrow. :D

  14. Terrion 24 Apr 2008 at 2:59 pm

    Wow Michelle, another beauty. Thanks again for your inspiration and hard work in putting out these tutorials!

  15. Kathyon 24 Apr 2008 at 5:25 pm

    Michelle, this is fabulous..you are fabulous! Love it! So creative and beautiful. I never would have thought of making an oval punch into a vase. Love the earthy feel to this scene :)

  16. Roxanne Stevenson 24 Apr 2008 at 6:12 pm

    Absolutely beautiful!!!!!

  17. Nanon 24 Apr 2008 at 9:02 pm

    Your cards are masterpieces. Absolutely beautiful…what a talent!

  18. Heather Fullertonon 25 Apr 2008 at 3:27 am

    Thanks so much for giving tutorials with your cards. I have learned many technigues from you. Thanks and I love your card.
    Retired Heather

  19. Barb (GrandmaUpNorth)on 25 Apr 2008 at 6:07 am

    This card is just beautiful! You have such talent. Thank you for explaining exactly how you do it. I may get enough courage to try this one!!!

  20. dawnon 25 Apr 2008 at 6:12 am

    once again Michelle… beautiful!!! thank you my friend!

  21. Sandyon 25 Apr 2008 at 7:14 am

    Beautiful. You sure think out of the box. That’s one thing I never seem to do. You are so inspirational. Thank you!

  22. Karen Lindsayon 25 Apr 2008 at 8:33 am

    What a beautiful card! What a neat idea! And you just dreamed that up all by yourself!!?? I wish I had such a creative imagination. Thank you for sharing. :)

    Karen

  23. Conniecrafteron 25 Apr 2008 at 9:16 am

    Awesome bg, Love those trees and your creative way of doing a vase, Love it!

  24. Barbon 07 May 2008 at 1:54 am

    This looks like so Much fun… I haven’t thought of inking punched shapes…just another new technique to work with.
    Stunning, just stunning!.
    Barb

  25. Susanon 07 May 2008 at 4:34 pm

    Well, I’ve been 3H on your amazing blog. Your tutorials…they speek for themselves.
    I like any tutorials, as you’re ssooo good at demoing them!
    Keeps up the great work & THX. for sharing. I’m glad I found your site!
    AMAZING!!!!!

  26. Jayne Merceron 17 May 2008 at 5:19 pm

    Hi Michelle,

    I just wanted to say thank you for these wonderful tutorials. I decided to have a go using this one as I’ve just got Lovely as a Tree. Mine isn’t a beautiful as yours but I’m really happy with my first attempt at this technique. You can see mine at

    http://www.jaynemercer.com/blogs/

    Thanks again.

Trackback URI | Comments RSS

Leave a Reply