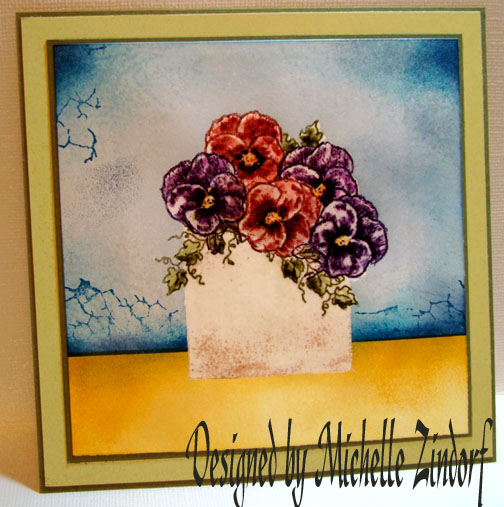
I’m proclaiming this week “Art Inspiration Week” here on my blog. Why you ask? Because I can, lol.
I love art and find so much joy in trying to recreate a masterpiece with rubber stamps, ink and embossing powder. My pieces always fall short of the original, but I learn tons along the way. So join me this week and hopefully you will be inspired. 🙂
Today I drew my inspiration from a painting by Anouska Vaskebova titled “Pansies II”. Here is a picture of the original.

Isn’t it stunning!
Well let’s get started on the tutorial.
Supplies:
| Stamps: Stampin’ Up Flower Garden & All Season Wreath, Stampendous Marble Texture Cube, Hero Arts Shadow stamp E2055 |
| Paper: Whisper White, River Rock & Always Artichoke |
| Ink: Stampin’ Up Barely Banana, More Mustard, Bravo Burgundy, Elegant Eggplant, So Saffron, Always Artichoke, Night of Navy, Not Quite Navy, Adirondack Cloudy Blue & Hazelnut |
| Accessories: Markers Elegant Eggplant, Apricot Appeal, Black, Bravo Burgundy, Brayer, Sponges, Versamark marker, Aqua Painter, Clear Embossing Powder, Heat Gun, post it notes |
Stamped two pansies with Elegant Eggplant ink and one with Bravo Burgundy ink on Whisper White card stock.
Using my Aqua Painter and just plain water I went over the pansies. The dye ink will bleed so it gives a watercolor effect.
Colored the center of the flowers with an Apricot Appeal marker.
Colored dark areas of the stamped images on the Elegant Eggplant flowers with my Aqua Painter and Elegant Eggplant ink.
Note: Squeeze the closed ink pad and you will get a puddle of ink on the lid in which to use for watercoloring.
Traced the outline of the Elegant Eggplant flowers with an Elegant Eggplant marker.
Colored the dark areas of the Bravo Burgundy flower with an Aqua Painter and Bravo Burgundy ink.
Traced the outline of the Burgundy flower with a Bravo Burgundy marker.
Oops, missed taking a photo, added a touch of black marker to the center of the flowers to give a nice contrast to the yellow centers.
Colored over the flower images with a Versamark marker being careful to stay within the image lines.
Heat embossed images with clear embossing powder and a heat gun. Note: heat embossing your images will make them darker 🙂
Since the flowers are heat embossed they will resist ink stamp over them so we are free to put in a second row of flowers.
Stamped second row of flowers, one in Bravo Burgundy and one in Elegant Eggplant. Repeated the same coloring steps as in the first row of flowers.
Colored over the second row of flowers with a Versamark marker and then heat embossed them with clear embossing powder and a heat gun.
Stamped leaves with Always Artichoke ink.
Colored the leaves lightly with an Aqua Painter and Always Artichoke ink.
Created a shadow on the leaves by putting more Always Artichoke ink at the bottom half of the leaves with an Aqua Painter.
Went over the leaves with a Versamark marker and heat embossed them with clear embossing powder and a heat gun.
Now it’s time for a flower pot. I dug out one of my long neglected shadow stamps and stamped the pot with Hazelnut ink, stamping off once on my scrap paper before stamping on my card stock so the image would not be so dark.
Went over flower pot with a Versamark marker and heat embossed it with clear embossing powder and a heat gun.
Now it’s time to put in the counter and wall.
Masked wall area with post it notes.
Brayered on the counter area with Barely Banana ink.
Sponged on So Saffron ink using a pouncing motion so the color is broken up little specks.
Sponged on More Mustard ink, not covering all of the So Saffron ink.
Lightly sponged a little Always Artichoke ink at the top of the counter area, where it meets the post it note.
Removed the post it notes and then add new ones to mask the counter area. Note: Didn’t mask a little bit of the counter at the top so I wouldn’t get a white line between the wall and the counter and they would blend together better. 🙂
Brayered on Cloudy Blue ink.
Used side “B” of a marble texture cube and Cloudy Blue ink at the bottom of the wall and top corners.
Stamped side “C” of the marble texture cube with Not Quite Navy ink at the bottom of the wall and the top left corner.
Sponged, using a pouncing motion, Not Quite Navy ink at the bottom and top corners of the wall.
Lastly, sponged a little Night of Navy ink not covering all of the Not Quite Navy. Also, put a few very light spots of Night of Navy in the light areas of the wall to try to create a little texture.
Removed post it note masks and wiped the ink off of the embossed images with a paper towel being careful to stay on the embossed images with the paper towel.
Assembled card and here it is finished.
Thanks and hugs to all of you who left me such wonderful encouraging comments yesterday. Now that I know so many of you fantastic, big hearted stampers are looking at my tutorials I will continue the best I can in posting them even though the weeds are growing in my gardens. They do have pretty yellow flowers on them, lol.
Have a fantastic day!
Until tomorrow. . . . . .


36 responses to “Pansies II Inspired – Tutorial”