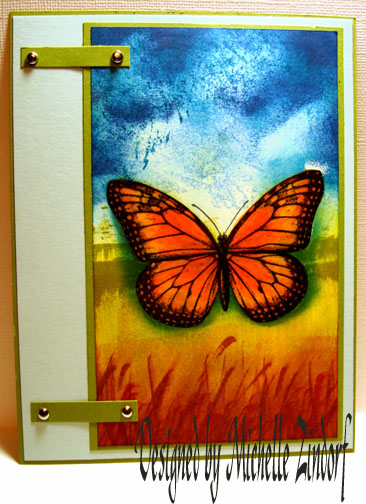
Winter has seemed to hang around way to long this year. I was so very happy to see a butterfly flying around in my garden Saturday and the humming birds have returned to enjoy the feeders I have put out for them. I assume that means warm weather is here to stay. 🙂
To celebrate I have created this butterfly tutorial for you. Let’s get started.
Supplies:
| Stamps: Stampin’ Up Wonderful Wings, Stampendous Marble Texture Cube |
| Paper: Stampin’ Up Whisper White, Old Olive & Soft Sky |
| Ink: Adirondack Lettuce, Rust, Denim, Aqua, Ginger & Stonewashed, Butterscotch, Stampin’ Up Not Quite Navy, Distress ink Peeled Paint, Palette Noir Black |
| Accessories: Prismacolor Markers Goldenrod, Orange, Yellow Orange, Brads, Sponges, Versamark Marker, Clear embossing powder, Heat Gun |
Stamped the Butterfly image on Whisper White card stock using Palette Noir Black Hybrid Ink.
Note: This is a very good ink to use with Prismacolor Markers. It doesn’t smear with the alcohol based markers.
Sorry for the first 3 pictures being blurry. I changed my camera setting and forgot to change it back, yikes!
Anyway, I colored the image with a Yellow Orange Prismacolor Marker.
Colored the inside and outside edges of the wings with an Orange Prismacolor marker.
Colored the body of the butterfly with a Goldenrod Prismacolor marker.
Felt I wanted the color to me more intense so I went over the entire butterfly again with the Yellow Orange marker.
Here we go the camera is in focus again. 🙂
Also, went over the inside and outside of the wings with the Orange marker once more. Yep, that is much better!
Being careful to stay within the lines of the image I colored in the butterfly with a Versamark marker and then heat embossed it using clear embossing powder and a heat gun.
Wow, that makes this butterfly pop!
Sponged on Lettuce ink using a streaking motion with the sponge to get some grass texture started.
To continue getting texture I used the narrow end of the Butterscotch ink pad and did direct to paper with it. Using a streaking motion.
Note: It’s a good idea to try this out on your scrap paper first to get a feel for how much presser you want to put on the stamp pad.
For direct to paper techniques I like to use these Adirondack pads because the pad sits up more on the base giving you access to the edges of the pad.
Using the narrow edge of the Ginger ink pad I made lines to simulate grasses by just touching it to the paper at an angle.
I also did a bit of sponging with the Ginger ink at the bottom of the card stock.
Using a circular motion, sponged Aqua ink in the sky area.
Stamped side “A” of the Marble Texture Cube with Stone Washed ink in the top of the sky area.
Sponged side “B” of the Marble Texture Cube with Not Quite Navy ink over the Stonewashed ink.
Sponged some Not Quite Navy ink at the top of the card stock.
Sponged some Denim ink at the top of the card stock to make the sky really dramatic.
Applied Peeled Paint ink at the horizon line, by using the edge of the ink pad and pulling down.
Created a shadow for the butterfly by sponging in a circular motion around the side edge and bottom edge of the butterfly with Not Quite Navy ink. I keep most of the sponge on the butterfly and barely go onto the background to get the shadow.
I think I need more grasses so I put some in with the edge of a Rust ink pad.
Assembled card and here it is finished measuring 5 x 6.5.
Thank you for coming along on this celebration of warmer weather.
Just a note: I have added a new tab at the top of this blog in which I answer the most frequently asked questions. I will be updating this from time to time so you may want to check it out occassionally if you have questions. 🙂
Until my next post. . . . .
Michelle


37 responses to “First Butterfly – Tutorial”