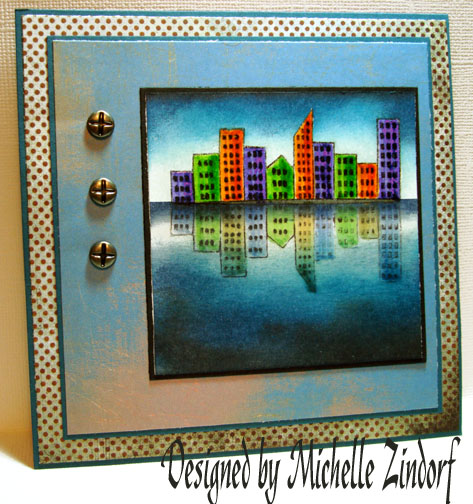
When I seen this stamp set Going Places from My Favorite Things I just had to have it for no other reason than I had to have the buildings stamp. My mind just started working the minute I ordered it. Well it came in the mail last night and here is my first piece with it.
My stuff usually looks quite country, but today we are going to the City.
Supplies:
| Stamps: My Favorite Things Going Places, Rubber Stampede Mirror Image Stamp |
| Paper: Stampin’ Up Whisper White & Not Quite Navy, Basic Grey DP Archaic & Cupcake |
| Ink: Stampin’ Up Black, Night of Navy, Not Quite Navy, Soft Sky & Palette Noir Black |
| Accessories: Versamark marker, Stampin’ Up Markers Apricot Appeal, Pumpkin Pie, Gable Green, Green Galore, Lovely Lilac & Almost Amethyst, Clear Embossing Powder & Heat Gun, Screw Brads from Gina K. Designs, Sponges, Black Marker |
Used my Mirror Image Stamp by Rubber Stampede to stamp a reverse image of the buildings on Whisper White card stock using black ink.
Note: to use the mirror image stamp, stamp your image on to the mirror image stamp and then stamp your mirror image stamp on the card stock.
Stamped the building stamp with Black ink being careful to line up the buildings with the mirror image.
Colored some of the mirror image buildings with an Apricot Appeal marker and the matching building above it with a Pumpkin Pie marker. I’m using a lighter shade on the mirror images so it is not so strong in appearance.
Colored some of the mirror image buildings with an Almost Amethyst marker and the matching buildings above them with a Lovely Lilac marker.
Colored the rest of the mirror image buildings with a Gable Green marker and the matching buildings above them with a Green Galore marker.
I wanted to create a bit of shadow on the right sides of the main building images, so I took the matching marker and colored just the right sides of the buildings with it.
Colored in the space between the mirror image and the main image with a gray maker. I also darkened the windows on the main image buildings with the same marker.
Colored over the main image buildings only with a Versamark Marker and then heat embossed the buildings with clear embossing powder and a heat gun.
Note: I did not heat emboss the mirror images.
Sponged Soft Sky ink over the entire card stock. In the water area I used a streaking motion from left to right across the card stock to simulate water. In the sky area I used a circular motion.
Sponged Not Quite Navy ink on the sky and water areas using the same motions with the sponge as I did with the Soft Sky ink. I did not cover the Soft Sky ink completely.
Sponged Night of Navy ink in the same way as I did the Not Quite Navy ink. I did not cover the Not Quite Ink completely.
Used post it notes to mask the sky and main building area.
Sponged Night of Navy at the post it note edge.
Added a hint of black sponging at the bottom and top of the card stock.
Assembled the card and here it is finished. This card measures 5.25″ x 5.25″ completed.
Wow, I had a bit of computer issues today uploading this. Yeah! I finally got it to upload.
Thanks so much for following along with me to the city.
Until my next post. . . . .
Michelle

