May 21 2008

Soakin Up the Day - Tutorial

Published by zindorf at 3:08 am under Tutorials

dsc04065-copy.jpg

If you missed the party last night over on Split Coast Stampers in Gina K. Designs Forum you missed a great new stamp release party.  There were tons of sneak peeks and contests.

This is a sneak peek card I did for the party last night using Melanie Muenchinger’s “Jumping for Joy” set.  You can see all of the new stamp sets today at Gina K. Designs, just following this link:  http://www.ginakdesigns.com/

I think I have been permanently trained now to take photos whenever I am stamping a card out, lol.  Imagine, here I was in a hurry to get a card done for the party and I’m stopping to take photos.  Yep, I’ve been trained to do tutorials for every card created!  Hey, it only took 56 tutorials to make it a habit, lol.  Old dogs and new tricks!

Anyhoo, here is the tutorial for this one.

Supplies:

Stamps: Melanie Muenchinger’s Jumping for Joy at Gina K. Designs
Paper: Whisper White, Old Olive, Cool Caribbean
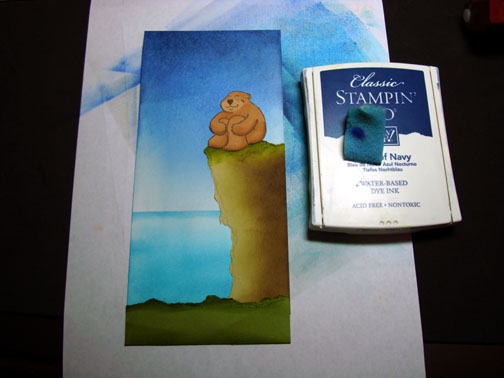
Ink: Soft Sky, Night of Navy, Old Olive, Brilliant Blue, Cool Caribbean, Taken with Teal, Chocolate Chip, River Rock, Black
Accessories: prismacolor markers, Sponges, Brayer, Post it Notes

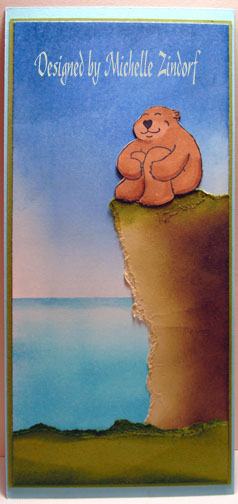
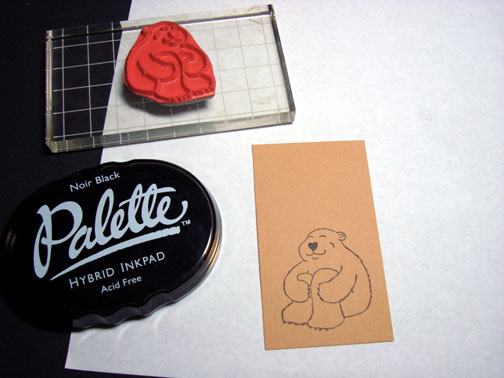
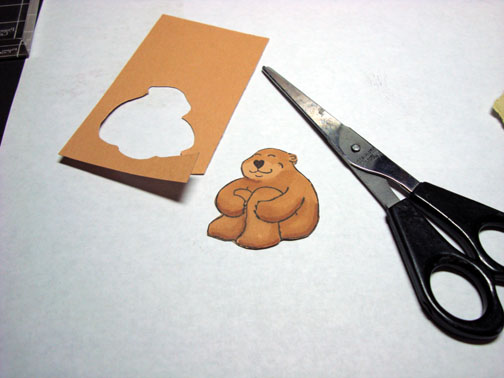
Started off by stamping this sweet bear (love his expression) on a piece of Creamy Caramel cardstock with Palette Noir Black ink.  Note:  I used this ink because it doesn’t smear when using Prismacolor markers.

dsc04039.JPG

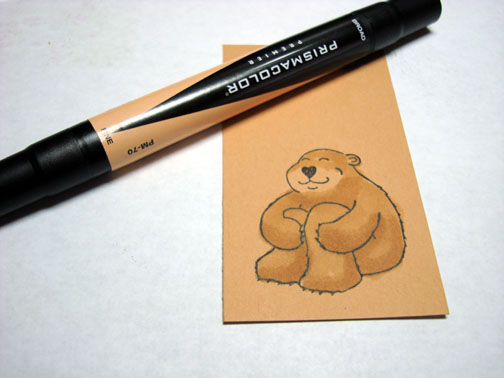
Colored the Bear with a Prismacolor Sand Marker.  I did not color his muzzle or his inner ears.   I also did a second swipe of color with the same marker to create shadows under his arms, feet, behind and chin.

dsc04040.JPG

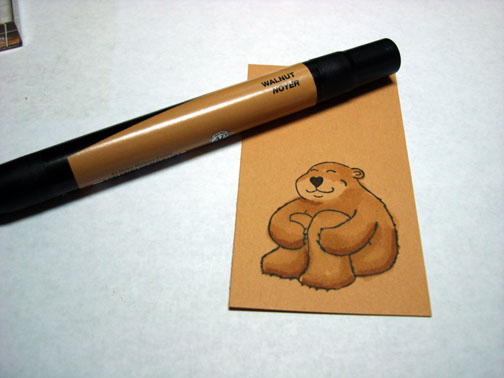
Continued with the shadowing on him with yet a darker marker, Prismacolor Walnut on his under arms, feet, behind and chin.

dsc04041.JPG

I used scissors to cut him out.  He has pretty easy curves to maneuver around with scissors.

dsc04042.JPG

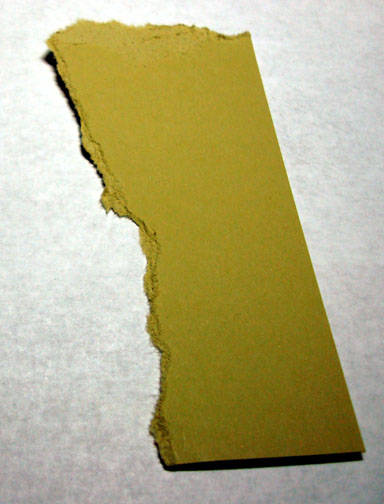
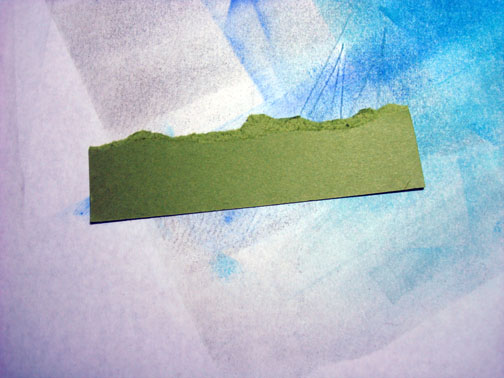
Ripped a cliff shape from a piece of River Rock card stock.

dsc04043.JPG

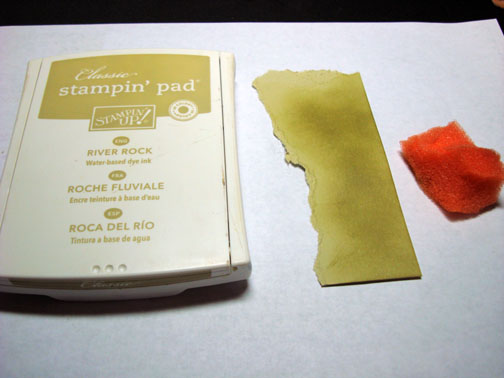
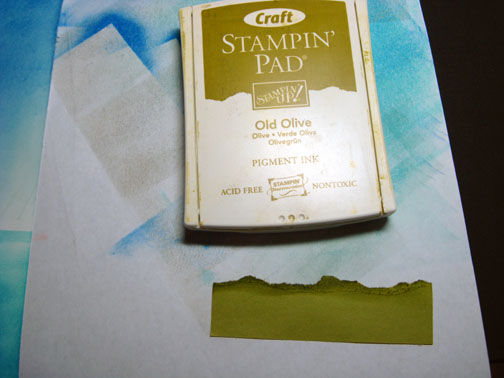
Heavily sponged River Rock ink on the right side of the cliff.  Leaving the left side bare because I’m imagining that my sun is shining on the front of the cliff. :)

dsc04044.JPG

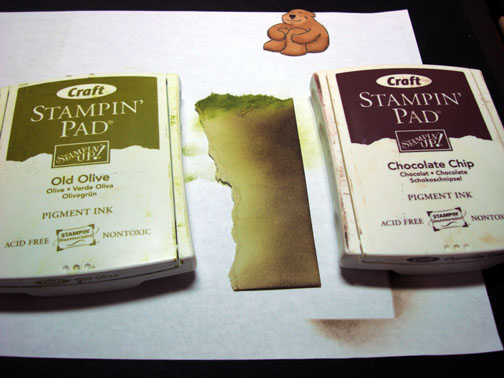
Heavily sponged Old Olive ink on the top of the cliff for grass and lightly sponged on some Chocolate Chip ink at the right side of the cliff, not covering the River Rock ink entirely.

dsc04045.JPG

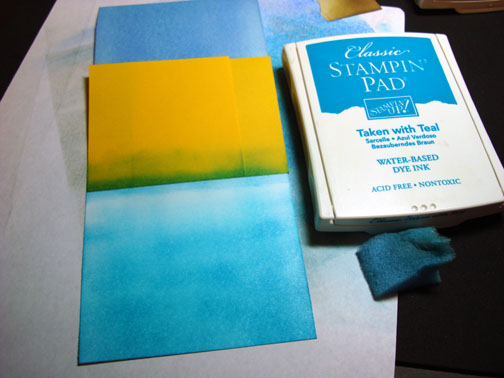
Now for the background, brayered on Soft Sky ink at the top 2/3rds of a piece of Whisper White card stock.

dsc04053.JPG

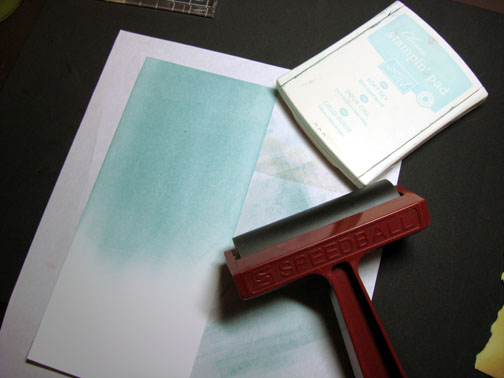
Brayered on Brilliant Blue ink at the top of the card stock, not covering the Soft Sky ink entirely.

dsc04054.JPG

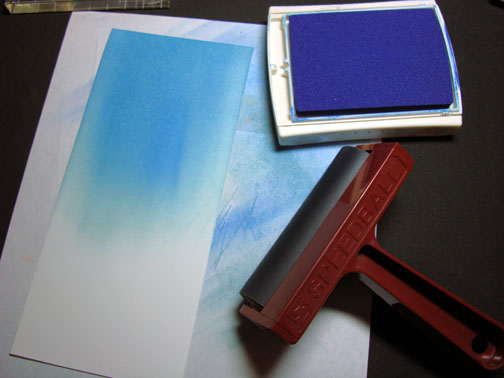
Placed Post it Notes, sticky end where I wanted my horizon line to be and to mask the sky area.

dsc04055.JPG

Brayered on Cool Caribbean ink at the bottom of the card stock.

dsc04056.JPG

Sponged Taken with Teal ink at the Post it Note edge to make a dark line for the horizon.  Also using a swiping motion from left to right I sponged on Taken With Teal in the water area getting heavier towards the bottom of the card stock.

dsc04057.JPG

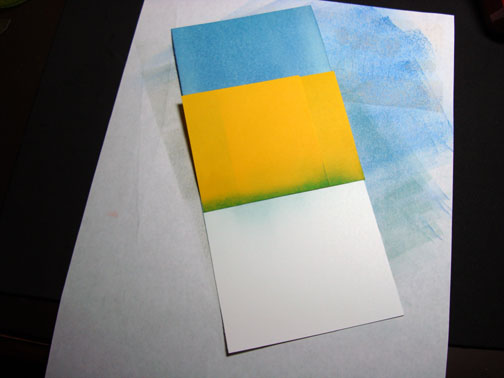
Took a piece of Old Olive card stock and tore the top edge of it off.  This will be the ground area.

dsc04059.JPG

Swiped the bottom and top of the torn card stock over the Old Olive ink pad.

dsc04060.JPG

Assembled main image panel.

dsc04061.JPG

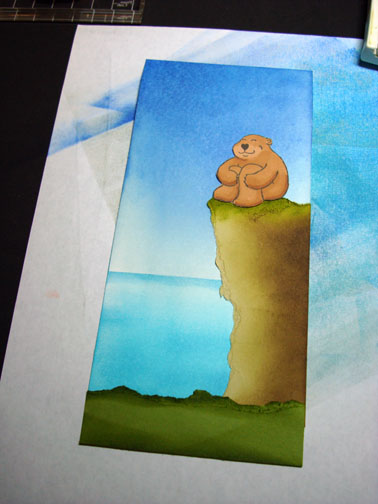
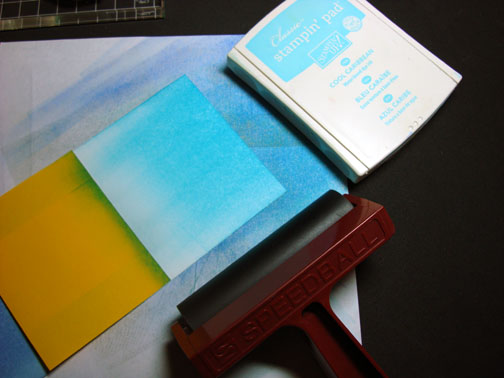
Sponged Night of Navy ink at the top of the card stock.

dsc04062.JPG

Assembled card and here it is finished measuring 4″x 8.5″.

dsc04065-copy.jpg

Hope your day gives you an expression like the one this bear is wearing!

Until my next post. . . . . ..

Michelle

28 Responses to “Soakin Up the Day - Tutorial”

  1. Tonnieceon 21 May 2008 at 4:32 am

    Well this cute card sure put a smile on my face.
    He looks so pleased about something, Hummmm…..I wonder what?

  2. yvonne w.on 21 May 2008 at 5:34 am

    cute, cute, cute that says it all!

  3. Tonnieceon 21 May 2008 at 5:46 am

    Oops, I forgot to ask if you were feeling better today.
    I sure hope so.
    Have a grrrrrreat day

  4. Sankarion 21 May 2008 at 7:33 am

    I am so impressed by all your work - I love the colors, the softness, and the feeling of depth in your cards. They have gotten me inspired. The bear is so cute. Your cards are beautiful!

  5. Laurie Helgasonon 21 May 2008 at 8:34 am

    A cute bear on a cliff. That is soooo cute.

    Next week, stamping friends are going to be shown some of your brayer techniques. :O)

  6. Giovanaon 21 May 2008 at 9:02 am

    The card is so pretty!!!!
    God bless
    Giovana

  7. MSBetsyZon 21 May 2008 at 9:28 am

    LOL, what a cute card! I popped in briefly last night but didn’t notice this bear…I may have to go back and try to find him today. Thanks once again, Michelle!

  8. barb schramon 21 May 2008 at 9:59 am

    Oh, I loved this last night but it is so nice to see the tutorial, one day, I am going to muster up the courage to try your wonderful techniques, you are inspiring!

  9. Jen Caputoon 21 May 2008 at 11:41 am

    What a great scene! love it, and your tutorial is fab!

  10. Judy Raderon 21 May 2008 at 1:34 pm

    This card is fantastic, next to card making bears are my next favourate. In fact I don’t get much time to make them now because making cards and checking out your blog takes up my time. Have a good day Judy.

  11. Danielleon 21 May 2008 at 2:42 pm

    This is too cute!

  12. Rebekkaon 21 May 2008 at 4:16 pm

    another great card, with a great scean.

  13. Heather Fullertonon 21 May 2008 at 8:19 pm

    You are soooo talented. Imagine, loving a bear on a cliff!
    Retired Heather

  14. Debieon 21 May 2008 at 8:35 pm

    Fabulous card Michelle! I never tire of your tutorials.

  15. Trena in Napervilleon 21 May 2008 at 8:40 pm

    How cute!! Thank you for sharing details on how you do what you do. I am so inspired to try different things. Thank you!!

    Take care and STAY POSITIVE!

  16. Melissa (SCS: stampin_melissa)on 21 May 2008 at 9:23 pm

    Wow, this is gorgeous! I love that bear just gazing out over the water!

  17. Sandyon 21 May 2008 at 9:37 pm

    This card is adorable. Great work.

  18. Dawnon 22 May 2008 at 5:58 am

    too cute Michelle…love it!

  19. Janet Siskon 22 May 2008 at 6:30 am

    I love how you make sophisticated still look cute! You also make it LOOK so easy on your tutorials. One of these days when things slow down in my life (LOL) I am going to try these great techniques. Thanks for all the inspiration.

  20. Ann C.on 22 May 2008 at 7:58 am

    Amazing that you can even make cutsie stamps look right on a brayed background! I really like the ripped cliff.

  21. Cindy H.on 22 May 2008 at 10:42 am

    What a fun card!! The little bear is very cute! I can even picture him doing a cannonball off that cliff, lol! tfs

  22. Norineon 22 May 2008 at 11:44 am

    Dawn
    I love all your work you are so talented. I have a ? regarding the brayer. Everytime I use it I get these streak lines I can never make it look smooth like yours is there a trick to it? I went out a bought a foam brayer and that didnt work either. Please help
    Hugs
    Norine

  23. zindorfon 22 May 2008 at 11:49 am

    Norine asked “I love all your work you are so talented. I have a ? regarding the brayer. Everytime I use it I get these streak lines I can never make it look smooth like yours is there a trick to it?”

    Norine, You will want to refer to the frequently asked questions tab at the top of my blog. :) Also, Dawn is a very pretty name, but it is not mine, lol. My name is Michelle :)

  24. Laurie Helgasonon 22 May 2008 at 11:57 am

    I made myself complete some paperwork for DD confirmation camp before checking your blog.

    I hope you are feeling well and all is right at your home.

  25. Sara in WIon 22 May 2008 at 9:35 pm

    Fantastic card! Thanks again for doing the tutorials for us!

  26. Norineon 23 May 2008 at 6:06 am

    MICHELLE I am so sorry for calling you Dawn can we blame it on a blonde moment or maybe senior LOL

  27. Sharon in NEon 27 May 2008 at 6:40 pm

    This just tickles me pink!

  28. […] tutorial here […]

Trackback URI | Comments RSS

Leave a Reply