Happy Saturday! I think I live for the weekends. 🙂
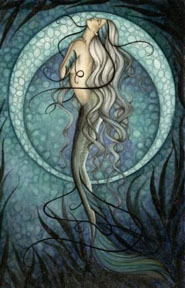
This morning I choose to be inspired by a fantasy art piece by Jessica Galbreth. When I view art for inspiration I pick the elements from it that visually inspired me. I’m sure you can see the elements that I pick out from this art piece.
Oh! before I forget, we have a blog candy winner! Drum roll please. . . . . . . . . . . . .. . . .
The winner is out of 478 entries:
Emilie who wrote “OMG, I really really want to let you know how excited I am every time you do “blog candy” Some day I hope to be the lucky one. I look forward every single day to your creations and oooohhhh and ahhhhhh over each and every step and scroll up and down. I am just like a kid in a candy shop”.
Emilie, congrats, please e-mail your mailing address to [email protected] and I will pop these stamps in the mail to you.
Thanks everyone for playing along!
Now on with the tutorial.
This beautiful owl stamp is from a Set from Firecracker Designs By Pamela. Here is the link to her on line store: https://www.safesecurestore.com/stores/merchant.mvc?Screen=PROD&Product_Code=4×5099&Category_Code=NEW&Store_Code=firecrackerdesignsbypamela
Supplies:
| Stamps: Fire Cracker Designs by Pamela “Yoo Hoo” & Stampendous “Marble Texture Cube” |
| Paper: Stampin’ Up Whisper White, Not Quite Navy & Chocolate Chip |
| Ink: Stampin’ Up Night of Navy, Not Quite Navy & Baja Breeze, Palette Noir Black |
| Accessories: Sponge, Coluzzle, Versmark Marker, White Gel pen, Black fine tip marker, Prismacolor Markers, Ribbons & Silver Brads |
Stamped Owl with Palette Noir Black ink on a 4″ x 6″ piece of Whisper White card stock.
Extended the branch a bit with a fine tip black marker.
Colored the Owl with a Prismacolor 10% Cool Grey marker.
Added Prismacolor Cool Grey 30% marker to the dark parts of the Owl.
Went a little darker over the darker with a Cool Grey 60% marker, not covering the Cool Grey 30% marker entirely.
Colored over all of the grey areas again with the Cool Grey 10% marker to blend everything together and to get rid of any harsh lines where the colors meet.
Colored the eyes with Goldenrod.
Added Cool Grey 10% around the eyes.
Colored the beak and claws black.
Colored the branch Light Tan.
Added a Walnut shadow at the bottom of the branch.
Colored over the entire image, branch in all with a Versmark marker.
Heat embossed the image using fine detail clear embossing powder and a heat gun.
Note: My embossing powder looked a bit pitted the first time, so I went over it again with a Versamark marker and heat embossed it a second time with clear embossing powder. I wanted to make sure my bird was going to stay grey and white and not turn blue when I put the background in. 🙂
Cut a 3 5/8″ circle from card stock with a circle coluzzle template.
Used the circle as a mask for the moon and sponged Baja Breeze ink all over the card stock.
Tip: if your sponged ink looks really blotchy keep applying ink until it smooths out.
Cut a 3 1/8″ circle out of a piece of card stock with a Coluzzle.
Used the negative piece of card stock and put the opening to the right side of the moon I create and sponged Baja Breeze ink in the opening.
Sponged Baja Breeze ink to the right of the owl.
Put the circle mask back on and sponged Not Quite Navy ink around the top, left and bottom of the mask. I left the right side of the mask light.
Removed the mask.
Put the negative piece of card stock back on and sponge Not Quite Navy at the top, left side and bottom of the opening, leaving the right side with not Not Quite Navy on it.
Removed mask.
Heavily sponged Not Quite Navy ink at the top and bottom of the card stock.
Sponged Night of Navy ink at the top and bottom of the card stock, being very heavy at the bottom.
Time to clean up or I will for sure have a nice big blue fingerprint on my stark white moon. 🙂
I liked unexpected texture in the background of the inspiration piece so I added a bit of marbling to mine.
Stamped side “C” of the Marble texture cube with Baja Breeze ink all of the card stock, while holding my breath, lol. You just never know if you are pushing a piece to far. 🙂
Whew, let my breath out. It looks fine.
Wiped the ink from the embossed images with a soft rag.
Assembled card front and added ribbon and silver brads.
Tip: you can piece through your ribbon and cardstock with a piecing tool to get your brads started.
Almost forgot to put some stars in the sky.
Added stars by dotting randomly a bit of White Gel pen in the darkest areas of the card stock.
Here you have it, the finished card measuring 5″ x 6.5″.
I hope this tutorial inspired you to look at art and pull from it some really fun shapes to include in your own stamped art.
May your Saturday be all that you want it to be.
Until my next post. . . . .. . . . . . . .
Hugs,
Michelle
Links to all my tutorials can be found here: https://zindorf.splitcoaststampers.com/tutorials-ive-written/
Here is a link to my workshop calendar if you want to get info on beginner and advanced Brayer workshops: https://zindorf.splitcoaststampers.com/workshop-calendar
Frequently asked questions answers: https://zindorf.splitcoaststampers.com/frequently-asked-questions/


Pingback: COPIC Marker Class | LunAria Design Studios