Monthly Archives: April 2009

A Bit of Blog Candy!!!!

dsc08793.JPG

This is the first time I have had my blog post be time stamps so I am holding my breath that it will post when I programmed it to, lol.    I am currently on the road traveling to/from or teaching in Savannah, Georgia.   I will return on Tuesday, May 4th. 

Check out this Blog Candy stamp sheet from Innovative Stamp Creations that I have for you to try to win.  My favorite kind of image, TREES!!!

To throw your hat in the ring for a chance to win this stamp sheet, just leave a comment on this post telling me to enter you.  If you are getting this blog update by e-mail you will need to click this link and then leave your comment:   

https://zindorf.splitcoaststampers.com/2009/04/29/a-bit-of-blog-candy/

I will select the winner by using a random number generator when I return on Tuesday, May 4th.   Good luck to everyone.

dsc06969.JPG     If you would like to see more of Innovative Stamp Creations great stamps, here is a link to their online store:

https://www.innovativestampcreations.com/ischomepage.html

Mention Michelle Zindorf sent you and they will put something special in your package for free! 🙂

Until my next post. . . . . . . . . . . . .

Hugs,

Michelle

Get ready for Brayer Workshops!  I am coming to:

dsc07666supersmall.jpg

Dayton, Ohio

Covington, Indiana

Buffalo, Minnesota

Webster, New York

New Johnsonville, Tennessee

Stoughton, Wisconsin

Castro Valley, California

Yardley, Pennsylvania (near Philadelphia)

Knox, Maine

Broomfield, Colorado

Lynchburg, Virginia

Columbia, Missouri

Portland, Michigan

Here is a link to my workshop calendar where you can see all of my travel schedule and to get info on beginner and advanced Brayer workshops:  https://zindorf.splitcoaststampers.com/workshop-calendar

Link to my Stampin’ Up website were you can order all of your must have Stampin’ Up products from me 24-7:  https://michellezindorf.stampinup.net

Here is a link to all of my tutorials:  https://zindorf.splitcoaststampers.com/tutorials-ive-written/

Frequently asked questions answers:  https://zindorf.splitcoaststampers.com/frequently-asked-questions/

Powerful Tree – Tutorial #205

dsc08791.JPG

Sometimes a simple design can be very powerful.  This is an example of such a design. 

Of course I gravitate to trees when I want to do a simple design.  Who am I kidding I gravitate to trees all the time, lol.  Anyway,  this tree from the Stampin’ Up’s set Thoughts & Prayers just screams “Tree of Life” to me.  That’s right my stamps speak to me.  Don’t yours?  Now you do think I am crazy, lol.

There is not very many steps to this project, but it is one that can be used for many occasions.

There is a reason I picked a simpler design today.  I am busy packing for my trip to Savannah, Georgia Baby!  I cannot wait to head down South and teach my brayer workshops.   This is my first trip to Savannah so I am especially excited.  Watch out Savannah, here I come!

One more thing before I get started on today’s tutorial.  Please check out these fantastic stamps which 100% of the profit will go to Bernie Berlin’s no kill animal shelter  ” A Place to Bark and Meow. ”   https://www.scrapbookingsuppliesrus.com/?action=product1

Let’s get started on the tutorial.

Supplies:

Stamps: Stampin’ Up Thoughts & Prayers
Paper: Stampin’ Up Whisper White, Baja Breeze & Pacific Point
Ink: Stampin’ Up Classic Ink Basic Gray, Going Gray, Pacific Point & Baja Breeze
Accessories: Post it Note, Sponges, Curvy Cutter

Are you inspired by this Blog?  One way for you can help support this blog is by ordering your Stampin’ Up products through me.   You can order from me 24-7 from this link:  https://michellezindorf.stampinup.net or e-mail me at [email protected] if you are within the United States.  Want to become a Stampin’ Up Demonstrator and earn instant income?  Consider being part of my Stampin’ Up Team.  My Upline, Karen Barber and I have valuable monthly meetings in Miamisburg, Ohio.
dsc08792.JPG

Cut a 4.5″ circle out of scrap card stock to use as a mask for the moon.

dsc08779.JPG

Held the circle mask at the bottom of a 4.5″ square piece of Whisper White card-stock and sponged on Baja Breeze ink around the mask.

dsc08780.JPG

dsc08781.JPG

Removed the mask.

dsc08782.JPG

Sponged Going Gray ink at the top of the card stock leaving white area in between the Baja Breeze ink and the Going Brayer ink.

dsc08783.JPG

Stamped the tree by first loading it with Going Gray ink and then tapping a Pacific Point ink pad on the leaves before stamping it.

dsc08784.JPG

Tore a post it note in the shape of a hill and used it as a mask.

dsc08785.JPG

Flipped the card stock upside down and sponged Going Gray ink right at the post it note’s torn edge to create the hill.

dsc08786.JPG

Sponged Basic Gray ink at the very top of the card stock.

dsc08787.JPG

I used a very simple layout with no embellishments.  Here it is finished measuring 5.25″ square.

dsc08791.JPG

May your life be one of simplicity!

Until my next post. . . . . . . . . . . . .

Hugs,

Michelle

Get ready for Brayer Workshops!  I am coming to:

dsc07666supersmall.jpg

Dayton, Ohio

Savannah, Georgia

Covington, Indiana

Buffalo, Minnesota

Webster, New York

New Johnsonville, Tennessee

Stoughton, Wisconsin

Castro Valley, California

Yardley, Pennsylvania (near Philadelphia)

Knox, Maine

Broomfield, Colorado

Lynchburg, Virginia

Columbia, Missouri

Portland, Michigan

Here is a link to my workshop calendar where you can see all of my travel schedule and to get info on beginner and advanced Brayer workshops:  https://zindorf.splitcoaststampers.com/workshop-calendar

Link to my Stampin’ Up website were you can order all of your must have Stampin’ Up products from me 24-7:  https://michellezindorf.stampinup.net

Here is a link to all of my tutorials:  https://zindorf.splitcoaststampers.com/tutorials-ive-written/

Frequently asked questions answers:  https://zindorf.splitcoaststampers.com/frequently-asked-questions/

Tree & Vines – Tutorial #204

dsc08736.JPG

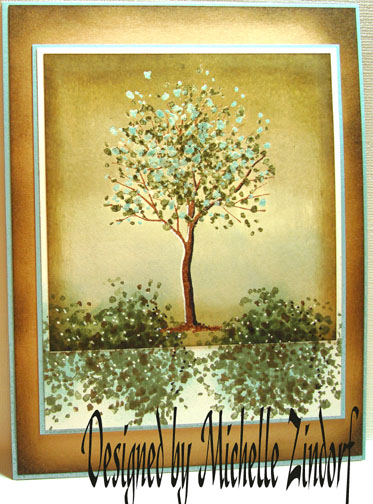
I am so addicted to stamping!  Are you?  Are you constantly thinking about your next creation?  I am so addicted that I dream about stamping my next projects.  This card was first created in my dream last night, sick huh.  🙂   Since I did this in my dream already, when I actually put it on paper this morning it was like I was doing for the second time.

Please tell me I am not the only one that dreams about stamping.   Maybe I need to go to Stamper Anonymous.  I could see it now, we would all be swapping cards and stamps in the parking lot before and after the session, lol.  No wait, I think that is called convention!   ROTFLMAO!!!  I crack myself up sometimes, lol.   Just humor me this morning.  I haven’t had my whole pot of coffee yet. 

Before you think I have completely lost it, let’s get start on the tutorial. . . . .

Supplies:

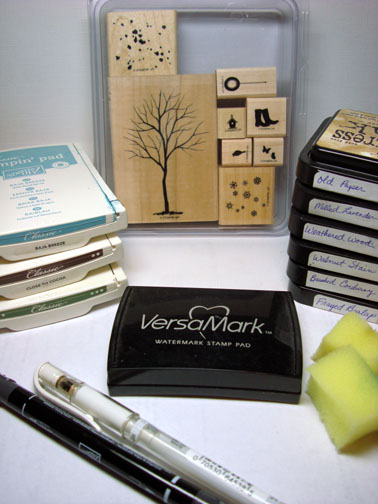
Stamps: Stampin’ Up Branch Out
Paper: Stampin’ Up Whisper White, Baja Breeze & Creamy Caramel
Ink: Stampin’ Up Baja Breeze, Close to Cocoa & Always Artichoke, Distress Inks Old Paper, Milled Lavender, Weathered Wood, Walnut Stain, Brushed Corduroy, Frayed Burlap
Accessories: Stampin’ Up Basic Black Marker, Signo White Gel Pen, Sponges, Clear embossing powder and Heat gun

Are you inspired by this Blog?  One way for you can help support this blog is by ordering your Stampin’ Up products through me.   You can order from me 24-7 from this link:  https://michellezindorf.stampinup.net or e-mail me at [email protected] if you are within the United States.  Want to become a Stampin’ Up Demonstrator and earn instant income?  Consider being part of my Stampin’ Up Team.  My Upline, Karen Barber and I have valuable monthly meetings in Miamisburg, Ohio.dsc08737.JPG

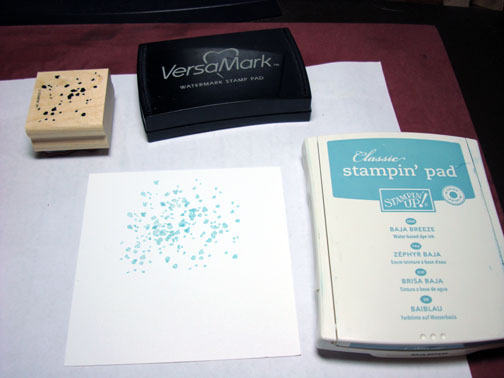
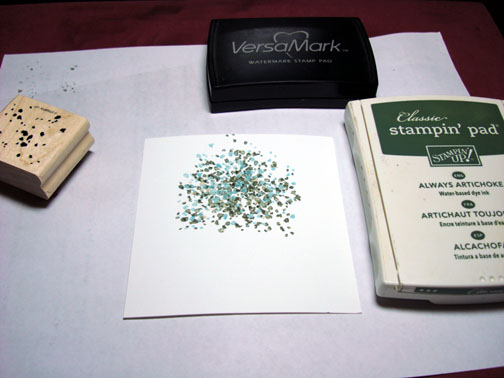
Stamped the, I’m going to call it the leaf stamp, but it is just a stamp with splotches on it, on a 4″ x 4″ piece of Whisper White card stock by first loading the stamp with Versamark and then Baja Breeze ink before stamping it.   I had to envision (guess, lol) where the leaves would be on the tree.  I reloaded my stamp with Versamark and Baja Breeze ink and stamped it quite a few times here.
dsc08716.JPG

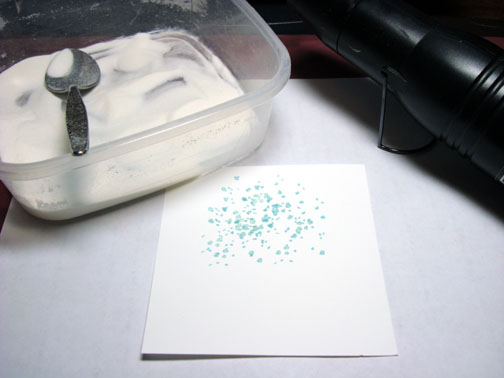
Heat embossed the leaves using clear embossing powder and a heat gun.
dsc08717.JPG

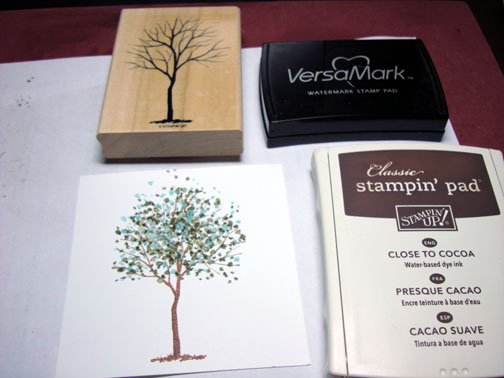
Using the same method I stamped Always artichoke leaves by first loading my stamp with Versamark and then with Always Artichoke ink before stamping it repeatedly.  Heat embossed the leaves using clear embossing powder and a heat gun.
dsc08718.JPG

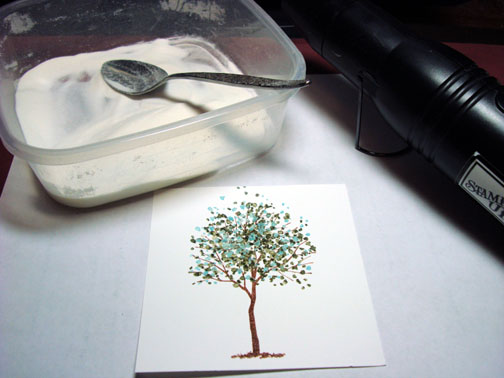
Stamped the tree by first loading the stamp with Versamark and then Close to Cocoa ink before stamping it over the leaves.  Heat embossed the tree with clear embossing powder and a heat gun.
dsc08719.JPG

dsc08720.JPG

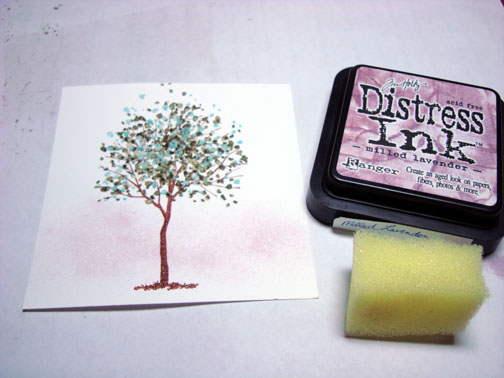
Sponged on a bit of Milled Lavender Distress ink.

dsc08721.JPG

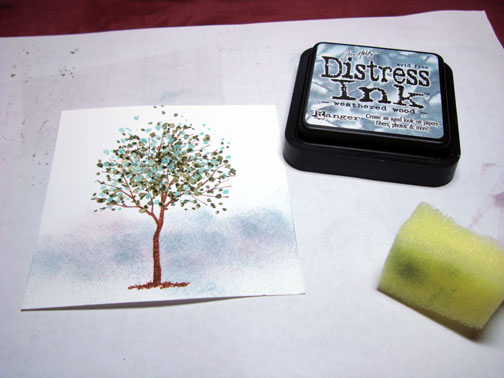
Sponged on a bit of Weathered Wood Distress ink.

dsc08722.JPG

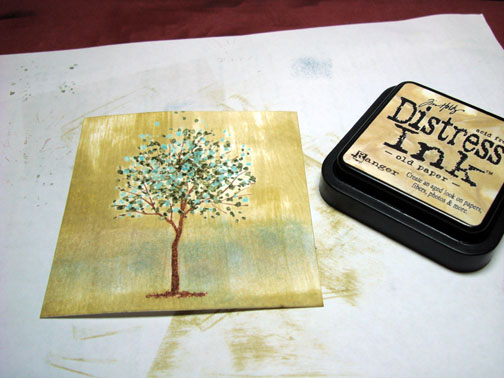
Swiped the edge of the Old Paper Distress ink pad from top to bottom on the card stock.

dsc08723.JPG

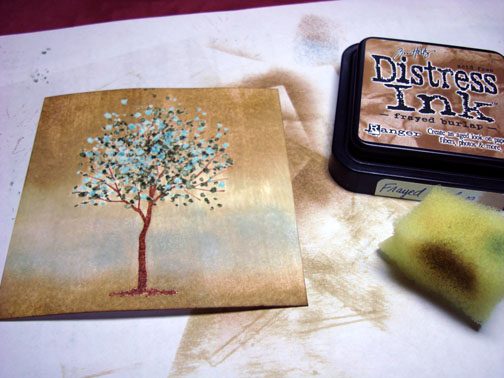
Sponged Frayed Burlap Distress ink at the top and bottom of the card stock.

dsc08724.JPG

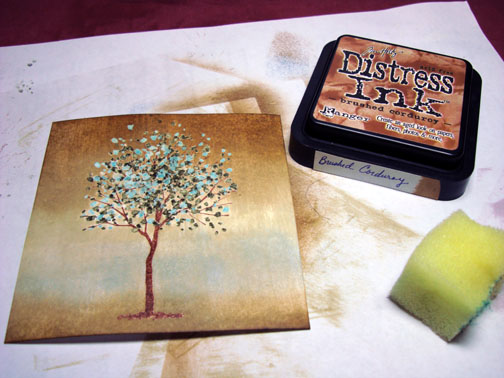
Sponged Brushed Corduroy Distress ink at the top and bottom of the card stock, not covering the Frayed Burlap ink entirely.

dsc08725.JPG

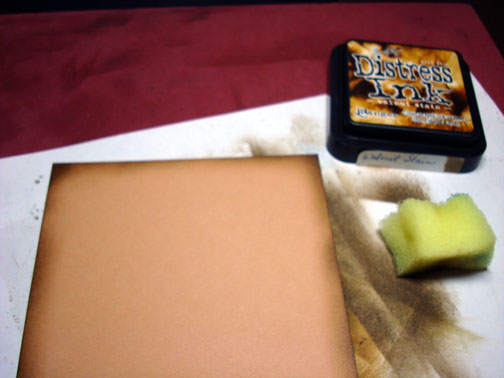
Ooops, missed a picture.  Sponged Walnut Stain Distress ink all around the edge of the card stock.

Adhered the main image panel to a 4 1/8″ x 5 1/8 piece of Whisper White card stock.

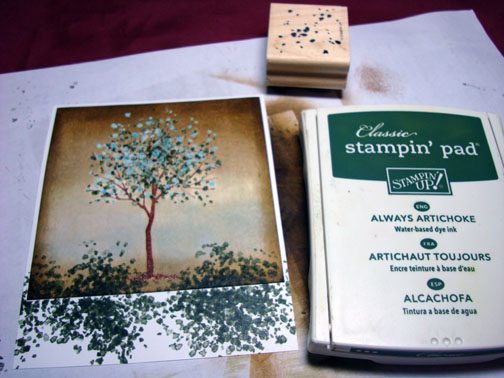
Stamped the leaf stamp with Always Artichoke ink at the bottom of the two panels to simulate vines.

dsc08726.JPG

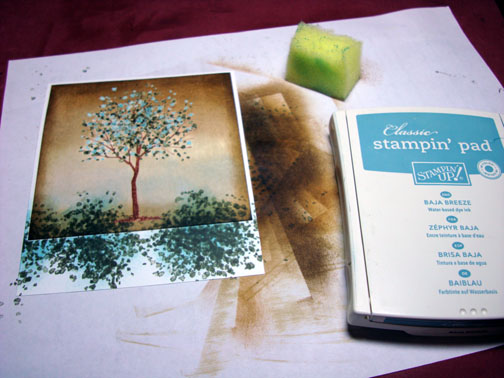
Sponged Baja Breeze ink over the vines.

dsc08727.JPG

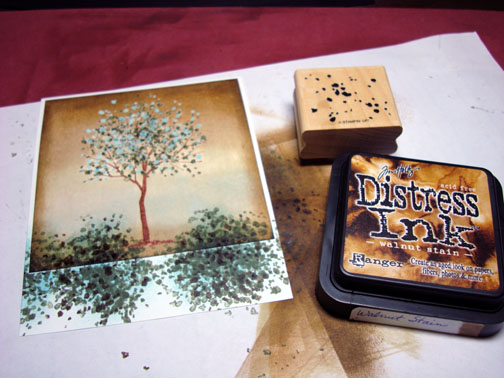
Stamped the few leaves with Walnut Stain Distress ink over the vines.

dsc08728.JPG

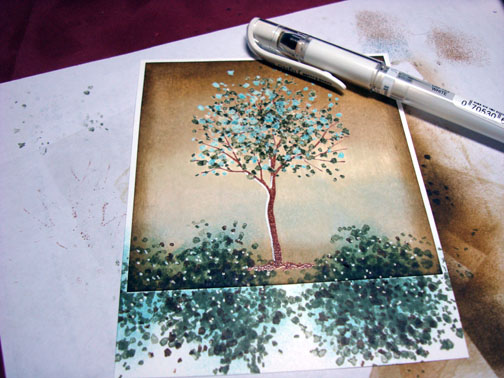
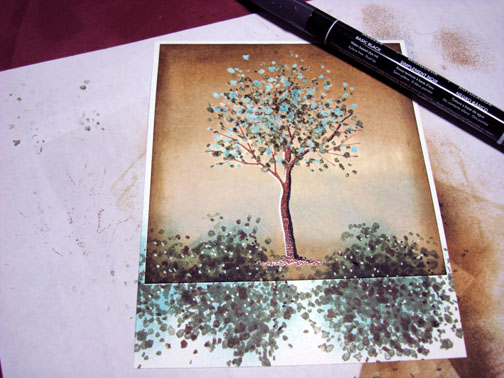
Added a White Gel pen highlight down the left side of the tree and a few white gel pen dots in the vines.

dsc08729.JPG

Added a Basic Black marker line down the left side of the tree and a few Basic Black dots in the vines.

dsc08730.JPG

Sponged Walnut Stain Distress ink around the outside edge of a Creamy Caramel card stock panel.

dsc08731.JPG

Assembled my card and here it is finished measuring 5″ x 6.5″.

dsc08736.JPG

May your day be one of utter joy!

Until my next post. . . . . . . . . . . . .

Hugs,

Michelle

Get ready for Brayer Workshops!  I am coming to:

dsc07666supersmall.jpg

Dayton, Ohio

Savannah, Georgia

Covington, Indiana

Buffalo, Minnesota

Webster, New York

New Johnsonville, Tennessee

Stoughton, Wisconsin

Castro Valley, California

Yardley, Pennsylvania (near Philadelphia)

Knox, Maine

Broomfield, Colorado

Lynchburg, Virginia

Columbia, Missouri

Portland, Michigan

Here is a link to my workshop calendar where you can see all of my travel schedule and to get info on beginner and advanced Brayer workshops:  https://zindorf.splitcoaststampers.com/workshop-calendar

Link to my Stampin’ Up website were you can order all of your must have Stampin’ Up products from me 24-7:  https://michellezindorf.stampinup.net

Here is a link to all of my tutorials:  https://zindorf.splitcoaststampers.com/tutorials-ive-written/

Frequently asked questions answers:  https://zindorf.splitcoaststampers.com/frequently-asked-questions/

Mellow Beach Scene – Tutorial #203

dsc08714.JPG

Here in Ohio the sun is shining really bright and the sky is blue.  Makes me think of summer.  I rushed through this project today so I can hurry up and head out to my perennial gardens to get dirty and feel the sun on my face.  I hope you are in a position today to soak up the sun as well.

I used one of the new Stampin’ Up Stamp Sets “Just Beachy” that is in the new Occasions Mini Catalog.   If you are in the USA and don’t have this new mini catalog and would like a copy, e-mail me at [email protected]and I will get one out to you or I will send you the Internet link to view it if I run out of catalogs.

Let’s get started 🙂

Supplies:

Stamps: Stampin’ Up Just Beachy, Poscket Silhouettes, Season of Joy, Embrace Life
Paper: Stampin’ Up Whisper White, Basic Black & Close to Cocoa
Ink: Stampin’ Up Taken with Teal, Craft White, Close to Cocoa, Basic Black, Tempting Turquoise, Creamy Caramel
Accessories: Versamark pad and marker, Sponges, White Gel pen, Stampin’ Up markers, Post it note, Clear embossing powder, heat gun, Brayer

Please don’t forget you can order your Stampin’ Up products from me 24-7 from this link:  https://michellezindorf.stampinup.net or e-mail me at [email protected] if you are within the United States.  Also, please consider being part of my Stampin’ Up Team.  We have valuable monthly meetings in Miamisburg, Ohio.

dsc08715.JPG

Stamped the car by first loading the stamp with Versamark and then loading it with Black ink before stamping it on a 3.5″ x 8.5″ piece of Whisper White card stock.

dsc08688.JPG

Stamped the flip flops by first loading the stamp with Versamark and then with Basic Black ink before stamping them.

dsc08689.JPG

Heat embossed both images using clear embossing powder and a heat gun.
dsc08690.JPG

Colored in the surf board and parts of the flip flops with a Real Red marker.

Colored the wood on the car and parts of the flip flops with a Close to Cocoa marker.

dsc08692.JPG

Colored the car and parts of the flip flops with a Summer Sun marker.

dsc08693.JPG

Colored cars tires and parts of the flip flops with a Creamy Caramel marker.

dsc08694.JPG

Colored over the car and the flip flops with a Versamark marker and heat embossed the image using clear embossing powder and a heat gun.

dsc08695.JPG

Brayered on Creamy Caramel ink at an angle over the bottom of the card stock.

dsc08697.JPG

Flipped over the card stock and brayered Tempting Turquoise ink at an angle.

dsc08698.JPG

Masked the sky area with a couple of post it notes.

dsc08699.JPG

Sponged Taken with Teal ink right at the post it note edge to create my horizon line.

dsc08700.JPG

Sponged Taken with Teal at the top of the card stock.

dsc08701.JPG

Stamped the flowers a few times with Basic Black ink at the right hand bottom corner of the card stock.

dsc08702.JPG

Colored over the flowers with a Real Red marker.

dsc08704.JPG

Sponged Close to Cocoa at the top of the ground area.

dsc08705.JPG

Sponged Taken with Teal ink on and above the Close to Cocoa ink I just sponged on.

dsc08706.JPG

Stamped the flourish with White Craft ink then used a White Gel pen and traced over part of the flourish to make it brighter.   Added White gel pen Highlights to the flowers.  Added White dots to create foam at the waters edge.

dsc08710.JPG

Stamped the Sentiment with Taken with Teal ink.

dsc08711.JPG

Assembled card and here it is finished measuring 4″ x 9″.

dsc08714.JPG

Have some fun in the sun today!

Until my next post. . . . . . . . . . . . .

Hugs,

Michelle

Get ready for Brayer Workshops!  I am coming to:
3-small.jpg

Dayton, Ohio

Savannah, Georgia

Covington, Indiana

Buffalo, Minnesota

Webster, New York

New Johnsonville, Tennessee

Stoughton, Wisconsin

Castro Valley, California

Yardley, Pennsylvania (near Philadelphia)

Knox, Maine

Broomfield, Colorado

Lynchburg, Virginia

Columbia, Missouri

Portland, Michigan

Here is a link to my workshop calendar where you can see all of my travel schedule and to get info on beginner and advanced Brayer workshops:  https://zindorf.splitcoaststampers.com/workshop-calendar

Link to my Stampin’ Up website were you can order all of your must have Stampin’ Up products from me 24-7:  https://michellezindorf.stampinup.net

Here is a link to all of my tutorials:  https://zindorf.splitcoaststampers.com/tutorials-ive-written/

Frequently asked questions answers:  https://zindorf.splitcoaststampers.com/frequently-asked-questions/

Sunrise Silhouette Trees – Tutorial #202

dsc08685.JPG

I was in the mood for a silhouette scene today.  It was a bonus to be able to create this scene using just the one tree stamp from the Stampin’ Up set LeJardin Botanique.

Let’s get started.  🙂

Supplies:

Stamps: Stampin’ Up Le Jardin Botanique & Holidays & Wishes
Paper: Stampin’ Up Whisper White & Basic Black
Ink: Stampin’ Up Basic Black, Chocolate Chip, Really Rust, Pumpkin Pie, Summer Sun, White
Accessories: White Gel Pen, Piercing tool, Stamp-a-ma-jig, Brayer, Sponge

Please don’t forget you can order your Stampin’ Up products from me 24-7 from this link:  https://michellezindorf.stampinup.net or e-mail me at [email protected] if you are within the United States.  Also, please consider being part of my Stampin’ Up Team.  We have valuable monthly meetings in Miamisburg, Ohio.

dsc08687.JPG

Brayered Summer Sun ink at an angle on a 4.5″ x 6″ piece of Whisper White card stock.

dsc08672.JPG

Flip the card around and brayered Pumpkin Pie ink at an angle.

dsc08673.JPG

Brayered on Really Rust ink not covering the Pumpkin Pie ink entirely.

dsc08674.JPG

Brayered on Chocolate Chip ink not covering the Really Rust ink entirely.

dsc08675.JPG

Stamped the tree 7 times using Basic Black ink.

dsc08676.JPG

Stamped the tree 6 times at the bottom of the card stock with Basic Black ink.

dsc08677.JPG

Sponged Basic Black ink at the bottom of the card stock to create the ground area.

dsc08679.JPG

Stamped the tree stamp a couple of more times at the bottom of the card stock to create more brush in the scene.

dsc08680.JPG

Sponged some Basic Black ink in the top left hand corner of the card stock to create more drama in the sky.

dsc08681.JPG

Using my Stamp-a-ma-jig for place, stamped the sentiment using White ink.

dsc08682.JPG

Let the sentiment ink dry a moment and decided to go over it with a White Gel pen to make it brighter.

dsc08683.JPG

Added a silver brad at each side of the sentiment after assembling my card front.

dsc08684.JPG

Here is the completed card measuring 5″ x 6.5″.

dsc08685.JPG

May your skies be filled with color today.

Until my next post. . . . . . . . . . . . .

Hugs,

Michelle

Get ready for Brayer Workshops!  I am coming to:

3-small.jpg

Dayton, Ohio

Savannah, Georgia

Covington, Indiana

Buffalo, Minnesota

Webster, New York

New Johnsonville, Tennessee

Stoughton, Wisconsin

Castro Valley, California

Yardley, Pennsylvania (near Philadelphia)

Knox, Maine

Broomfield, Colorado

Lynchburg, Virginia

Columbia, Missouri

Portland, Michigan

Here is a link to my workshop calendar where you can see all of my travel schedule and to get info on beginner and advanced Brayer workshops:  https://zindorf.splitcoaststampers.com/workshop-calendar

Link to my Stampin’ Up website were you can order all of your must have Stampin’ Up products from me 24-7:  https://michellezindorf.stampinup.net

Here is a link to all of my tutorials:  https://zindorf.splitcoaststampers.com/tutorials-ive-written/

Frequently asked questions answers:  https://zindorf.splitcoaststampers.com/frequently-asked-questions/

Pink & Blue Floral – Tutorial #201 and a Blog Candy Winner

dsc08670.JPG

Hey there everyone,  I’m back from Arkansas.  Thank you Linda Carson for hosting me while I was there.  Also thank you to the wonderful ladies that attended my workshops.  I had a great time.

arkansas-1.jpg     arkansas-2.jpg

I drove 12 hours to reach Arkansas. Here are a few sites that I seen along the way.  A couple of these where taken as I was doing 70 miles an hour down the Inter State, lol.  Don’t do this!

St. Louis

dsc08579.JPG

Maramec Springs Park in Missouri

dsc08623.JPG

dsc08640.JPG

Open Road . . .  . . . . . .

dsc08650.JPG

I took lots and lots of pictures, but I will not bore you with them.  Let’s get on to more important stuff like the Blog Candy winner. . . .

The random number generator selected. . . . . . . . . . . . .. . . . . .

Dawn Frost who wrote “Have fun driving for 12 hours tomorrow. I hate driving more than 2 hours at a time! My hat goes off to you. Thank you so much for a chance to win some blog candy. Have fun at your workshop.”

Congratulations Dawn, please e-mail your address to mzindorf@ aim.com and I will pop these in the mail to you.

dsc08572.JPG

Thanks to all 435 of you that played along!  As always I wish I had a set to send each of you.

Now on with the tutorial 🙂

Supplies:

Stamps: Stampin’ Up Friends 24-7
Paper: Stampin’ Up Baja Breeze, Not Quite Navy and Whisper White
Ink: Stampin’ Up Not Quite Navy, Baja Breeze, Always Artichoke
Accessories: Brayer, Clear embossing powder, Heat Gun, Stampin’ Up Markers, Piercing Tools and Stampin’ Up Mat Pack, Versmark Marker and Pad, Photo Corner Punch, Brads

Please don’t forget you can order your Stampin’ Up products from me 24-7 from this link:  https://michellezindorf.stampinup.net or e-mail me at [email protected] if you are within the United States.  Also, please consider being part of my Stampin’ Up Team.  We have valuable monthly meetings in Miamisburg, Ohio.

 dsc08671.JPG

Stamped Flourish 5 times with Versamark only on a 3.25″ x 5.5″ piece of Whisper White card stock.  Heat embossed embossed the images using clear embossing powder and a heat gun. 

dsc08652.JPG

dsc08653.JPG

Stamped the flowers twice by first loading the stamp with Versamark and then Always Artichoke ink before stamping.

dsc08654.JPG

Heat embossed the flower images using clear embossing powder and a heat gun.  Colored the stems and leaves with an Old Olive marker.

dsc08655.JPG

Colored the flowers in with a Blush Blossom marker.

dsc08656.JPG

Added Rose Red marker to the flowers.

dsc08657.JPG

Went over the flowers again with the Blush Blossom marker to blend the two colors together.

dsc08658.JPG

Colored over the flowers, leaves and stems with a Versamark marker and then heat embossed the images using clear embossing powder and a heat gun.

dsc08659.JPG

dsc08660.JPG

Brayered Baja Breeze ink on the card stock at an angle.

dsc08661.JPG

Brayered Not Quite Navy ink on the card stock at an angle, not covering the Baja Breeze ink entirely.

dsc08662.JPG

Wiped the ink off of my embossed images with an old cotton cloth.

dsc08663.JPG

Extended my flower stem with an Old Olive Marker.

dsc08664.JPG

Assembled card front and added a white punched Photo Corner, brads and pierced along each side of my white panel using a piercing tool and Stampin’ Up Mat Pack.

dsc08665.JPG

Here is the finished card measuring 5″ x 6.5″.

dsc08670.JPG

May your day be full of sweet smelling blossoms!

Until my next post. . . . . . . . . . . . .

Hugs,

Michelle

Get ready for Brayer Workshops!  I am coming to:

3-small.jpg

Dayton, Ohio

Savannah, Georgia

Covington, Indiana

Buffalo, Minnesota

Webster, New York

New Johnsonville, Tennessee

Stoughton, Wisconsin

Castro Valley, California

Yardley, Pennsylvania (near Philadelphia)

Knox, Maine

Broomfield, Colorado

Lynchburg, Virginia

Columbia, Missouri

Portland, Michigan

Here is a link to my workshop calendar where you can see all of my travel schedule and to get info on beginner and advanced Brayer workshops:  https://zindorf.splitcoaststampers.com/workshop-calendar

Link to my Stampin’ Up website were you can order all of your must have Stampin’ Up products from me 24-7:  https://michellezindorf.stampinup.net

Here is a link to all of my tutorials:  https://zindorf.splitcoaststampers.com/tutorials-ive-written/

Frequently asked questions answers:  https://zindorf.splitcoaststampers.com/frequently-asked-questions/

Blog Candy before Traveling

dsc08572.JPG

I am traveling to Fort Smith, Arkansas tomorrow to teach.  Today will be spent making last minute preparations with packing, checking my car’s tire pressure etc.  Fort Smith is 12 hours from me so I will be chugging along tomorrow for quite sometime and loving every moment of it.  I am one of those people that loves to drive, especially through states I have never visited before.    I have just a few spots on Friday morning open if you would like join us, Saturday’s workshops are sold out.  You can e-mail at [email protected] for more info.  🙂

Anyhow, I wanted to leave you with some blog candy today.   This is a set no longer available from Stampin’ Up.    It is titled Botanical Blooms and it is a darling, darling two-step stampin set.

To throw your hat in the ring for a chance to win this set, just leave a comment on this post telling me to enter you.  If you are getting this blog update by e-mail you will need to click this link and then leave your comment:    https://zindorf.splitcoaststampers.com/2009/04/15/blog-candy-before-traveling/

I will select the winner by using a random number generator when I return on Monday, April 20th.   Good luck to everyone and have a super rest of the week.  As for you folks in Fort Smith, Arkansas get ready because here I come!!!

Until my next post. . . . . . . . . . . . .

Hugs,

Michelle

Get ready for Brayer Workshops!  I am coming to:

3-small.jpg

Fort Smith, Arkansas

Savannah, Georgia

Dayton, Ohio

Covington, Indiana

Buffalo, Minnesota

Webster, New York

New Johnsonville, Tennessee

Stoughton, Wisconsin

Castro Valley, California

Yardley, Pennsylvania (near Philadelphia)

Knox, Maine

Broomfield, Colorado

Lynchburg, Virginia

Columbia, Missouri

Portland, Michigan

Here is a link to my workshop calendar where you can see all of my travel schedule and to get info on beginner and advanced Brayer workshops:  https://zindorf.splitcoaststampers.com/workshop-calendar

Link to my Stampin’ Up website were you can order all of your must have Stampin’ Up products from me 24-7:  https://michellezindorf.stampinup.net

Here is a link to all of my tutorials:  https://zindorf.splitcoaststampers.com/tutorials-ive-written/

Frequently asked questions answers:  https://zindorf.splitcoaststampers.com/frequently-asked-questions/