May 08 2009

It’s a Love Story - Tutorial #207

Published by zindorf at 9:07 am under Tutorials

dsc09023.JPG

It’s a little weird, but the whole time I was stamping this piece this morning I had running through my head “It’s a love story . . . . baby just say yes. .. . .  .”  Most of you are familiar with Taylor Swift’s song “Love Story”, right.  Anyway, that is why this tutorial is named what it is, lol. 

Before we start the tutorial I just have one announcement.  My Blog readers have asked for it so I have added more destinations to my Brayer Workshop journeys.  I will be in Moore, Oklahoma November, 2009 and then in 2010 I have added Jacksonville, Florida,  Pocatello, Idaho & Salem, Oregon.  I hope my adventures never stop!  I have the best time traveling and meeting all of you.  I swear I have never met a stamper I didn’t like.  If you are in or near a large city in a state I do not have listed on my calendar already, please e-mail me at mzindorf@aim.com and we will see if I can get your city worked into my calendar.  :)

Here is a link to my calendar to see every where I will be:  http://zindorf.blogs.splitcoaststampers.com/workshop-calendar/

Now on with the tutorial.

Supplies:

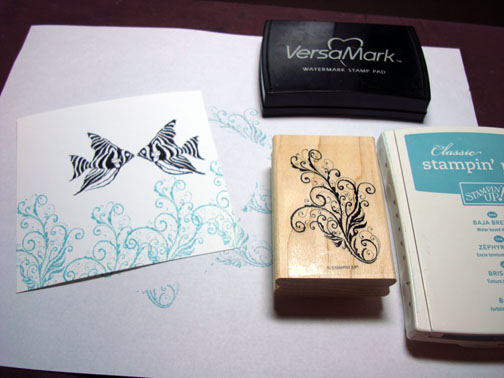
Stamps: Stampin’ Up Ocean Commotion & Rubber Stampede Reverse Image Stamp
Paper: Stampin’ UP Whisper White, Baja Breeze, Basic Black & Not Quite Navy
Ink: Stampin’ Up Craft White, Classic Night o Navy, Basic Black, Baja Breeze & Not Quite Navy
Accessories: Versamark pad and Marker, White Gel Pen, Stampin’ Up Basic Black marker, Sponge, Brayer, Ticket Corner Punch, Clear embossing powder and heat gun

Are you inspired by this Blog?  One way for you can help support this blog is by ordering your Stampin’ Up products through me.   You can order from me 24-7 from this link:  http://michellezindorf.stampinup.net or e-mail me at mzindorf@aim.com if you are within the United States.  Want to become a Stampin’ Up Demonstrator and earn instant income?  Consider being part of my Stampin’ Up Team.  My Upline, Karen Barber and I have valuable monthly meetings in Miamisburg, Ohio.

dsc09025.JPG

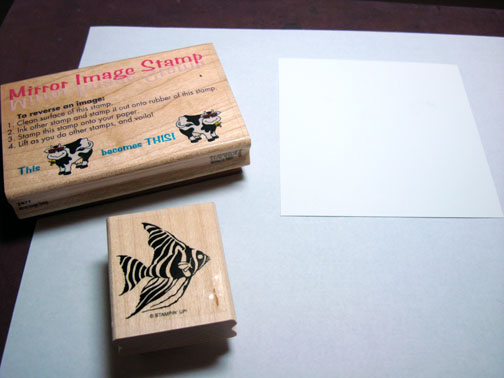
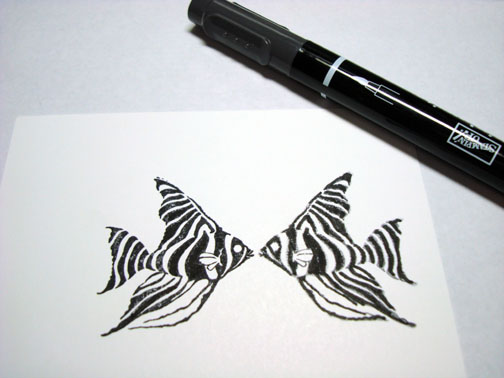
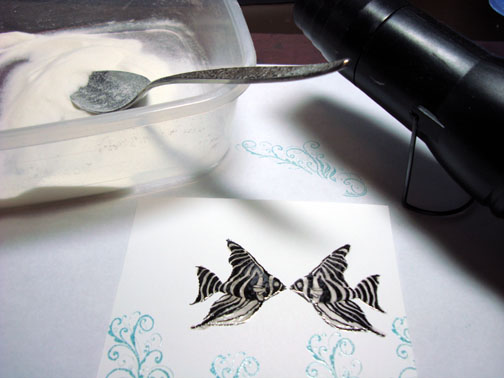
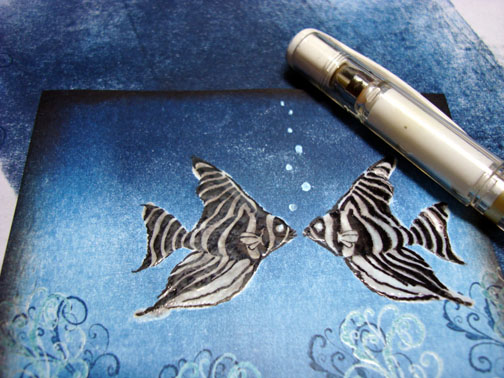
I am starting out this piece by first stamping my reverse image of the fish.  I am using a Rubber Stampede Mirror Image Stamp.  If you wish to purchase one of these stamps, I suggest doing an online search for one.

It use the Mirror image stamp, you ink your original fish stamp with Black ink, stamp it on the reverse image stamp and then stamp your reverse image stamp on the 4 1/8 ” square piece of Whisper White card stock.

Note:  It is much, much easier to start out with your reverse image and then stamp your original image to line up with it.

dsc09001.JPG

dsc09002.JPG

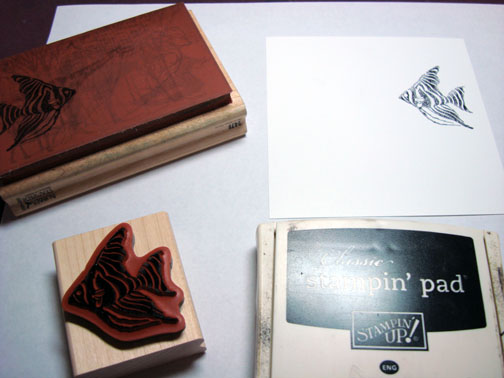
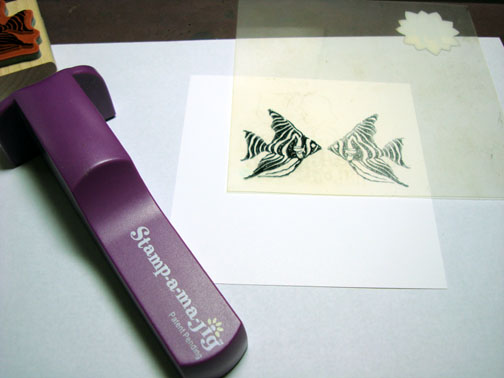
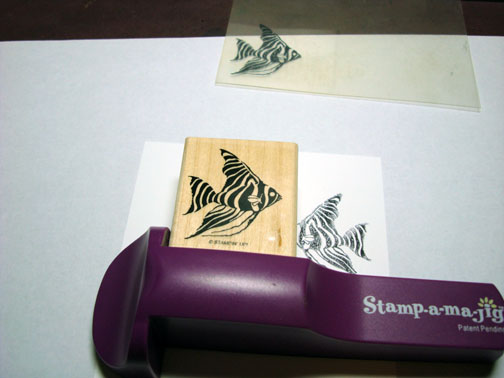
I used my Stamp-a-ma-jig to line up my original fish and stamped it with Basic Black ink. 

Note:  if you do not have a Stamp-a-ma-jig you need to order one right away!  It is the most useful tool I own.

dsc09003.JPG

dsc09004.JPG

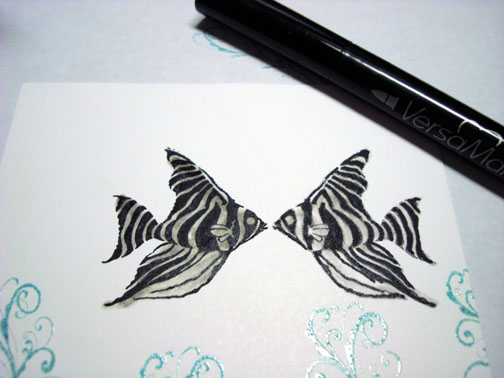
Colored my reverse image fish to darken the black with a Black marker.

dsc09005.JPG

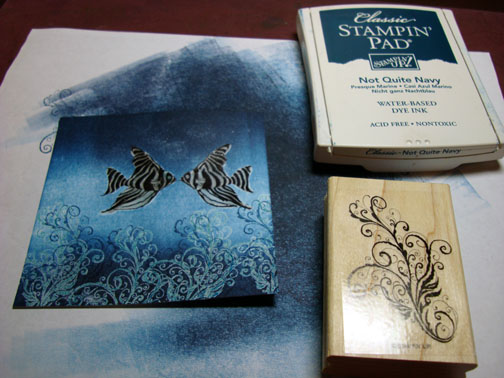
Stamped the plant at the bottom by first loading my stamp with Versamark and then Baja Breeze ink before stamping it.  Repeated 4 times (I added the number of times for my friend Lilann, lol). 

dsc09006.JPG

Heat embossed the plants using Clear embossing powder and a heat gun.

dsc09007.JPG

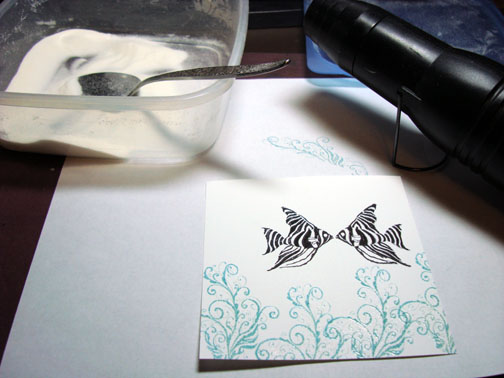
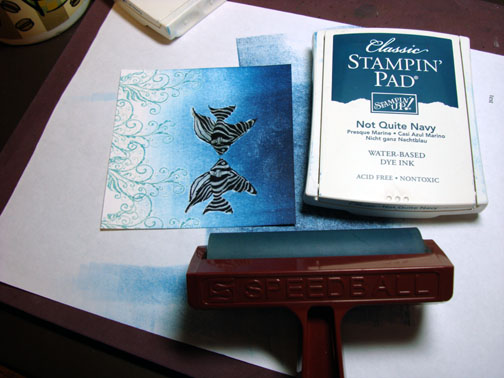
Colored over my fish with a Versamark marker and heat embossed the using clear embossing powder and a heat gun. 

Now beware, the white on the fish will turn a bit gray from the Versamark Marker smearing the black ink a bit.  All is still good in the world.  :)

dsc09008.JPG

Heat embossed the fish using clear embossing powder and a heat gun.

dsc09009.JPG

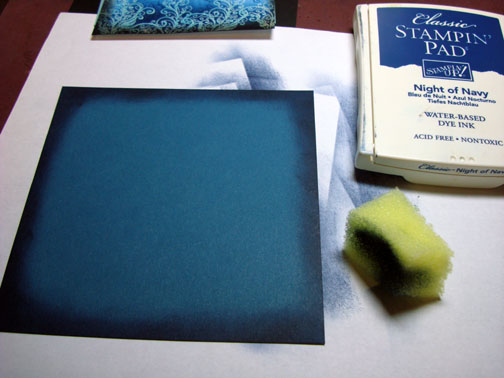
Brayered Not Quite Navy ink at the bottom and the top of the card stock.

dsc09010.JPG

dsc09011.JPG

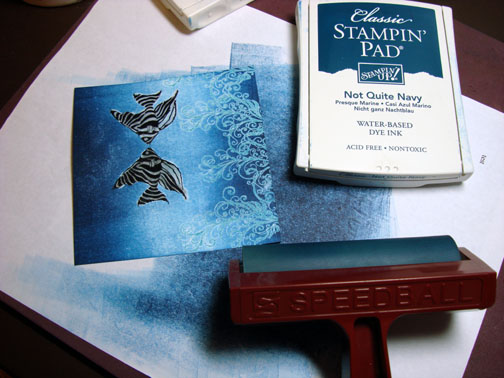
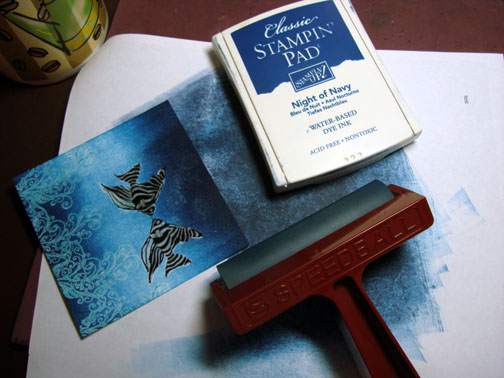
Brayered Night of Navy ink at the top and bottom of the card stock not covering the Not Quite Navy ink entirely.

dsc09012.JPG

dsc09013.JPG

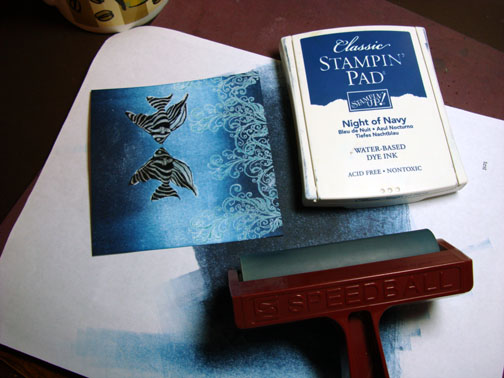
Over stamped by embossed plants with Not Quite Navy ink.

dsc09014.JPG

I let the ink dry a moment and then I wiped the ink off of my embossed images with an old cotton towel.

dsc09015.JPG

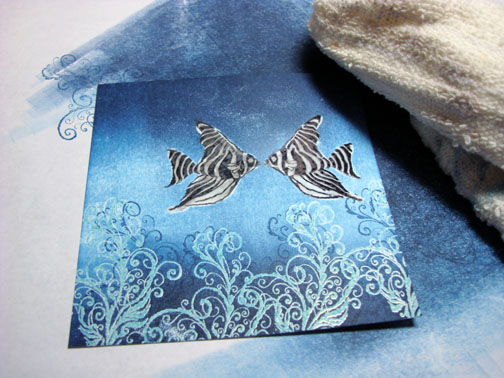
Sponged Black ink all around the edge of the card stock.

dsc09016.JPG

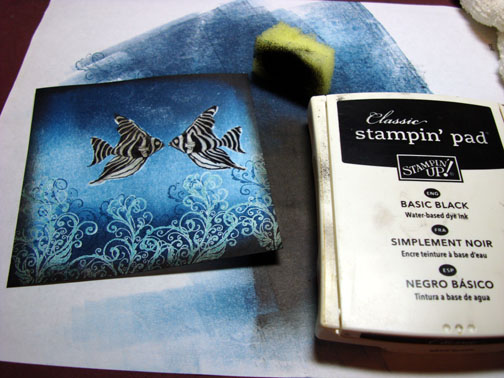
Added a few white gel pen dots for bubbles.

dsc09017.JPG

Cut a 5.25″ square piece of Not Quite Navy card stock and sponged Night of Navy ink around the outside edge.

dsc09018.JPG

Stamped the very top of the plant image all around the edge of the panel using White Craft ink.

dsc09019.JPG

Used a Ticket corner punch on my Main image panel and the two panels below it.

dsc09020.JPG

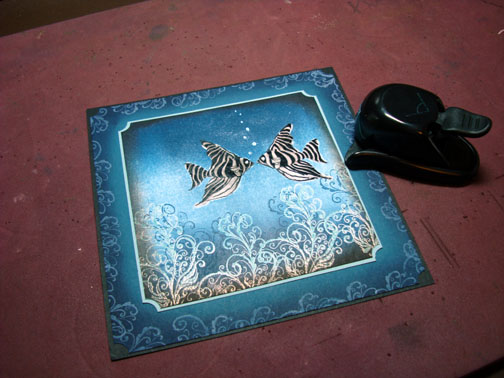
Assembled my card and here it is finished measuring 5.5″ square.

dsc09023.JPG

May your day be filled with love.

Until my next post. . . . . . . . . . . . .  . .

Hugs,

Michelle

Get ready for Brayer Workshops!  I am coming to:

dsc07666supersmall.jpg

Dayton, Ohio

Covington, Indiana

Buffalo, Minnesota

Webster, New York

New Johnsonville, Tennessee

Stoughton, Wisconsin

Columbia, Missouri

Lynchburg, Virginia

Castro Valley, California

Yardley, Pennsylvania (near Philadelphia)

Knox, Maine

Broomfield, Colorado

Moore, Oklahoma

Portland, Michigan

2010

Jacksonville, Florida

Pocatello, Idaho

Salem, Oregon

Here is a link to my workshop calendar where you can see all of my travel schedule and to get info on beginner and advanced Brayer workshops:  http://zindorf.blogs.splitcoaststampers.com/workshop-calendar

Link to my Stampin’ Up website were you can order all of your must have Stampin’ Up products from me 24-7:  http://michellezindorf.stampinup.net

Here is a link to all of my tutorials:  http://zindorf.blogs.splitcoaststampers.com/tutorials-ive-written/

Frequently asked questions answers:  http://zindorf.blogs.splitcoaststampers.com/frequently-asked-questions/

32 Responses to “It’s a Love Story - Tutorial #207”

  1. Jill Hon 08 May 2009 at 9:19 am

    Ohhh, a love story :-) Another wonderful card Michelle. Have a great weekend.

  2. Phyllison 08 May 2009 at 9:53 am

    Holey Moley Michelle!!! What a gawgus piece! I am so excited to go try this one. I am just about to get this brayering thing down. Still need a lot of practice though. I am so loving stamping and using many many of your techniques that I’ve learned from your tutorials. Thank you for taking the time to do these for us and at the same time sharing bits of your life each time. COME TO SAN MARCOS TEXAS!!!! We would have a great time at one of your work shops.

  3. Christyneon 08 May 2009 at 10:14 am

    Another AWESOME tutorial! I think I must have one of those reverse image stamps. Off to search!

  4. Sharon Field/Createdbyuon 08 May 2009 at 10:20 am

    Oh Michelle, this is truly inspiring!! I am packing to leave for Utah and NOW I’ve got to add more stamp pads and my brayer! My suitcase is going to be soooo heavy!
    I’m looking forward to your workshop here in Jacksonville, FL next February… I’m sure you’ll have all sorts of goodies to teach us!

  5. Sandy Knechton 08 May 2009 at 10:22 am

    Your Love Story is beautiful. Wouldn’t you know, I sign up for Columbia, Missouri and now you’re coming to St. Louis, Missouri just 20 minutes from my home. Who is hosting you in St. Louis?

  6. Trena in Napervilleon 08 May 2009 at 10:22 am

    Michelle! What a lovely, sweet under water scene. It makes want to create something in blue today!

    Take care and STAY POSITIVE!

  7. Evelynon 08 May 2009 at 10:42 am

    BEAUTIFUL as always. I”m gonna have to try this one. Please, please, please come to Virginia Beach! I want to meet you and learn from the “master”.

  8. Pattion 08 May 2009 at 11:02 am

    Love it Michelle, frame it and it’s beautiful artwork.

  9. Sharon Won 08 May 2009 at 11:12 am

    This is absolutley beautiful!! You are so talented

  10. maryon 08 May 2009 at 11:19 am

    Another awesome Michelle original! Thanks for the tutorial.

  11. Gloria Dojlidoon 08 May 2009 at 11:45 am

    What a beautiful card. Thanks so much for sharing your talent with us!

  12. Deniseon 08 May 2009 at 12:15 pm

    WOW! This one stopped me in my tracks! Soooo eye catching. Of course, I love all your work, but this one was great!

  13. Teresaon 08 May 2009 at 2:32 pm

    Very nice!!!

  14. Elizabethon 08 May 2009 at 2:54 pm

    Blues (especially dark blues) are my favourite colours. I love how you used them here and particularly how you used just the edge of the stamp as decoration. Definitely inspirational - I will be doing a card along these lines. Thankyou

  15. robinon 08 May 2009 at 3:06 pm

    lovely!!!

  16. minnaon 08 May 2009 at 3:07 pm

    Oh how I love your tutorials. Your cards are masterpieces, each and every one. Thank you for sharing them with us.
    Minna

  17. Linda C.on 08 May 2009 at 3:39 pm

    Most EXCELLENT & inspiring artwork!!

  18. lindaon 08 May 2009 at 4:54 pm

    Did’nt like fish stamps that much…but……that was before I saw you card today!!!!
    Love it, really!!! I also want a fish stamp!!!

    euhhhhh…by the way….I live in the neighborhood of Rotterdam (in the Netherlands)…does that count too??!! it’s a big city….. ;o)!!

    I really love your work, I watch your blog every day!!!…(and hope to learn to brayer like you some day!!)

  19. Sheila Bennetton 08 May 2009 at 5:23 pm

    Oh wow, wow - love the angel fish! This is one of my very favorite of your cards. And I really like a lot of them. :)

  20. Jessaleeon 08 May 2009 at 6:24 pm

    I have had the reverse image stamp forever and have almost never used it, now I have an an awesome reason to get it back into action. Love this card!

  21. Dana Binceron 08 May 2009 at 7:51 pm

    This card is AMAZING! Sooo adorable. Absolutely lovely. Breathtaking might be a better word. Your work is so great. You make it look very easy. I am so impressed.
    Thanks for sharing!

  22. Lilannon 08 May 2009 at 9:43 pm

    Oh my gosh. I just about fell out of my chair when I read your blog. I’ll have you know that I had already counted the number of plants when I looked at the original photo. I’m starting to think you know me way too well. I absolutely love the card. I can’t wait for my SU classic inkpads to get here next week so I can make it. Thanks for the tutorial.

  23. Ruthanneon 08 May 2009 at 11:26 pm

    WOW, I like all of your work, but this one, yippee! I just love it. I look forward to your tutorials everyday. Wish that you could do a video so we could see you in action. That would be almost as good as being able to take one of your classes. Thanks for the inspiration!

  24. Carol Deeon 09 May 2009 at 12:08 am

    Cool, love those fish and waves.

  25. Rukhshanaon 09 May 2009 at 7:45 am

    What a gorgeous, card! Come to London, England - I keep looking but it never makes it onto your route map LOL (actually that’s a very wistful LOL!)

  26. Debieon 09 May 2009 at 8:09 am

    These fishies are so cute! What a beautiful card Michelle. Thanks so much for sharing the tutorial with us.

  27. Linda Vogton 09 May 2009 at 8:31 am

    A masterpiece - I love it! You never stop inspiring me, Michelle!

  28. Cindion 09 May 2009 at 9:52 am

    Another beautiful card!! You always amaze me!!

  29. Annelieson 11 May 2009 at 2:30 pm

    Amazing! I absolutely love this card!

  30. Cheryl Wilcoxon 11 May 2009 at 10:02 pm

    Wow, Michelle, that’s a fabulous card! I’ve been thinking about this set, and now I have a good reason to get it!! :) LOVE, LOVE, LOVE it!

  31. […] http://zindorf.blogs.splitcoaststampers.com/2009/05/08/its-a-love-story-tutorial-207/ […]

  32. […] I got my newest SU stamp set I new what I want to make. I’ve seen cards made with this set on Michele Zindorf’s blog and I loved them. I made several practice images until I got the mirror image stamping right and the […]

Trackback URI | Comments RSS

Leave a Reply