
Thank you so much for all the Birthday wishes yesterday. 🙂 I had a lovely day at the Cincinnati Zoo and then had dinner with loved ones. So my birthday turned out to be a perfect day.
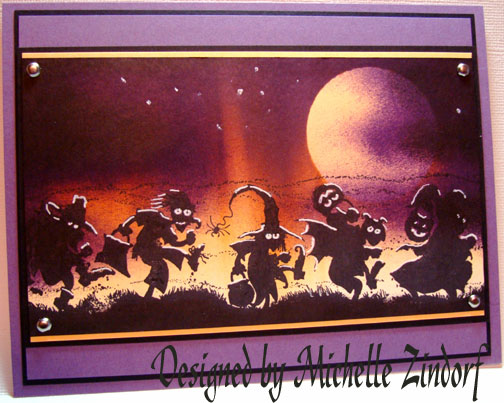
Now regarding the tutorial today, I have noticed the weather is turning cooler already here in Ohio and it is only September 1st. It has put me in the mood for a Halloween scene. This was created with my unmounted Stampin’ Up Wheel Stamp, Haunting. Grab you brayer and play along. 🙂
Let’s get started. . . . . .
Supplies:
| Stamps: Stampin’ Up Unmounted Jumbo Wheel Haunting |
| Paper: Stampin’ Up Whisper White, Apricot Appeal, Basic Black, Perfect Plum |
| Ink: Stampin’ Up Basic Black, Elegant Eggplant, Pumpkin Pie & Apricot Appeal |
| Accessories: Silver Brads, Brayer, 1 3/4″ circle Punch, Sponge, White Gel Pen, Acrylic Block, Post it Note |
Want a free 39 page, Stampin’ Up Mini catalog? If you are a resident of the United States, just e-mail your mailing address to me and I will get one in the amil to you.
Are you inspired by this Blog? One way you can help support this blog is by ordering your Stampin’ Up products through me. You can order from me 24-7 from this link: https://michellezindorf.stampinup.net or e-mail me at [email protected] If you are within the United States. Want a copy of the brand new 2009-2010 Stampin’ Up Catalog for $9.95, just e-mail me at [email protected] and I will get one in the mail to you. Want to become a Stampin’ Up Demonstrator and earn instant income? Consider being part of my Stampin’ Up Team. Through August 31 you can become a Stampin’ Up Demonstrator for as little as $85 with the mini kit. Also check out the Stampin’ Up specials, click this link to check it out: https://www.stampinup.net/esuite/home/michellezindorf/promotions

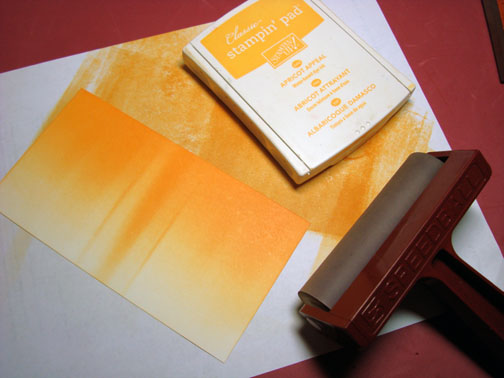
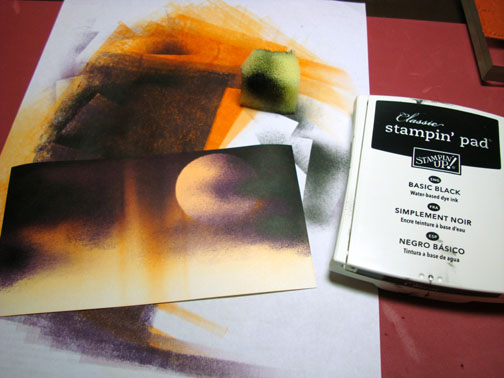
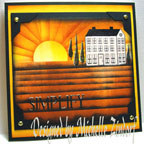
Brayered Apricot Appeal ink at the top of a 3.5″ x 6″ piece of Whisper White card stock.
Masked the moon with a 1 3/4″ circle punch, punched from the stick part of a post it note.
Brayered Pumpkin Pie ink over the mask at the top of the card stock.
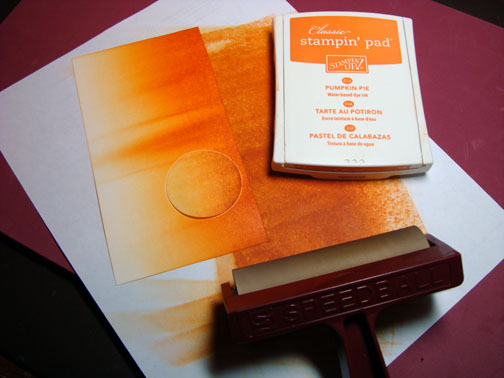
Brayered Elegant Eggplant at the top of the card stock, not covering the Pumpkin Pie ink entirely.
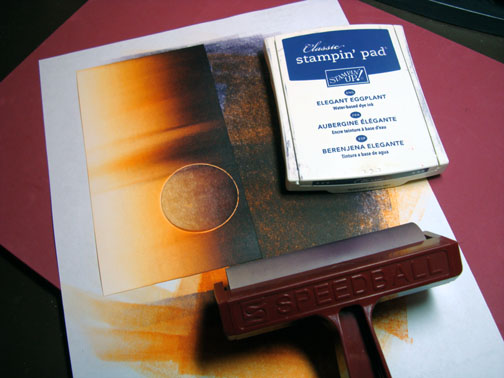
Removed the post it note mask from the moon and sponged a bit of Elegant Eggplant ink on creating a cloud shape.

Added a bit of Basic Black ink with a sponge in the center of the cloud shapes.
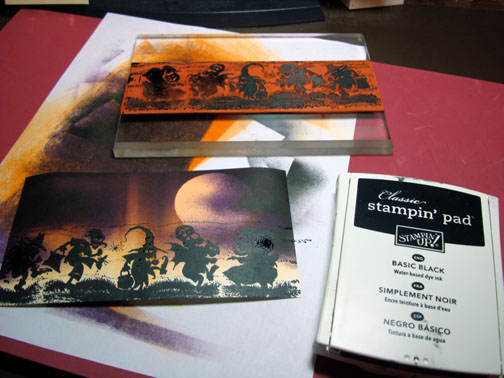
Stamped the Unmounted Wheel Stamp, Haunting across the bottom of the card stock with Basic Black ink.
Added White Gel pen highlights and colored in their eyes with the same white gel pen.
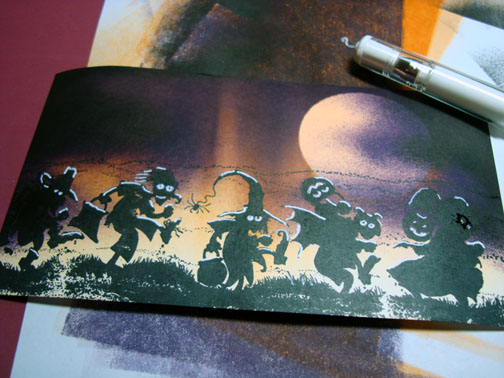
Added a few dots in the sky with a white gel pen and sponged some Basic Black ink at the bottom of the main image panel before assembling the panel layers. Also added 4 silver brads.
Here is the finished card measuring 5″ x 6.5″.
May your day be filled unexpected delights.
Until my next post. . . . .
Huge Hugs,
Michelle
 Get ready for Brayer Workshops! I am coming to:
Castro Valley, California
Yardley, Pennsylvania (near Philadelphia)
Knox, Maine
Akron, Ohio
Broomfield, Colorado
Moore, Oklahoma
Nashville, Indiana
Portland, Michigan
2010
Dayton, Ohio at Marco Paper
Phoenix, Arizona
Monroe, Louisiana
Jacksonville, Florida
St. Louis, Missouri
Mechanicsville, Virginia
Raleigh, North Carolina
Colleyville, Texas
Colorado Springs, Colorado
Boise area of Meridian, Idaho
Riverside, California (Southern California)
Salem, Oregon
Wheaton, IllinoisSt. Cloud, MinnesotaRockville, MarylandNorth Chili, New York (near Rochester)
New Johnsonville, Tennessee
Helena, Montana
Middleburg Heights, Ohio
Venice, Florida
Here is a link to my workshop calendar where you can see all of my travel schedule and to get info on beginner and advanced Brayer workshops: https://zindorf.splitcoaststampers.com/workshop-calendar
Link to my Stampin’ Up website were you can order all of your must have Stampin’ Up products from me 24-7: https://michellezindorf.stampinup.net
Frequently asked questions answers: https://zindorf.splitcoaststampers.com/frequently-asked-questions/
Pingback: Tightwad Tuesday goes spooky: Halloween under $20 stamp sets and wheels « Rogue Thoughts…Jean's Stamping Studio in the Rogue Valley