

My last post was of a non-traditional colored Christmas Card. Well today’s is definitely a traditional Christmas card. This tutorial is a long one since I show how to build a scene using the embossed resist technique.
Before we get into the tutorial, I want to give away some homeless ink pads and reinkers. One of these pads have never been used and the rest have been used very little and have lots of good life left in them. This give away includes the following Stampin’ Up Classic ink pads:
Riding Hood Red, Tangerine Tango, Pink Pirouette, Pacific Point, Kiwi Kiss and 2 pads of Baja Breeze. Also included is a reinker of Pacific Point and Kiwi Kiss. 🙂
Can you give these pads a good home? If so, leave a comment on this post to enter the give away. If you are receiving this post via e-mail you will need to click this link and then leave a comment at the bottom of the post: https://zindorf.splitcoaststampers.com/2009/12/11/traditional-santa-tutorial-286-and-homeless-ink-pads/
I will select the winner using a random number generate on Monday, December 14, 2009. Please help me find them a good loving home. Thank you. 🙂

Now on with the tutorial. . . . . . .
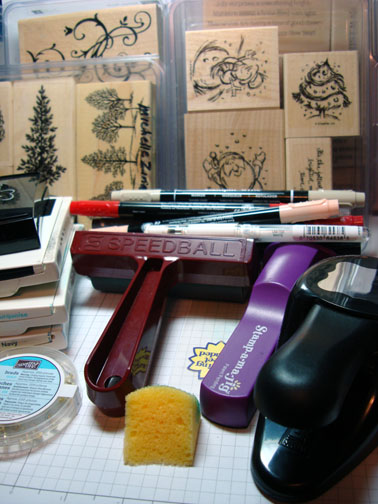
Supplies:
| Stamps: Stampin’ Up! Jolliest Time of Year, Baroque Motifs, Lovely as a Tree, Many Merry Messages |
| Paper: Stampin’ Up Whisper White and Real Red |
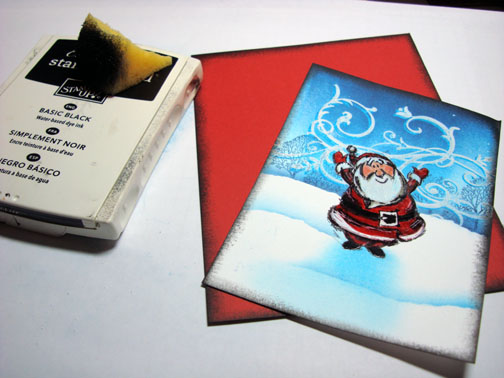
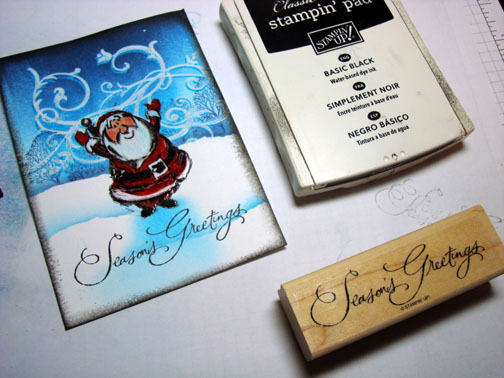
| Ink: Stampin’ Up Basic Black, Tempting Turquoise and Not Quite Navy |
| Accessories: Stampin’ Up Markers, White Gel Pen, Versamark Marker and Pad, Sponge, Gold Brads, Curly Label Punch, Brayer, Clear embossing Powder, Heat gun, Stamp-a-ma-jig |
Want a free 39 page, Stampin’ Up Mini catalog? If you are a resident of the United States, just e-mail your mailing address to me and I will get one in the mail to you. Are you inspired by this Blog? One way you can help support this blog is by ordering your Stampin’ Up products through me. You can order from me 24-7 from this link: https://michellezindorf.stampinup.net or e-mail me at [email protected]. If you are within the United States. Want a copy of the brand new 2009-2010 Stampin’ Up Catalog for $9.95 with free shipping, just e-mail me at [email protected] and I will get one in the mail to you. Want to become a Stampin’ Up Demonstrator and earn instant income? Consider being part of my Stampin’ Up Team. Also check out the Stampin’ Up specials, click this link to check it out: https://www.stampinup.net/esuite/home/michellezindorf/promotions
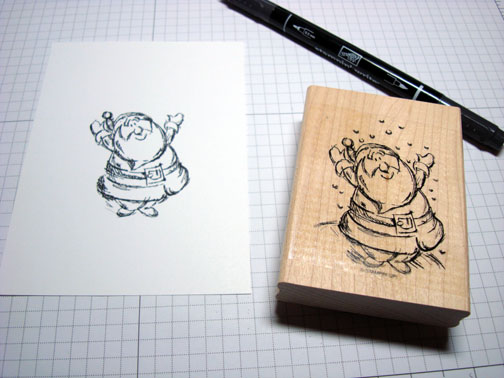
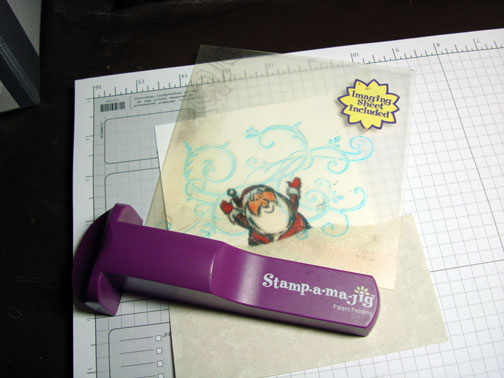
Using a Basic Black marker, colored in the part of the image that I wanted to stamp and then huffed my breath on it and stamped it on a 4″ x 5.5″ piece of Whisper White card stock.
Added some Bravo Burgundy marker to the dark parts of his clothing.

Added Real Red marker to his clothing.
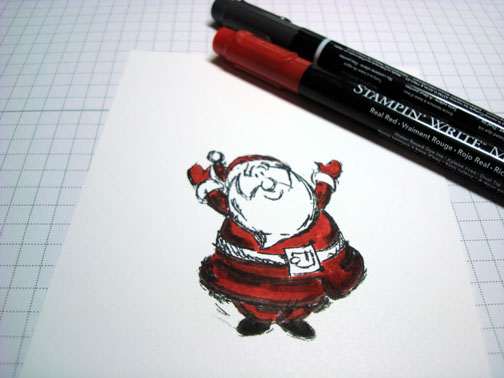
Colored his face in with a Blush Blossom marker.

Added Pretty in Pink marker to his cheeks.

Colored his boots and belt in with a Basic Black marker.

Added some Sahara Sand marker to the darker places in his beard and cuffs.

Oops! Just seen that I colored the white fur on the bottom of his coat red. Never fail, added some white gel pen to the bottom of this coat.

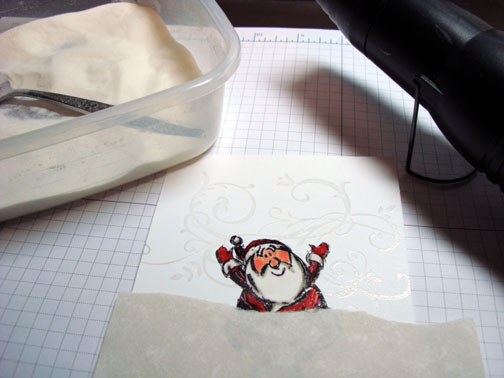
Used a heat gun and heated up the image to set the markers.
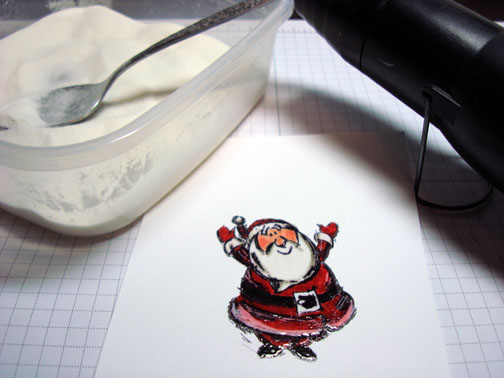
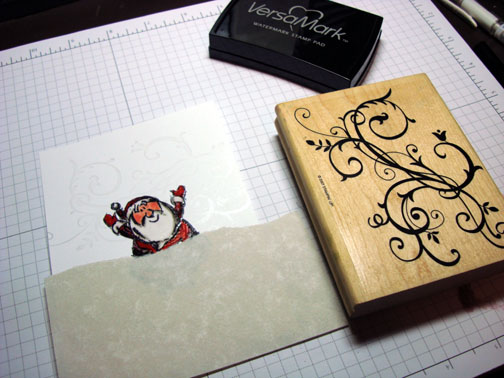
Colored over the image using a Versamark marker. Heat embossed the image using clear embossing powder and a heat gun. Now the image is protected from further applications of ink (emboss resist).

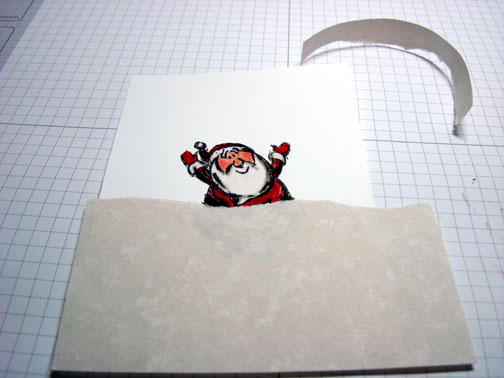
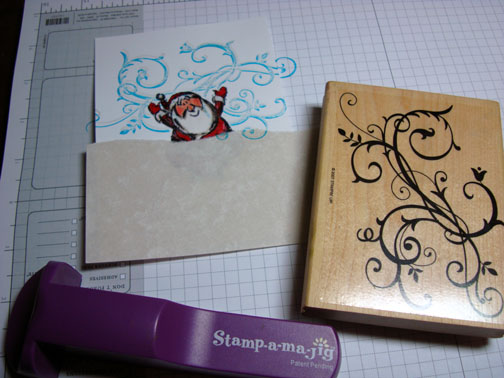
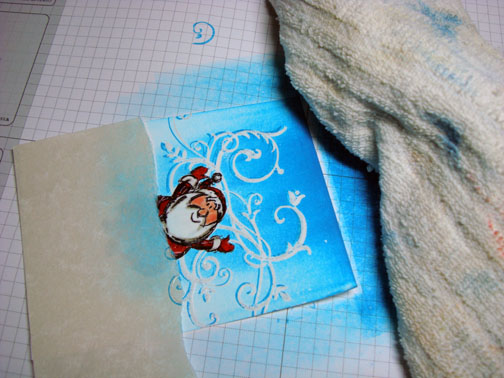
Tore a bit off the top of a post it note and used it to mask my snow in my scene.
Stamped the flourish using Versamark only. Heat embossed the flourish using clear embossing powder and a heat gun.
Using a Stamp-a-ma-jig, Over stamp the Flourish by loading my stamp with Versamark and then Tempting Turquoise ink before stamping it.
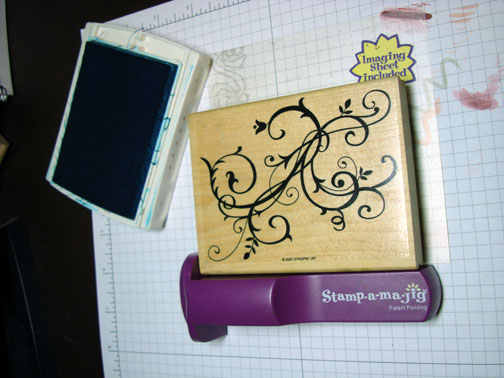
Heat embossed the flourish using clear embossing powder and a heat gun.
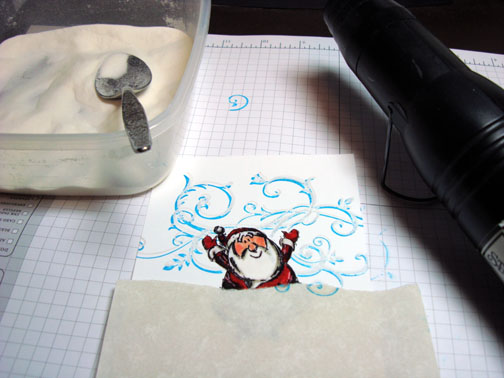
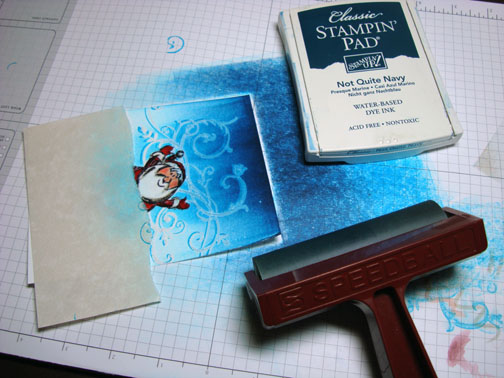
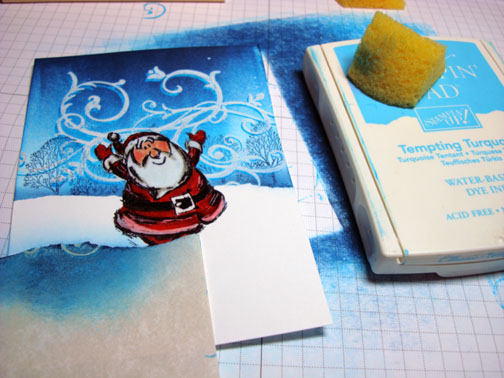
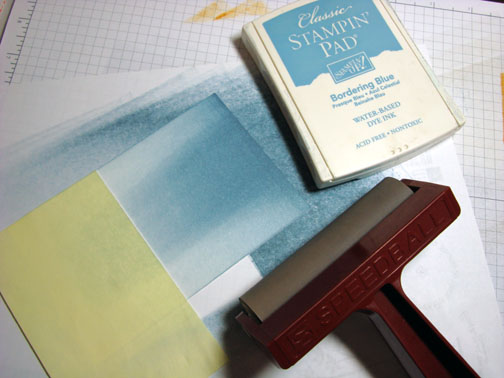
Brayered Tempting Turquoise ink at the top of the card stock.
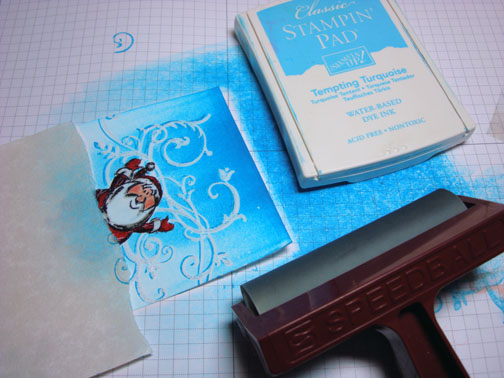
Wiped the emboss images off with a cotton towel or a paper towel. I use an old dish towel. Trying to stay green. 🙂 Do this after each application of ink.
Brayered Not Quite Navy at the top of the card stock, not covering all of the Tempting Turquoise ink.
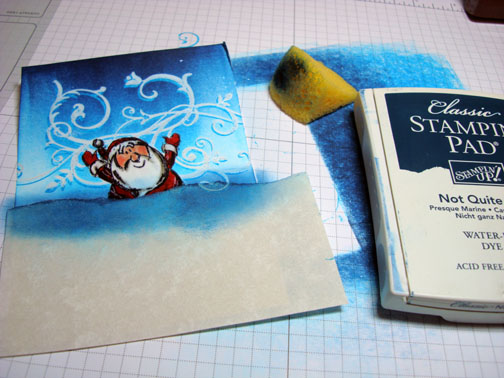
Sponged Not Quite Navy ink at the post it note edge to darken the horizon line.
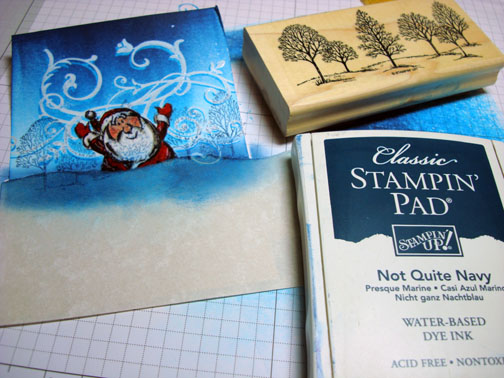
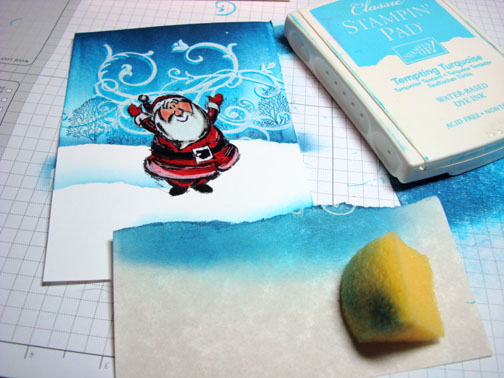
Stamped the line of trees using Not Quite Navy ink only. Wiped off the embossed images.
Moved the post it note down and added two hills by sponging Tempting Turquoise ink at the post it note edge.
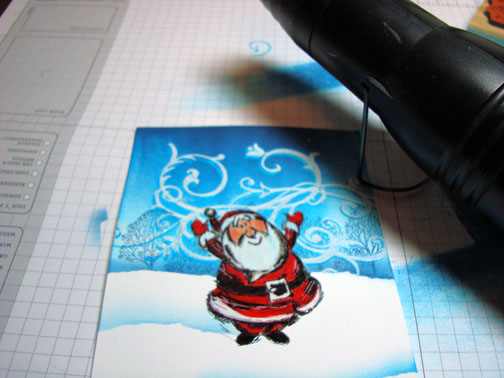
Created texture in Santa’s beard by streaking White Gel pen on it.

Using a heat gun, heated the embossed images again to bring back the shine and to set the white gel pen.
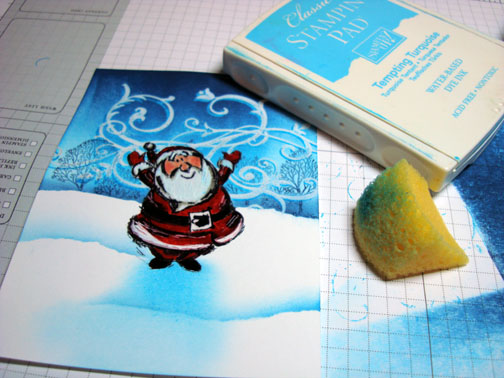
Added a shadow for Santa by sponging Tempting Turquoise ink under him.
I learn things from my workshop students all the time. Recently I learned from some smart ladies in Portland, Michigan, when you scrap a sponge full of ink against the card stock edge it is called “Whacking”, lol. Sorry, when I say whacking it reminds me of watching the Sapranos. Anyhow, I whacked the edges of the main image panel and a 5″ x 6.5″ panel of Real Red using Basic Black ink. I like to put dark ink around the edges of my panels. This saves me from putting a dark panel behind them.
Using my Stamp-a-ma-jig, stamped the sentiment using Basic Black ink.
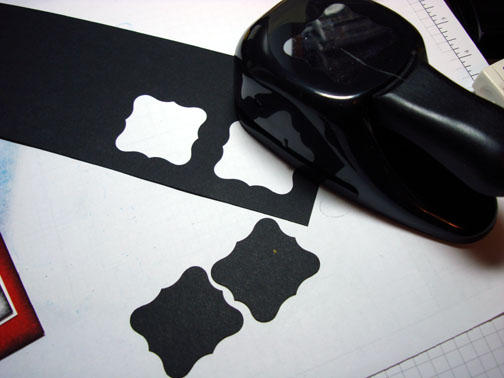
Punched two Curly Labels from Basic Black card stock and folded each one in half.
Assembled the card, added the punched labels and Gold Brads.
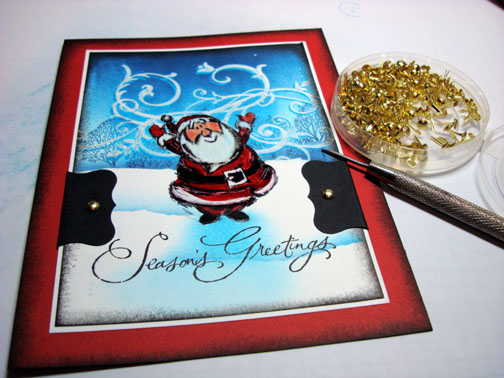
Here is the completed card that measuring 5″ x 6.5″.
Have you been good this year? You know he is watching!
I realize this post has been long, but I have one more thing to share with you. This was sent to me by my Aunt Nancy. She said it remindered her of me since I travel so much and live by my GPS system.
Question:
What do you get when you mix PMS with GPS? Answer:
A crazy witch who WILL find you!
Do you think my Aunt is trying to tell me something, lol.
Until my next post. . . . . .
Hugs,
Michelle
 Get ready for Brayer Workshops! I am coming to:
2010
Dayton, Ohio at Marco Paper
Phoenix, Arizona
Monroe, Louisiana
Jacksonville, Florida
St. Louis, Missouri
Mechanicsville, Virginia
Raleigh, North Carolina
Colleyville, Texas
Colorado Springs, Colorado
Boise area of Meridian, Idaho
Riverside, California (Southern California)
Salem, Oregon
Wheaton, Illinois
St. Cloud, Minnesota
Rockville, Maryland
North Chili, New York (near Rochester)
New Johnsonville, Tennessee
Kenova (Huntington), West Virginia
Helena, Montana
Middleburg Heights, Ohio
Venice, Florida
Grinnell, Iowa
Piedmont, Alabama (Near GA border close to Cedartown)
Auburn, Washington (near Seattle)
Elk Grove Village, Illinois
Savannah, Georgia
Atlanta, Georgia
North Liberty, Indiana
Saledad, California
Here is a link to my workshop calendar where you can see all of my travel schedule and to get info on beginner and advanced Brayer workshops: https://zindorf.splitcoaststampers.com/workshop-calendar
Link to my Stampin’ Up website where you can order all of your must have Stampin’ Up products from me 24-7: https://michellezindorf.stampinup.net
Frequently asked questions answers: https://zindorf.splitcoaststampers.com/frequently-asked-questions/