
Good morning, good morning, good morning. I am posting this and then I will run off to finish my Christmas shopping. I just have one person left to buy for, my Mother. My mother is the hardest one to buy for. Especially since when you ask her what she would like for Christmas she gives you answers such as a Million Dollars, new car, new brain, lol. We finally got a list from her so I will be able to finish all my shopping and hopefully wrap everything too.
Today’s tutorial is a holiday card. I am sure you all have your cards all made and in the mail to the lucky recipients. 🙂 Me, I am still plugging along. Just when I think I am all done, I think of someone that I missed. I sent out around 150 cards. Postage is a killer, lol. Enough whining from me. I have a announcement to make!
 The winner of the Stampin’ Up ink pads is. . . . . . . . . . .
Sandy S, TN who wrote “I would love to make a home for the inks, right now our funds are pretty tight and that would be a wonderful Christmas present (for me). Our family has agreed not to exchange gifts this year and just be glad for what we have. So thank you for the chance to receive your ink gift.”
Congrats Sandy S! Please e-mail your mailing address to me at [email protected] and I will pop these homeless pads into the mail to you.
Thanks everyone for playing along. 🙂
One more thing, I updated my Travel photo page finally. Thanks to everyone that has sent me photos from my brayer workshops they attended. Here is a link if you want to check it out: https://zindorf.splitcoaststampers.com/travel-photos/
Or you can access it from the tab “Travel Pics” at the top of my blog.
Now on with today’s tutorial .. . . . . . ..
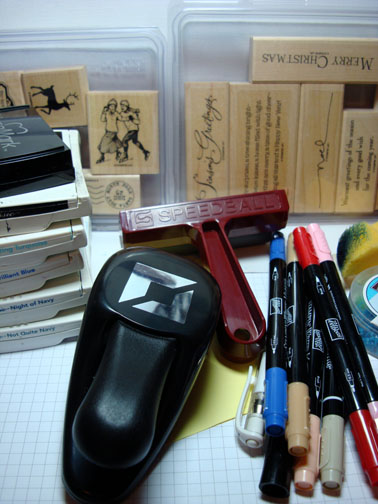
Supplies:
| Stamps: Stampin’ Up! Winter Post, Many Merry Messages |
| Paper: Stampin’ Up! Whisper White, Tempting Turquoise and Brilliant Blue |
| Ink: Stampin’ Up! Basic Black, Tempting Turquoise, Brilliant Blue, Night of Navy, Not Quite Navy |
| Accessories: Stampin’ Up! Tempting Turquoise Brads, Photo Corner Punch, Markers – Real Red, Brilliant Blue, Blush Blossom, Creamy Caramel and Sahara Sand, White Gel Pen, Brayer, Versamark Pad and Marker, Sponges, Post it Notes, Piercing Tool |
The new Stampin’ Up! 43 page Occasions Mini Catalog and Sale-a-Bration catalog will be out January 5, 2010. E-mail me your address if you want a set for free and you are a resident of the USA. If you are a customer of mine you will automatically get a set from me. 🙂
Are you getting inspired and enjoying this blog. One way you can help support it is to order your Stampin’ Up products through me. You can order from me 24-7 from this link: https://michellezindorf.stampinup.net or e-mail me at [email protected]. If you are within the United States. Want a copy 2009-2010 Stampin’ Up Catalog for $9.95 with free shipping, just e-mail me at [email protected] and I will get one in the mail to you. Want to become a Stampin’ Up Demonstrator and earn instant income? Consider being part of my Stampin’ Up Team. Also check out the Stampin’ Up specials, click this link to check it out: https://www.stampinup.net/esuite/home/michellezindorf/promotions
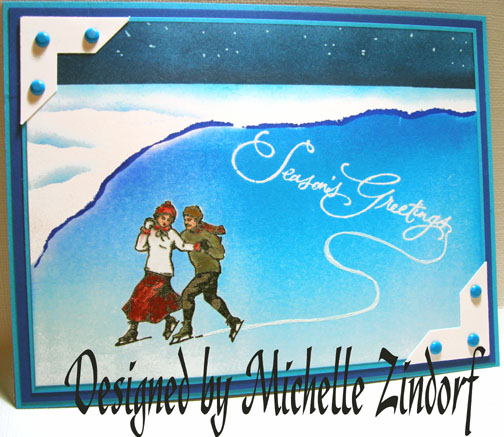
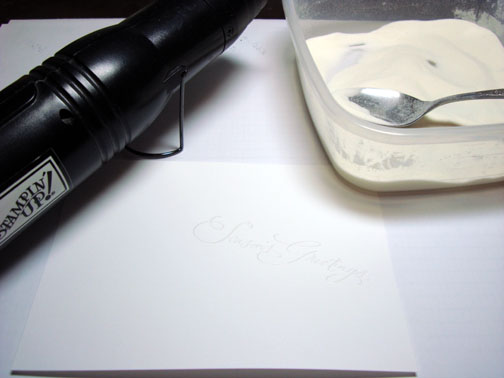
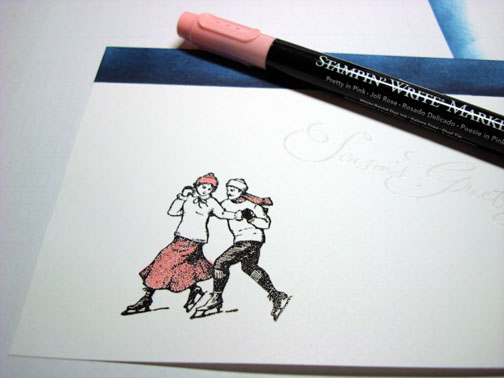
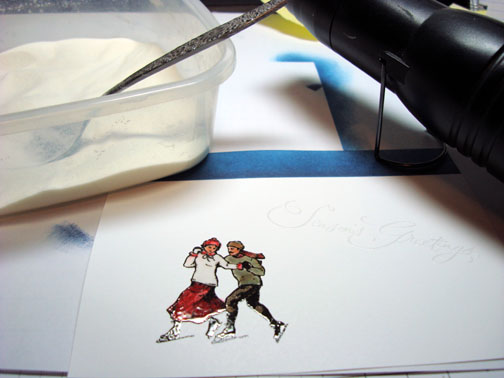
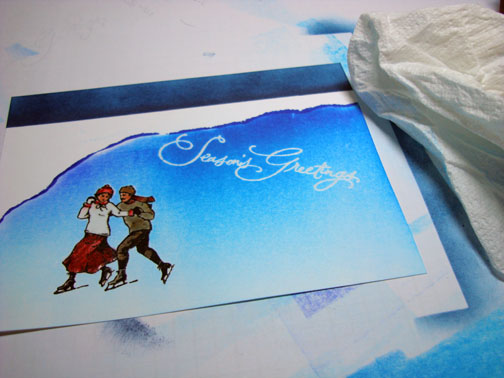
On a 4.5″ x 6″ piece of Whisper White card stock, stamped the Sentiment using Versamark only. Heat embossed the image using clear embossing powder and a heat gun.

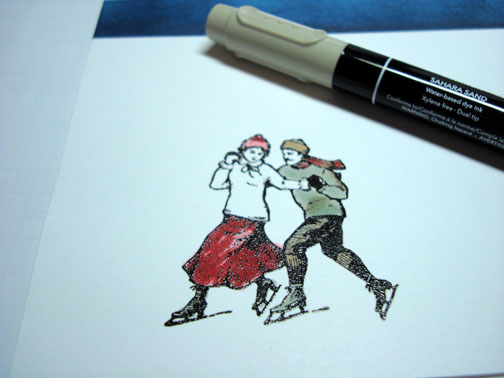
Stamped the skaters by first loading my stamp with Versamark and then Basic Black ink before stamping it. Heat embossed the skaters using clear embossing powder and a heat gun.

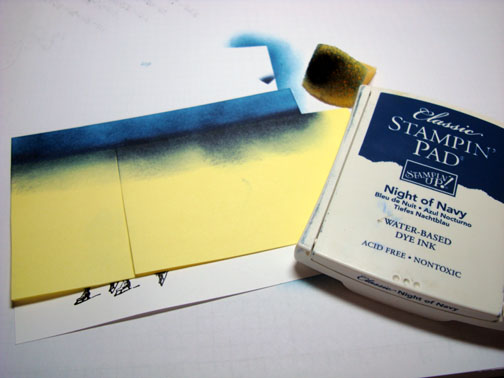
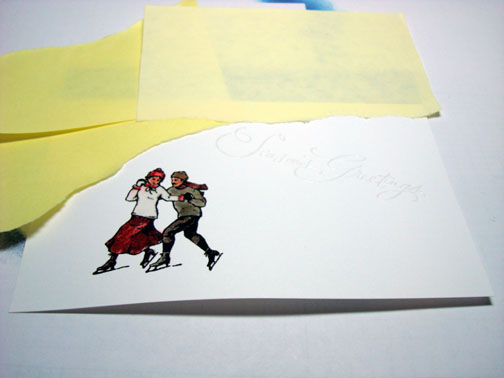
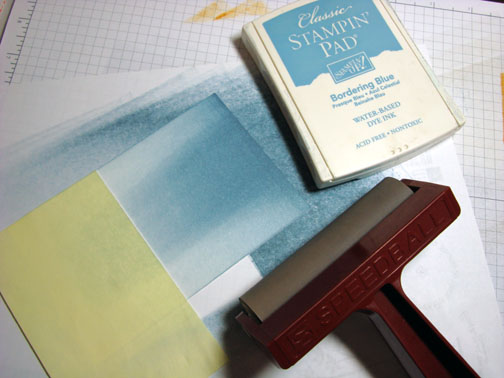
Masked the bottom of the card stock with post it notes, leaving about 1″ of the card stock showing at the top. Sponged Not Quite Navy ink in the un-masked area.
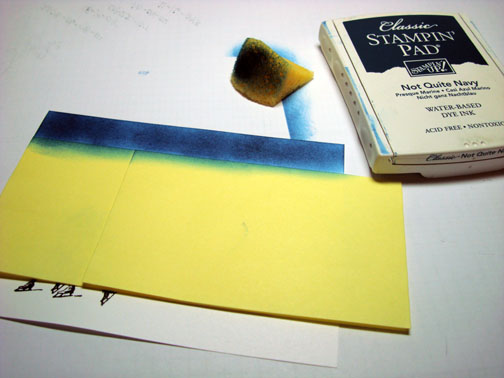
Sponged Night of Navy ink right at the post it note edge to darken the horizon line.
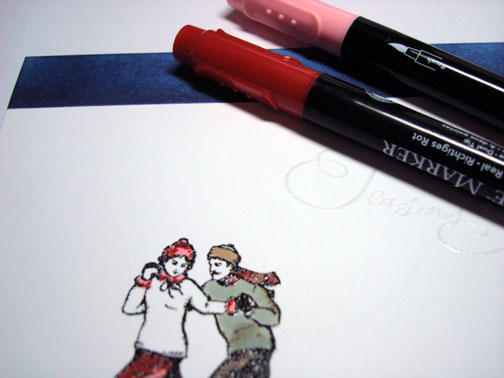
Added Pretty in Pink marker to the skaters.
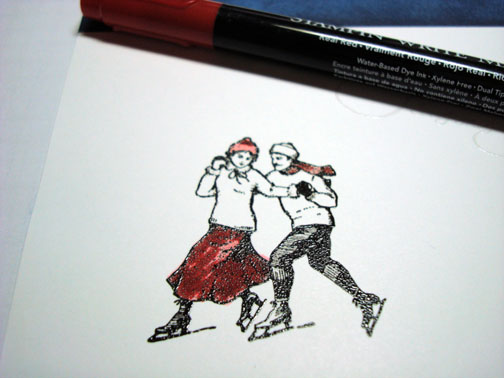
Added Real Red marker to the skaters.
Added creamy Caramel marker the male skater.
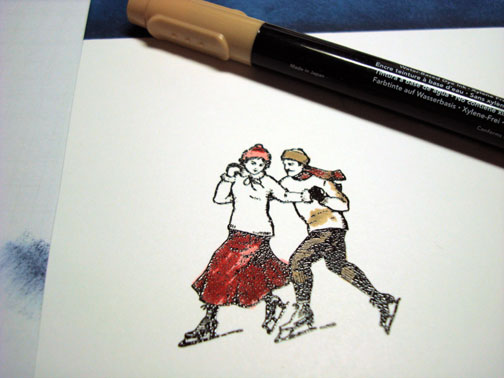
Added Sahara Sand marker to the skaters.
Colored in the girls collar and cuffs with Pretty in Pink and Real Red markers.
Colored the skater’s faces in with Blush Blossom marker.
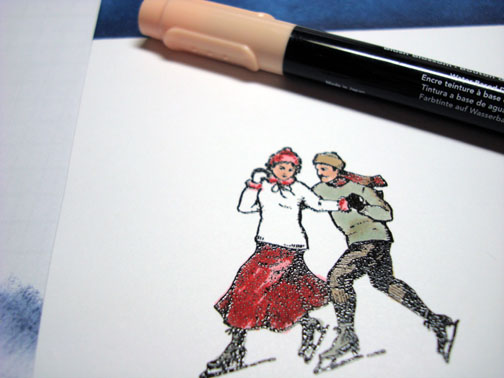
Colored over the skaters with a Versamark marker, being very careful to stay within the embossed lines. Also it helps to start with the light areas first and work your way to the dark areas, cleaning your Versamark marker tip often. This helps keep the areas from bleeding into one another.
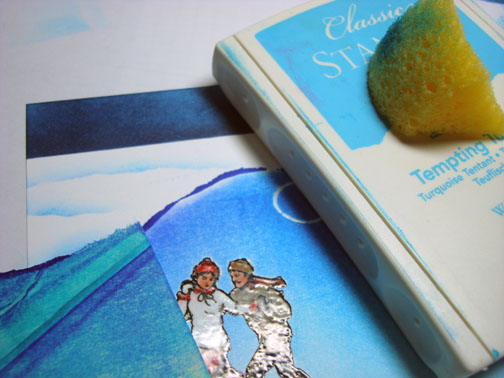
Heat embossed the skates using clear embossing powder and a heat gun.
Tore some post it notes and masked the sky and snow areas.
Brayered Tempting Turquoise ink into the pond area.
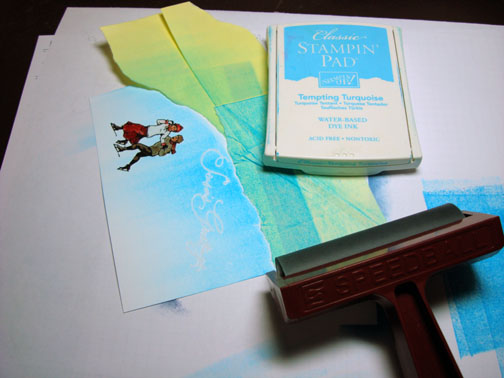
Added Brilliant Blue ink to the top of the pond area.

Edged the top of the pond using a Brilliant Blue marker.
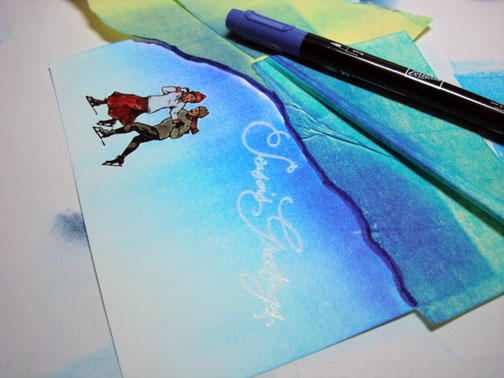
Removed the post it note masks and wiped the ink off of my embossed images using a paper towel.
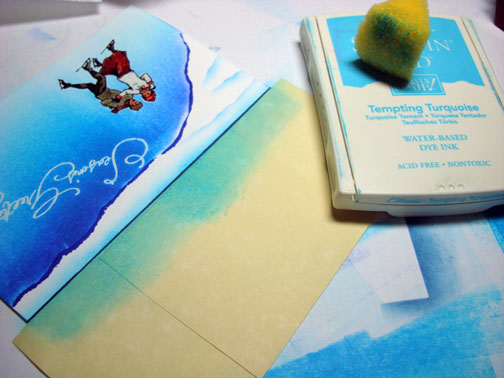
Using a torn post it note, sponged Tempting Turquoise ink at the torn edge of the post it note to create hills in the snow area.
Masked the sky area with post it notes and sponged Tempting Turquoise ink at the post it note edge to add color to the top of the snow area.
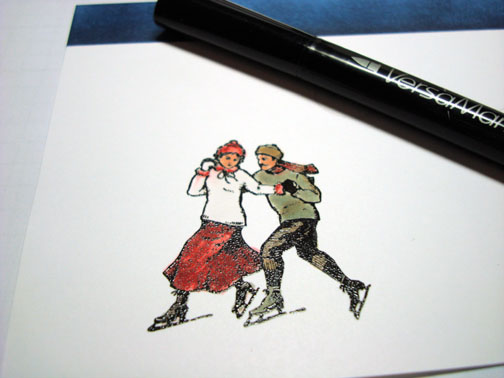
Added the line from the greeting to the skaters skate using a White Gel pen. Also added a few dots in the sky.

Added Tempting Turquoise and Brilliant Blue Panels. Also Added two large Whisper White photo corner punches.
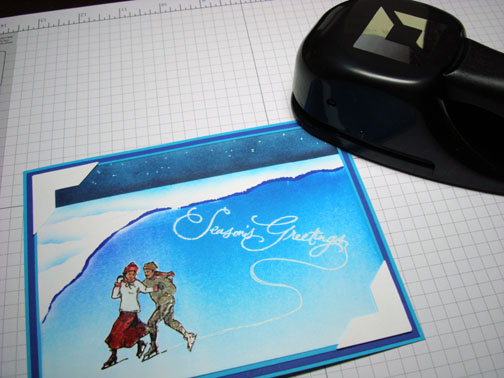
Added Tempting Turquoise Brads to the photo corner punches using a piercing tool to start the brads.
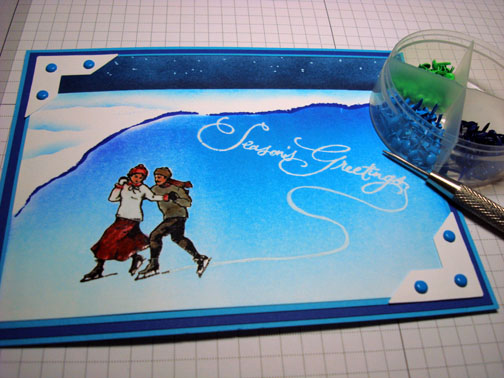
Here is the finished card measuring 5″ x 6.5″
Before I close for today I want to share with you something I received from my friend, Gail Emmons but it was written by Linda Payne. Gotta love it! This is not just a recipe, lol.
Cranberry Bread
By Linda Payne
Quick Recipe:
Grab a box of Pillsbury Mix while at local grocery store. Rush home.
Pull out loaf pan and turn on oven, break open box and dump contents into a bowl. Add eggs, oil and water per box.
Mix by hand – who wants to clean beaters – until all is moist. Pour batter into loaf pan, dump bowl and spoon into sink.
Set oven timer for time on box…ask hubby to carry in the rest of the groceries!
Long Recipe
Get all dressed up. Have your hair and nails done. Go shopping with a friend. On the way home make short stop at local grocery store (a one bag stop and include box of quick bread). Call hubby and let him know you’re making him something special when he gets home…if he’s already home – perfect! Once home – change into something comfy and cute and give hubby a wink… because you’re making him something special!
Pull out your Kitchen Aid mixer…turn on some music. Bring out your eggs, oil, measuring cups…put on an apron…give hubby a wink…because you’re making him something special!!
Turn on oven; prepare your loaf pan by spraying it with non-stick spray. Pour contents of box into mixer bowl. Add oil – start mixer on slow…watch it for a few seconds…turn it off. Carefully add eggs – start mixer on slow…watch it for a few seconds…turn it off (is hubby watching? send him a wink! because you’re making him something special!)
Carefully measure and add the water…..start mixer on slow…watch it for a few seconds…turn it off. Scrape your bowl…turn mixer on and let it mix for two minutes…check oven. Throw away box, egg shells, and wash measuring cup – put away oil.
Stop mixer. Scrape bowl …slowly pour batter into loaf pan and scrape mixer bowl. Put loaf pan in oven. Light a candle or two… (Is hubby watching…send him a wink! because you’re making him something special!)
If kids are in bed or away…you should have his attention by now…would suggest setting the timer in case you are “distracted”…but if you’re at my house… I’ve ditched the apron and have begun stamping and need to hear the buzzer so I don’t burn up my “something special for hubby”!!! who is so engrossed in the Andy Griffith show for the umpteenth thousand time that he doesn’t even realize how hard I just worked on the Long Recipe!
Ladies, you decide which recipe you prefer! LOL
May you be blessed today!
Huge Hugs and Happy Holidays,
Michelle
Get ready for Brayer Workshops! I am coming to:
2010
Dayton, Ohio at Marco Paper
Phoenix, Arizona
Monroe, Louisiana
Jacksonville, Florida
St. Louis, Missouri
Mechanicsville, Virginia
Raleigh, North Carolina
Colleyville, Texas
Colorado Springs, Colorado
Boise area of Meridian, Idaho
Riverside, California (Southern California)
Salem, Oregon
Wheaton, Illinois
St. Cloud, Minnesota
Rockville, Maryland
North Chili, New York (near Rochester)
New Johnsonville, Tennessee
Kenova (Huntington), West Virginia
Helena, Montana
Middleburg Heights, Ohio
Venice, Florida
Grinnell, Iowa
Piedmont, Alabama (Near GA border close to Cedartown)
Auburn, Washington (near Seattle)
Elk Grove Village, Illinois
Savannah, Georgia
Atlanta, Georgia
North Liberty, Indiana
Saledad, California
Here is a link to my workshop calendar where you can see all of my travel schedule and to get info on beginner and advanced Brayer workshops: https://zindorf.splitcoaststampers.com/workshop-calendar
Link to my Stampin’ Up website where you can order all of your must have Stampin’ Up products from me 24-7: https://michellezindorf.stampinup.net
Frequently asked questions answers: https://zindorf.splitcoaststampers.com/frequently-asked-questions/
10 responses to “Pond Skating Greeting – Tutorial #287 and Ink Pads Winner”