
Today is my Birthday, nana nana nana. . . . . .
With that being said, I have a super quick card for you today. It is so quick that I felt it didn’t need a tutorial. Please forgive me, I am forcing myself to take the day off, grin. I do however have the instructions for you below.
Reminder: The Stampin’ Up! Summer Mini Catalog ends today. Going, Going, Going, Gone! The new Stampin’ Up! Holiday Mini Catalog starts tomorrow, September 1, 2011. Want a free copy? E-mail me at [email protected] (include your mailing address in your e-mail, please) and I will get one out to you.
You can shop for Stampin’ Up! products 24/7 using my Stampin’ Up! web site, CLICK HERE. Your order will be shipped right to your door step Stampin’ Up!.
Let’s start with the supplies.
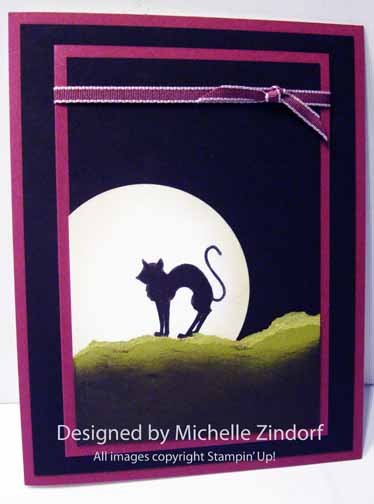
Supplies:
| Stamps: Stampin’ Up! Scaredy Cat |
| Paper: Stampin’ Up! Whisper White, Old Olive, Basic Black and Rich Razzelberry |
| Ink: Stampin’ Up! Basic Black |
| Accessories: Stampin’ Up! Sponge, Rich Razzelberry Ribbon and a 2.5″ circle punch |
Instructions:
Punch a 2.5″ circle from Whisper White card stock and stamp the cat from the Stampin’ Up Scaredy Cat set on it using Basic Black ink on the right hand side of the circle. Adhere the circle to a 3″ x 4.5″ piece of Basic Black card stock so the moon hangs over the left side of the Basic Black card stock panel. Cut the moon excess off.
Rip the top edge off of a 3″ x 2″ piece of Old Olive card stock. Adhere it to the Basic Black panel so the Old Olive card stock meets the cats feet. Cut off any excess Old Olive card stock. Sponge Basic Black ink at the bottom of the Old Olive. Add 2 Rich Razzelberry panels and 1 more Basic Black panel. Add Rich Razzelberry Ribbon.
Enjoy!
May your day be extra special.
Until my next post. .. . . .
Hugs!
Michelle
46 responses to “Scaredy Cat – with instructions”