
They There,
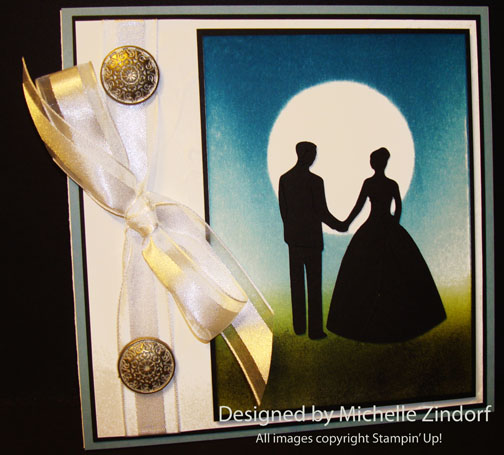
I have a wedding card tutorial for you today. This is the card that I gave my son, Mitchell and his lovely bride, Jamie on this past Saturday for their wedding.
The wedding was soooooo stunningly beautiful. The ceremony was preformed outdoors by a weeping willow tree with a pond back drop. The weather was perfect. The wedding party was a large one, 6 bridesmaids, Maid of Honor, 6 groomsman, Best Man, 2 Flower Girls, Ring Barrier and Jamie and Mitchell’s English Bulldog, Slug. Also of course, the bride and groom.
I love this picture of Jamie and Mitchell. Too fun!

I don’t have any pictures of the ceremony yet. They had a professional photographer so I left the camera at home and truly enjoyed watching my youngest get married through my teary eyes. Such a happy occasion. Jamie has really been a part of our family for a couple of years now, but now it is official.
Here are a few Stampin’ Up Reminders before I start the project.
 The new Stampin’ Up! Holiday Mini catalog is now in effect. I love all of Stampin’ Up’s products, but the new mini catalog just blew me away (CLICK HERE TO VIEW THE HOLIDAY MINI CATALOG). I especially love the coordinating products that you can get as a bundle at a discount. Gotta love a discount, right? Especially for those products to make your holiday gifts and cards.
Don’t miss out on my Customer free stamp set program. Check it out! Along with a handmade thank you card from me for your order you will receive a token for each $50 in product you ordered using me as your demonstrator. After you have collected 10 tokens you will receive a free current stamp set of your choosing, a value of $39 or less. Here is a link to my online shopping page that you can shop at 24/7 (from the comfort of your home, even in your pj’s) and the products will be shipped directly to your door step from Stampin’ Up: CLICK HERE TO SHOP. My free stamp set program will be an on going program. ![]()
Want a new annual catalog shipped to you? I will be happy to send you one. The catalog is free, but there is a $5 shipping charge. Note, I will only sell or ship within the United States do to Stampin’ Up! policies. Please contact me at [email protected]. Payment can be sent via Paypal or check.
You can join my Stampin’ Up! team and become a Stampin’ Up! Demonstrator now for the great new price of $99, CLICK HERE TO CHECK IT OUT. Contact me whether you want to start your own business or just enjoy the 20% discount on products.
Want to purchase one of my original cards or some Stampin’ Up! retired sets CLICK HERE.
Now on with today’s tutorial. . . . . . .
Supplies:
Card Stock: Stampin’ Up! Whisper White, Baja Breeze and Basic Black
Ink: Stampin’ Up! Baja Breeze, Old Olive, Island Indigo and Basic Black
Accessories: Stampin’ Up! Sponges, 1 3/4″ Circle Punch, Brayer, Antique Brads, Whisper White Satin Ribbon, Post it Note, Potpourri Basket Cricut Cartridge, Cricut Imagine Machine.
![]() Are you getting inspiration from this blog? One way you can help support it is to order your Stampin’ Up products through me. Click HERE to place an order and have your order delivered directly to your door step from Stampin’ Up!
Are you getting inspiration from this blog? One way you can help support it is to order your Stampin’ Up products through me. Click HERE to place an order and have your order delivered directly to your door step from Stampin’ Up!
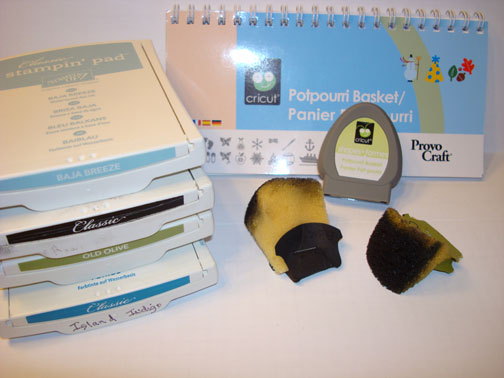
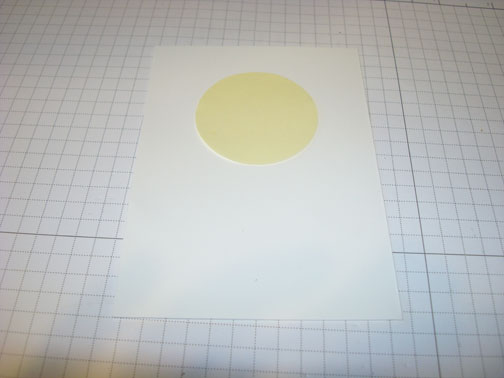
Punched a 1 3/4″ circle from a the sticky part of a post it note and masked the moon on a 3″ x 4.5″ piece of Whisper White card stock.
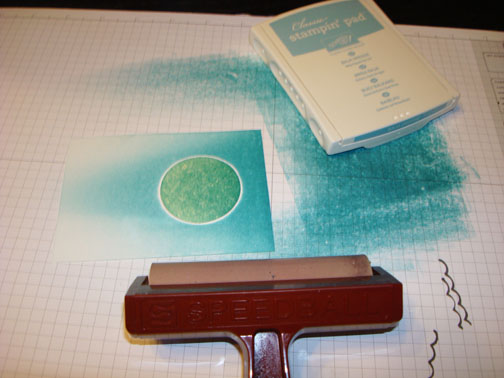
Brayered Baja Breeze on the top of the card stock. Also brayered Island Indigo at the top of the card stock (sorry I missed the photo on this).
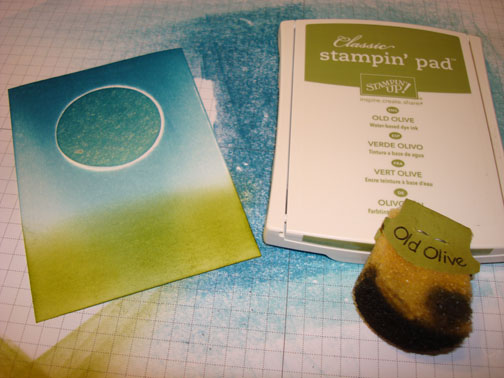
Sponged Old Olive ink at the bottom of the card stock.
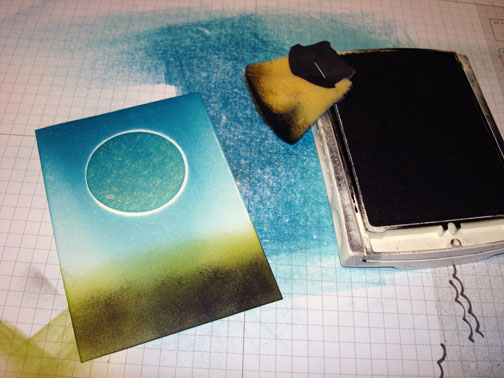
Sponged Basic Black ink at the very bottom of the card stock.
Removed the moon mask and added a bride and groom die cut. The die cut was cut using Potpourri Basket Cricut Cartridge at 2″ with my Cricut Imagine machine from Basic Black card stock.
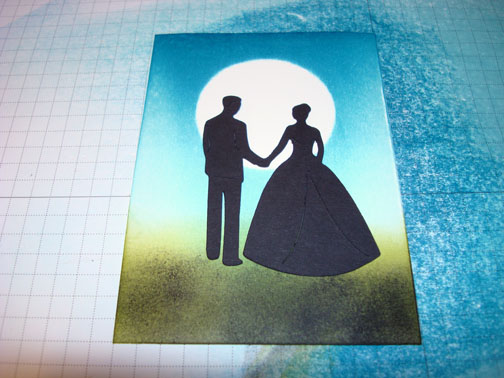
Added a 5.25″ square panel of Baja Breeze, 5″ square Basic Black panel, 4 7/8″ square Whisper White Panel, 3 1/8″ x 4 5/” Basic Black panel and a 10.5″ x 5.25″ piece of Whisper White folded in half for the card base. Also added White Satin Ribbon and two Antique Brads. Here is the finished card measuring 5.25″ square.
May your day be filled with wonder.
Until my next post. . . . .
Hugs,


 Get ready for Brayer and Direct to Paper Workshops! I am coming to the following locations, click the location name for more information.
Sacramento, California (Sold Out)
I hope you can make it to one of my workshops in 2012. I have decided not to travel after this year, so be sure to catch one now!
Link to my Stampin’ Up website where you can order all of your must have Stampin’ Up products from me 24-7: https://michellezindorf.stampinup.net
4 responses to “Happily Ever After – Tutorial #530”