Category Archives: Sneak Peeks

Among the Branches – Stampin’ Up! Card

DSC_0022_edited-2

Mercy Me, how I love all the new stuff that is coming your way in the upcoming Stampin’ Up! Holiday Catalog.  I only wish that Stampin’ Up! had an ordering button that reads press here to order everything, because that is just what I had done during the Demo pre-order.  I’ve had all of my new Holiday Catalog items for a while now and I don’t usually show sneak peeks because I know it is frustrating when you see something that you can’t order like RIGHT NOW.

Well, we are getting very close to the new Holiday Catalog sales period which starts September 1st so I’m going to start showing some projects with my favorite new items from the catalog so you have some projects in mind while making out your wish lists.  How does that sound?

I’m starting my sneak peeks with . . . .

Remember, to put these items on your wish list.  They will be available  to purchase on September 1st.

You can see just how this project was created in today’s tutorial.

FIND OUT HOW TO GET THE TUTORIAL FOR THIS PROJECT AND 11 OTHERS FREE THIS MONTH BELOW.

*******************************************

Supply List

******************************************************************************************************
Have a fabulous day!

Until my next post. . . . . . .  .

Huge Hugs!

*****************************************************************

Oh My, Get a Whole Month Worth of Tutorials Free!

Place a $50 merchandise order between August 1, 2015 and August 31, 2015 and receive the entire month of tutorials (at least 12) free of charge via e-mail.

You will receive all of the projects pictured below and they will keep coming until August 31st.  You will also receive 1 virtual token from me for each $50 in merchandise purchased with your order.  Collect 10 tokens and receive a free stamp set of your choice up to a $30 value.   Now, that’s the way to get some bang for your buck!
Free tutorials are an exclusive perk for my valued Stampin’ Up! customers and down line.
DSC_0022_edited-2  DSC_0031_edited-2   DSC_0032_edited-2   DSC_0026_edited-1  DSC_0027_edited-2  DSC_0028_edited-2  DSC_0037_edited-2  DSC_00233_edited-1 plus 4 more to come.
PLEASE USE HOSTESS CODE:  BAN9W7RS     (DO NOT USE IF MERCHANDISE ORDERED IS OVER $150)

If you wish to receive the tutorials please do not click the “no contact” box when placing your order. ************************************************************

Shop my online store now CLICK HERE *

Please note that this Free Stamps with Tokens Rewards Program  and free tutorials offer are being offered by me, Michelle Zindorf only, and not Stampin’ Up!

*******************************************************************

IF YOU WISH TO PURCHASE THIS MONTH’S SINGLE TUTORIALS OR THIS MONTH’S TUTORIAL PACKAGE CLICK HERE FOR DETAILS.

*******************************************************************

Stampin’ Up! Specials Happening Now!

********************************************************************

1/2 off Paper Pumpkin!

Screen Shot 2015-07-29 at 3.06.16 PM
Screen Shot 2015-07-29 at 2.45.34 PM

Paper Pumpkin is one of my very favorite Stampin’ Up! products. Each month you’ll receive an orange box with darling curated projects—sometimes cards, sometimes gift packaging, sometimes both!—that you can complete in less than an hour. All supplies and instructions included.  I’m always delighted at the projects I have received each month. When that orange box shows up in my mailbox I get so excited.  🙂

I hope you’ll give Paper Pumpkin a try and enjoy this fabulous get-started special at the same time. Just go to PaperPumpkin.com and enter HALFOFF as the promo code and choose me as your demonstrator!  Thank you!

***************************************************************************

Screen Shot 2015-08-182 at 11.51.26 AM copy

CHECK OUT THE LATEST BATCH OF STAMPIN’ UP! WEEKLY DEALS IN MY ON-LINE STORE.  DISCOUNTED PRICES ON THIS WEEK’S DEALS END AUGUST 24TH. 

Note:  Deal prices are only good while supplies last.  Hurry and get them now!

************************************************************

Quilted Coasters – Tutorial #524

Single quilted coaster    

Hey There,

Today’s tutorial on quilted coasters involved getting out the sewing machine, but know if you can sew a straight line you will have no problem making these quick quilted coasters.   They are super yummy looking using Stampin’ Up! fabrics, some of which are a sneak peek of what is to come in the new Stampin’ Up! Holiday Mini Catalog that starts on August 1, 2012.  But for now, know you will want everything in the mini.  It is so filled with fresh new stamps and embellishments, watch out!

Below is a sample of some of my Stampin’ Up! fabrics that can be found in the annual catalog.  I love the way the fabric matches all the great Stampin’ Up! colors we have come to love in the paper, ink, markers etc., etc.

Here are a few Stampin’ Up Reminders before I start the project.   During the month of July, with any $50 purchase, you can get this beautiful stamp set for $5.

Don’t miss out on my Customer free stamp set program. Check it out!  Along with a handmade thank you card from me for your order you will receive a token for each $50 in product you ordered using me as your demonstrator.  After you have collected 10 tokens you will receive a free current stamp set of your choosing, a value of $39 or less.   Here is a link to my online shopping page that you can shop at 24/7 (from the comfort of your home, even in your pj’s) and the products will be shipped directly to your door step from Stampin’ Up:   CLICK HERE TO SHOP.   My free stamp set program will be an on going program.  :)

Want a new annual catalog shipped to you?     I will be happy to send you one.  The catalog is free, but there is a $5 shipping charge.   Note, I will only sell or ship within the United States do to Stampin’ Up! policies.  Please contact me at [email protected].  Payment can be sent via Paypal or check.

You can join my Stampin’ Up! team and become a Stampin’ Up! Demonstrator now for the great new price of $99, CLICK HERE TO CHECK IT OUT.  Contact me whether you want to start your own business or just enjoy the 20% discount on products.

Want to purchase one of my original cards or some Stampin’ Up! retired sets CLICK HERE.

Now on with today’s tutorial. . . . .  . .

Start by cutting a piece of fabric 4.5″ x 10″.  You will need one of these for each coaster you make.

Cut a piece of batting 4″ square.  You will need one of these for each coaster.

Fold the fabric in half, front sides facing each other, and stitch the right and left sides closed using a 1/4″ seam allowance.   Now you have a pocket.

Now here is just a little tip if you are going to make a bunch of these.  Sew one side on each coaster, running them through your machine one right after each other without cutting the thread.  Flip them over and sew the other sides together and then cut them apart.  (clear as mud?)

Clip your bottom corners.

Turn the piece right side out and use your bone folder or a crochet hook to get the corners to be square.

Tuck the 4″ square batting smoothly in the pocket.

Turn the top edges under having one edge cover the batting.

Sew the open end closed using a 1/4″ seam allowance to 1/4″ of the end of the fabric.  With your needle down, turn the fabric so you are sewing down the next side, keep sewing around and around having a 1/4″ allowance from the previous row of stitches.

End your sewing in the middle and make a few back stitches.

I put together stacks of 6 coasters using ribbon and adding a tag for each stack.

Here is a couple of sneak peeks for you.  This set of coasters uses Stampin’ Up! Holiday Mini Catalog Orchard Harvest Designer Fabric and Perfectly Preserved Stamp set.

Another Mini Catalog Sneak Peak:

This set show cases the Stampin’ Up! Holiday Mini products, Candlelight Christmas Designer Fabric and Scentsational Season Stamp set.

The other 3 coaster sets I made today showcase the Comfort Cafe fabric from the Annual Catalog and Affection Collection Stamp Set from the Holiday Mini.


I hope you enjoyed this tutorial and find yourself dusting off that sewing machine to make some of these as quick house warming gifts or just some for yourself.  I think you will be surprised at how fast they whip up.

May your day be overflowing with all the people you love.

Until my next post. . . .  ..

Hugs,

Get ready for Brayer and Direct to Paper Workshops!  I am coming to the following locations, click the location name for more information.

Elizabethtown, Kentucky

West Bend, Wisconsin

Purcellville, Virginia

Orange, Massachusetts

Scottsdale, Arizona

Sacramento, California (SoldOut)

Staley, North Carolina

St. Petersburg, Florida

Newburge, Indiana

I hope you can make it to one of my workshops in 2012.  I have decided not to travel after this year, so be sure to catch one this year!

Link to my Stampin’ Up website where you can order all of your must have Stampin’ Up products from me 24-7: https://michellezindorf.stampinup.net


Tea Shoppe Sneak Peek – Tutorial #478


Hey There,

I hope you have had a wonderful holiday.   I sure did.  It was spent with family, celebrating and eating great food.  🙂  We did have something extra special to celebrate, my youngest son, Mitch proposed to his lovely, lovely girlfriend, Jamie and she said “YES”.

The happy couple. . . . . .  . .

I heard the news and cried tears of joy!     Jamie has already won all of us over and has been a part of this family from the day we met her.  I’m looking forward to them making it official.

Now, with the personal stuff set aside, I’m happy to bring you a tutorial today.   I took a little hiatus from stamping to have some spare time to prepare for the holidays and just have some general down time.   But now I’m back and was anxious to get back into my office to create.   I received my pre-order from Stampin’ Up! which included stamps from the up and coming Stampin’ Up! Occasions Mini Catalog.   The catalog will be in effect January 4 – April 30, 2012.   My current Stampin’ Up! customers will receive this mini catalog automatically from me.  If you would like an Occasions Mini Catalog, please e-mail your address to: [email protected] and I will get one in the mail to you.   You won’t want to miss out on the exceptionally wonderful things in this mini!

As the title of this post suggests, I am giving you a sneak peek of a project using a new set from the new mini.   The set name is Tea Shoppe and it’s right up my ally, I’m a tea drinker.

The tutorial below gives you instructions on how to create a stenciled wall, striped table cloth and embossed teacup.  Check it out below and then put this stamp set on your list of stamps you must have in 2012.


********************************************************************

Reminder!

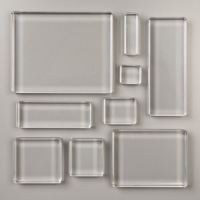
My customer drawing for December 2011 is a full set of Stampin’ Up! Clear Mount Acrylic Blocks and a rockin’ Stampin’ Up! Clear Block Storage Caddy to store them in.  The block set includes 9 different block sizes.    Total prize package is an $86.90 value.    How do you enter? For the month of December, 2o11, when you place a Stampin’ Up!  order using me as your Demonstrator,  you will receive one entry toward this months prize for each $25 increment in merchandise purchased.  Place an order for $50 and get two chances and so on and so on.    CLICK HERE TO PLACE AN ORDER OR TO BROWSE. Your order will be shipped directly to you from Stampin’ Up!.

Clear Block Bundle - by Stampin' Up!

If you stamp with clear-mount stamps, you’ll need a clear block to adhere your stamps to. Stampin’ Up’s blocks are a clear choice. Made from high-quality, sturdy acrylic, these blocks can hold one stamp or multiple stamps if you want to create a collage of images.

Clear Block Storage Caddy - by Stampin' Up!

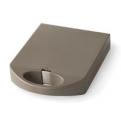
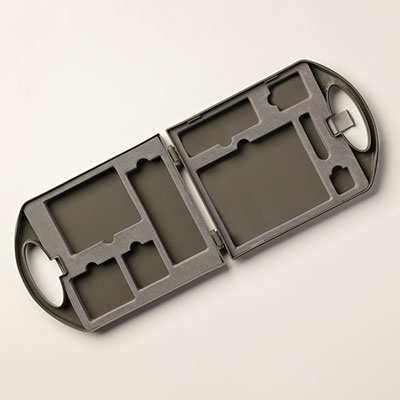
This compact storage caddy holds one of each size of our clear-mount blocks. The foam insert securely holds the blocks in place; an additional foam insert sits between the blocks to protect them when the caddy is closed.

■ Opens flat for easy access
■ Locks shut
■ Built-in handle makes it easy to carry
■ 8-1/16″ x 10-5/8″ x 1-13/16″

I will use a random number generator to determine the winner on January 1, 2012.

*****************************************************************************

Now on with the tutorial. . . . .
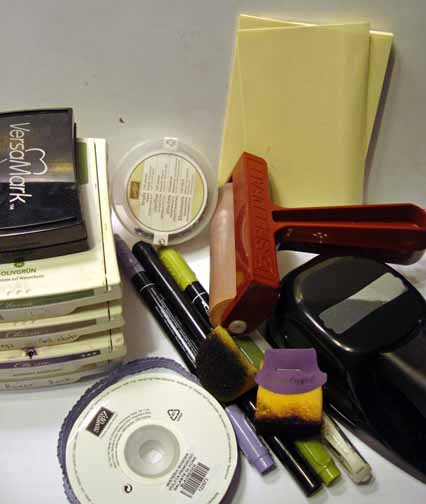
Supplies:

Stamps: Stampin’ Up!  Tea Shoppe

Card Stock: Stampin’ Up! Elegant Eggplant, Wisteria Wonder, Very Vanilla and Whisper White

Ink: Stampin’ Up! Old Olive, Always Artichoke, Elegant Eggplant and River Rock

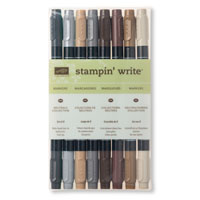
Accessories: Stampin’ Up!  Old Olive and Wisteria Wonder Markers, Wisteria Wonder Ribbon, Elegant Eggplant brads, Brayer, Clear embossing powder, heat gun, sponges, Versamark Pad and marker, Label punch, scissors, post it notes.

Want a free copy of the current Stampin’ Up! Mini Catalog?  Just e-mail your address to [email protected] and I will get one right out to you.  Get your copy of the 2011-2012 Stampin’ Up! Idea Book & Catalog by sending $9.95 to me at P.O. box 116, West Alexandria, Ohio 45381 or via paypal to [email protected], shipping is free. Are you getting inspiration from this blog?   One way you can help support it is to order your Stampin’ Up products through me.   Click HEREto place an order and have your order delivered directly to your door step from Stampin’ Up!    Want to become a Stampin’ Up Demonstrator , receive a 20% discount on product and earn instant income on orders, get to purchase products before they are released to the public?  Consider being part of my Stampin’ Up Team and start your own business or become a Hobby Demo just for the discount.  Click HERE for more information.


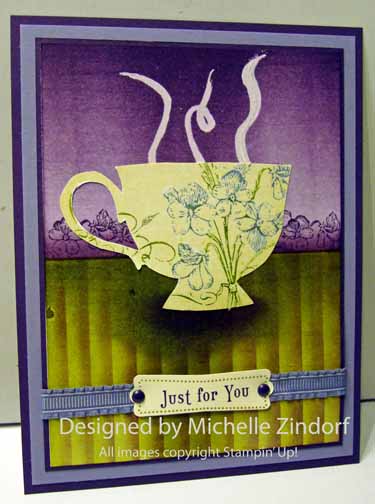
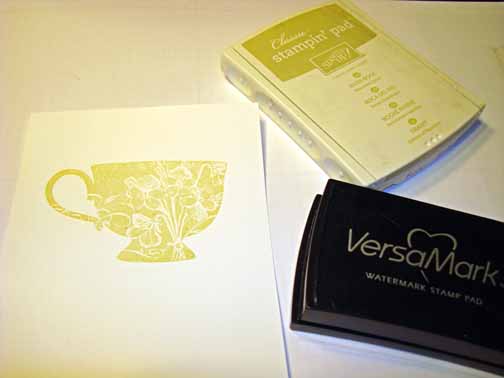
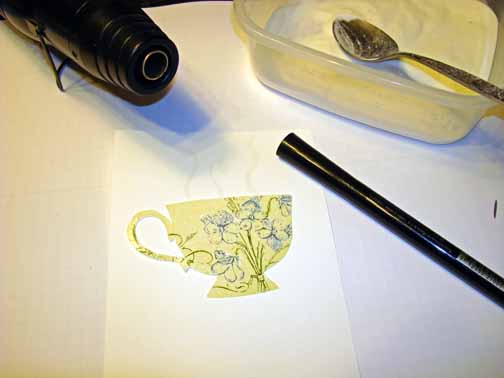
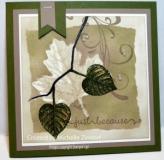
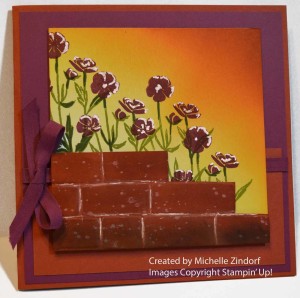
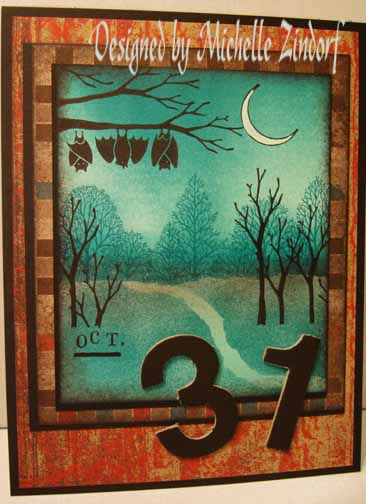
Stamped the teacup by loading it with Versamark and then with River Rock before stamping it on Whisper White card stock.

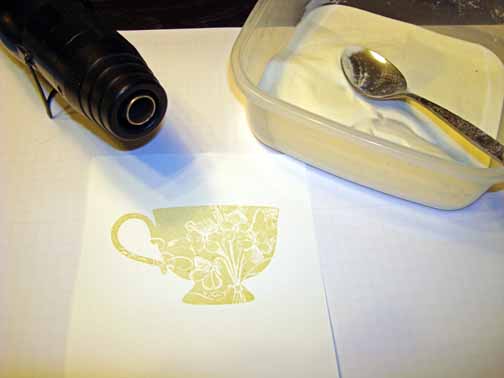
Heat embossed the image using clear embossing powder and a heat gun.

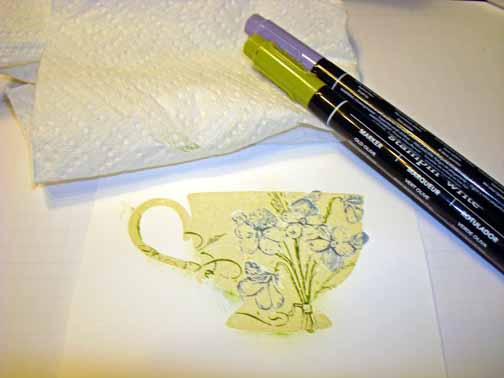
Colored the openings in the cup design using a Wisteria Wonder and Olive markers.   Wiped the excess marker off of the embossed image using a paper towel.
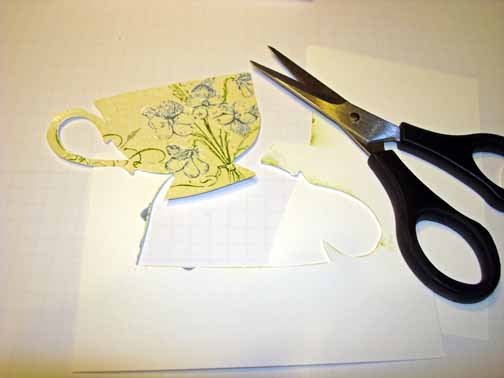
 

Cut the cup out.


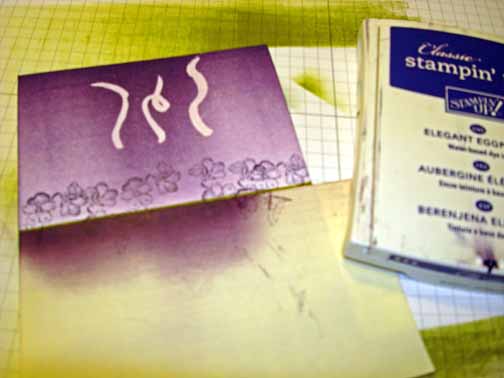
Laid my cup (don’t adhere yet ) on a 4.25″ x 5.75″ piece of Whisper White card stock and then added a few steam lines using my Versamark marker above the cup.  Heat embossed the steam lines using clear embossing powder and a heat gun.

Masked the bottom of the card stock using a post it note.

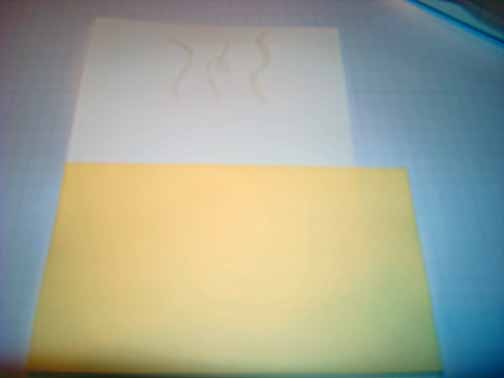
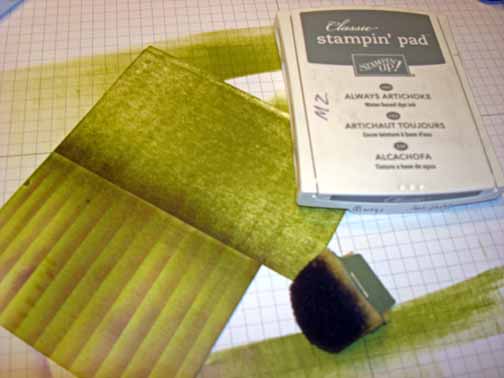
Brayered Elegant Eggplant ink at the top of the card stock.

Unmasked the bottom of the card stock and masked the top of the card stock.  Brayered Old Olive ink at the bottom of the card stock.

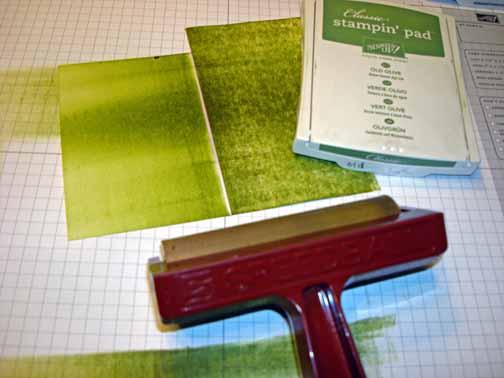
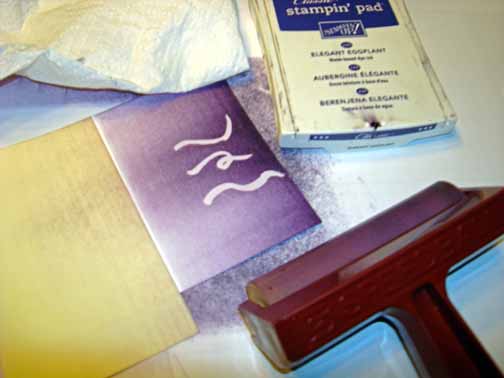
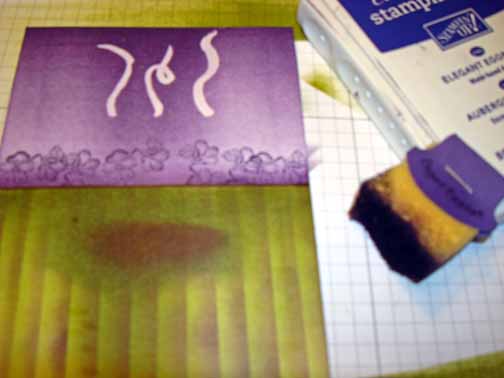
Using another post it note, sponged in stripes on the table cloth using Elegant Eggplant ink.  Sponged at the post it note edge and then moved a bit down for the next stripe.

Continue until you have the whole table cloth striped.

Sponged Always Artichoke at the top of the table cloth.

Remasked the bottom of the card stock and stamped the pansy stamp repeatedly across the bottom of the wall using Elegant Eggplant ink.

Sponged Elegant Eggplant ink at the bottom of the wall at the post it note edge.

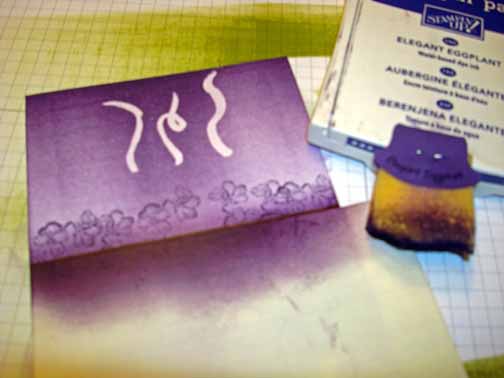
Created a shadow for the cup by sponging a spot of Always Artichoke ink and then inside that spot sponged a spot of Elegant Eggplant ink.

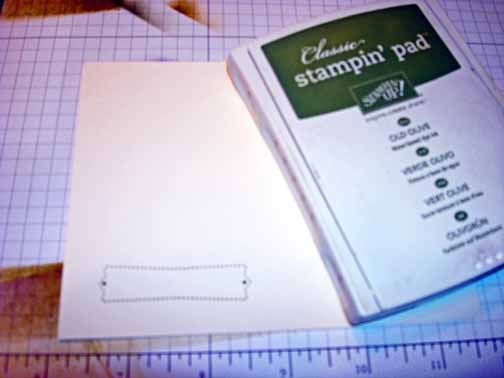
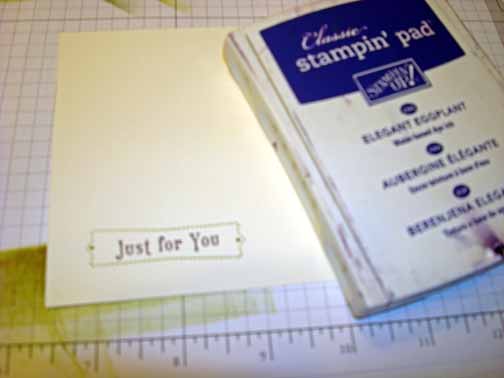
On a scrap of Very Vanilla card stock stamp the label outline stamp using Old Olive ink.

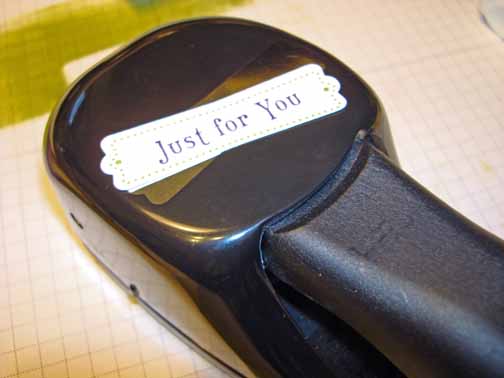
Stamped the sentiment inside of the label stamp using Elegant Eggplant ink.

Punched the image out.

Added two Elegant Eggplant panels, one Wisteria Wonder panel, my tea cup, Wisteria Wonder ribbon, my label and Elegant Eggplant brads.


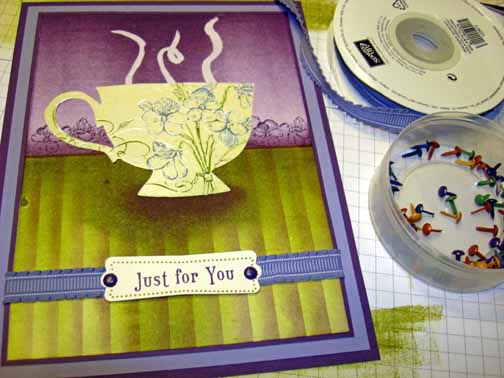
Here is the finished card measuring 5″ x 6.5″.

May your day be as warm and inviting as a good cup of tea!

Until my next post. . . . . . .

Hugs,

Get ready for Brayer and Direct to Paper Workshops!  I am coming to the following locations, click the location name for more information.

Dayton, Ohio – Direct to Paper Workshops

Dayton, Ohio – Brayer Workshops

Las Vegas, Nevada

Austin, Texas

Seattle, Washington

Greeneville, Tennessee

Indianapolis, Indiana

Indiana, Pennsylvania

Sparta, New Jersey

Piedmont, Alabama

Post Falls, Idaho (outside of Coeurd’Alene)

Sand Lake, Michigan (just North of Grand Rapids)

Lawrence, Kansas

Elizabethtown, Kentucky

West Bend, Wisconsin

Longmont (Gunbarrel), Colorado

Orange, Massachusetts

Sacramento, California

Staley, North Carolina


Here is a link to my workshop calendar where you can see all of my travel schedule and to get info on beginner and advanced Brayer workshops, along with the newly added Direct to Paper Workshop: https://zindorf.splitcoaststampers.com/workshop-calendar

Don’t see a workshop in your State?  Interested in hosting the workshops in your area   Click HERE to get hostess information.

Link to my Stampin’ Up website where you can order all of your must have Stampin’ Up products from me 24-7: https://michellezindorf.stampinup.net


Stampin’ Up! Holiday Set Sneak Peek

I’m really on a roll today.  I just received my pre-order from the Stampin’ Up! Holiday Mini Catalog and could not wait to start stamping away.  I do have a tutorial for this card, but I will have to wait until after the release of the catalog on September 1, 2011 to put it up on the blog.

One of the most fun things about being a Stampin’ Up! Demonstrator is getting the products before the general public gets them.   I’m so very impatient and I want it all and want it all now, so getting the products early and better yet, at a discount really rocks!

If you are interested in learning more about becoming a Stampin’ Up! Demonstrator, please contact me 937-344-1312 or [email protected].  I would love to talk to you about how Stampin’ Up can fit into your life, whether you just want the product discount or if you want to start your own business.   Doing what you love is awesome!  Besides, my Stampin’ Up! Ink to Art Team would love to welcome you on board.

I asked my last workshop students what they would like to see me create next.  One suggestion was a fall scene.   Well here you go!

Supplies for this project:

Stamps:   Stampin’ Up! Lovely as a Tree (current set), Calendar Alphabet & Numbers (Current) and Out on a Limb (not released yet)

Paper:  Stampin’ Up! Well Worn Designer Series Paper, Basic Black and Whisper White card stock

Ink:  Stampin’ Up! Basic Black, Island Indigo, Baja Breeze

Accessories:  Stampin’ Up Chip Board numbers, Brayer, Sponges, Basic Black marker, White Gel Pen, Post it notes

May your day be filled with Surprises!

Until my next post. . . . .  .

Hugs,

   Get ready for Brayer Workshops!  I am coming to the following locations, click the location name for more information.    

Monroe, Connecticut       

Dayton, Ohio     

Leesburg, Florida       

Montreal, Wisconsin       

Savannah, Georgia       

Lincoln, Illinois       

Jefferson, Louisiana (New Orleans Area)    

Las Vegas, Nevada   

Austin, Texas 

Greeneville, Tennessee

Indianapolis, Indiana

Indiana, Pennsylvania

Lawrence, Kansas

Staley, North Carolina

Here is a link to my workshop calendar where you can see all of my travel schedule and to get info on beginner and advanced Brayer workshops, along with the newly added Direct to Paper Workshop: https://zindorf.splitcoaststampers.com/workshop-calendar        

Don’t see a workshop in your State?  Interested in hosting the workshops in your area in 2012?   Click HERE to get hostess information.       

Link to my Stampin’ Up website where you can order all of your must have Stampin’ Up products from me 24-7:  https://michellezindorf.stampinup.net