Category Archives: Tools

Tool Tip – Ink Pads – Storage By Color

How do you store your ink pads, by color?

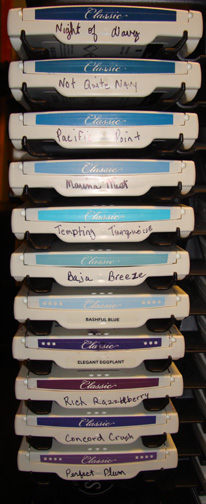
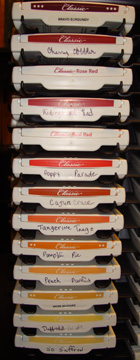
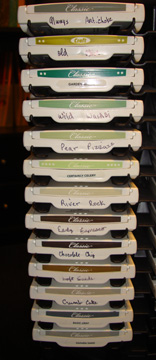
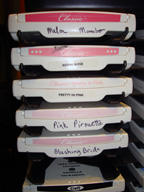
Since I generally like to select a couple different colors at one time from the same color family, Blues for instance, I store my ink pads by color family.    All my blues from dark to light etc.

This makes selecting a light tone, medium tone and dark tone of the same color very quick and easy.  Besides it is very inspirational looking at the colors lined up in this manner.

The rack I am using is the Stampin’ Up Color Caddy (item #104335) with the extender kit (item #107063).  It holds all of my inks and my reinkers on top.  🙂  You can find these items on page 193 of the 2010/2011 Idea book and catalog.

Below is a picture of the other color families and how I have them organized.


I hope you have found this tool tip useful.  I would love to hear how you store your ink pads and so would many of the readers here.  So let’s hear from you in the comment section.

One more tip for today, if you are looking for one of my past card tutorials, click the link at the top of my blog named, you got it, TUTORIALS.   This will take you to a page with thumbnail size pictures of the cards, click on the card pic and you will be taken to that tutorial.  No need to look back through my posts to find something.  🙂

Until my next post. . .  . .

Huge Hugs,

Michelle

   Get ready for Brayer Workshops!  I am coming to the following locations, click the location name for more information.  

Houston, Texas  

Wichita, Kansas  

Syracuse (Bridgeport), New York  

St. Peters, Missouri  

La Porte, Indiana  

Orlando (Davenport), Florida  

St. Cloud, Minnesota  

Colorado Springs, Colorado  

Ottumwa, Iowa  

Owings Mills, Maryland (Baltimore Area) 

Cleveland (Euclid), Ohio  

Staley , North Carolina (South of Greensboro)  

Monroe, Connecticut  

Leesburg, Florida  

Montreal, Wisconsin  

Savannah, Georgia  

Lincoln, Illinois  

Jefferson, Louisiana (New Orleans Area)  

Here is a link to my workshop calendar where you can see all of my travel schedule and to get info on beginner and advanced Brayer workshops:   https://zindorf.splitcoaststampers.com/workshop-calendar   

Don’t see a workshop in your State?  Interested in hosting the workshops in your area in 2012?   Click HERE to get hostess information.  

Link to my Stampin’ Up website where you can order all of your must have Stampin’ Up products from me 24-7:  https://michellezindorf.stampinup.net

Tool Time – Stampin’ Up! Clear Mount Stamps

dsc04895.JPG     dsc04904.JPG  

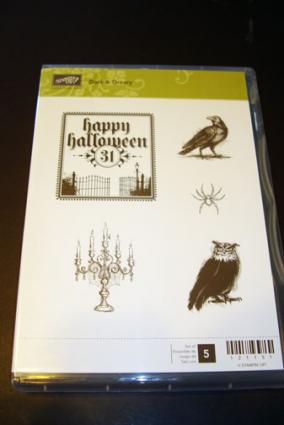
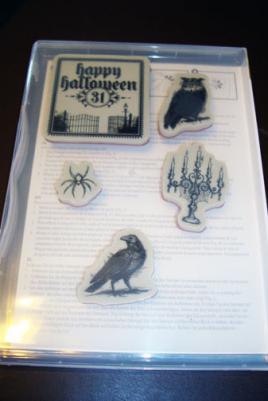
Have you checked out the Clear Mount Stamps from Stampin’ Up?   Now I said “Clear Mount” not “Clear Stamps”.  These stamps are the same quality Red Rubber Stamps that we have come to expect from Stampin’ Up.  They are just made to be used with a clear block instead permanent wood blocks.  They are also a bit less in cost.  They come in DVD size storage boxes, awesome!   I can store 2 of these sets in the same space that it takes to store one wood mount set in.  Think, double your stamp storage.  You could have double the stamps without your husband catching on, lol.

Now, I haven’t converted over to all clear mounted stamps.  I am just getting the feel for them.  This is actually the first set that I have put together.  I know, where have I been? 

Anyhow, I put this post together so you  can see how they go together.  Check it out!

I’m going to take you through the process of mounting the upper left hand corner stamp.  It says Happy Halloween.   When you get your stamps they will be in a sheet.  You will punch out the stamp you want to use.

dsc04896.JPG

See it has a paper backing.  Peel that off.

dsc04897.JPG

Now you can see these stamps already have a great foam backing.  No added prep work or expense for you.  🙂

dsc04898.JPG

This is the sticker sheet.

dsc04899.JPG  

Peel the paper backing off of the image you are using.  There is a slit in the middle of the paper backing on each sticker to make this easy. 

Leave it on the sheet, just take the backing off.

dsc04900.JPG

Line your stamp up to the outline on the sticker sheet and press firmly.

dsc04901.JPG

Lift the stamp up and your sticker is mounted perfectly on the back of the stamp.  This side is what sticks to the acrylic blocks.   When you go to stamp it you can see the image through the block so you know just where it is going to stamp.  🙂  Love that!

dsc04902.JPG

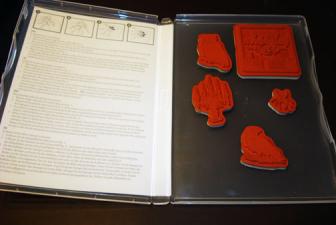
The stamps stick to the inside of the case that they come into.  When the case is closed you can see the images through the back of the case also.

dsc04903.JPG   dsc04904.JPG

Now about the clear blocks, you can purchase them from Stampin’ Up! singly, or in a set.  Stampin’ Up also sells this awesome case to store your blocks in.  🙂

dsc04894.JPG

Now I’m off to play with my new set of stamps.

Hugs for now,

Michelle

 dsc04164-2.jpg  Get ready for Brayer Workshops!  I am coming to the following locations, click the location name for more information.

Venice, Florida

Grinnell, Iowa

Piedmont, Alabama (Near GA border close to Cedartown)

Auburn, Washington (near Seattle)

Elk Grove Village, Illinois

Savannah, Georgia

Atlanta, Georgia

Milton, West Virginia

Soledad, California

Fayette, Tennessee near Nashville, TN & Huntsville, AL

Tucson, Arizona

Virginia Beach, Virginia

Houston, Texas

Wichita, Kansas

Syracuse (Bridgeport), New York

St. Peters, Missouri

La Porte, Indiana

Orlando (Davenport), Florida

Colorado Springs, Colorado

Cleveland (Euclid), Ohio

Here is a link to my workshop calendar where you can see all of my travel schedule and to get info on beginner and advanced Brayer workshops:   https://zindorf.splitcoaststampers.com/workshop-calendar 

Link to my Stampin’ Up website where you can order all of your must have Stampin’ Up products from me 24-7:  https://michellezindorf.stampinup.net

Frequently asked questions answers:  https://zindorf.splitcoaststampers.com/frequently-asked-questions/ 

Tool Time – Coloring Ribbon

dsc03991.JPG

This is a quick tool time tip. 

If you don’t have ribbon that is just the right color to match your project.  Take Whisper White Ribbon and sponge ink on it to match your project.   I like to use Classic Dye Ink for this.  It dries quickly.  🙂

Click HERE for other Tool Time Tips.

Hugs!

Michelle

dsc03326-2.jpg   Get ready for Brayer Workshops!  I am coming to:

St. Cloud, Minnesota (1 spot available)

Rockville, Maryland

North Chili, New York (near Rochester)

Kenova (Huntington), West Virginia

Helena, Montana

Middleburg Heights, Ohio (Sold Out)

Venice, Florida

Grinnell, Iowa

Piedmont, Alabama (Near GA border close to Cedartown)

Auburn, Washington (near Seattle)

Elk Grove Village, Illinois

Savannah, Georgia

Atlanta, Georgia

Soledad, California

Here is a link to my workshop calendar where you can see all of my travel schedule and to get info on beginner and advanced Brayer workshops:   https://zindorf.splitcoaststampers.com/workshop-calendar 

Link to my Stampin’ Up website where you can order all of your must have Stampin’ Up products from me 24-7:  https://michellezindorf.stampinup.net

Frequently asked questions answers:  https://zindorf.splitcoaststampers.com/frequently-asked-questions/ 

Tool Time – Organizing and Keeping Sponges for Each Ink Color

dsc02609.JPG

Today I have a little Tool Time segment for you on sponge organization.  I gave up along time ago trying to keep a sponge for each color of ink I have, until I seen this cute and quick idea.  I am not sure who to give credit to since I have heard this idea from a few different sources.  But it is such a good idea I thought I would try it and share it with you.

Supplies:

Stampin’ Up! Sponges, Item #101610 – cut into wedges

Stampin’ Up! Round Tab Punch, Item #108340

A scrap of each color of card stock that matches your ink colors.  If you don’t have colored card stock to match your ink colors, smear ink on white card stock.

Stapler

Stampin’ Up has card stock that matches all of their ink colors, so using the Stampin’ Up! tab punch, punched one tab out of each color card stock that I have in ink.  Pardon me, but I have them all, lol.  By the way, so should you.  🙂  I know I am an enabler, I hear that often.

dsc02607.JPG

Next fold the tab over a wedge of sponge and staple it.  The colored tab not only lets you quickly identify the ink color that the sponge is designated for, but also gives you something to hold onto when sponging.

dsc02608.JPG

I have this plastic container that has dividers in it.  I found it to be perfect to store my sponges.

dsc02609.JPG

This little project only took me about 30 minutes to throw together and will hopefully save me a bit of time and money.

I hope you enjoyed this little Tool Time segment.  Let me hear from you  in the comments section if you have great craft organization tips to share.

May your day be filled with lots of belly laughs.  🙂

Until my next post.  . . .  . . . . . . . . ..

Hugs,

Michelle

dsc09393-teeny-tiny.jpg  Get ready for Brayer Workshops!  I am coming to:

Monroe, Louisiana (just a couple of seats left)

Jacksonville, Florida

 St. Louis, Missouri

Mechanicsville, Virginia

Raleigh, North Carolina 

Colleyville, Texas

Colorado Springs, Colorado

 Boise area of Meridian, Idaho

Riverside, California (Southern California)

Salem, Oregon

Wheaton, Illinois

St. Cloud, Minnesota

Rockville, Maryland

North Chili, New York (near Rochester)

New Johnsonville, Tennessee

Kenova (Huntington), West Virginia

Helena, Montana

Middleburg Heights, Ohio

Venice, Florida

Grinnell, Iowa

Piedmont, Alabama (Near GA border close to Cedartown)

Auburn, Washington (near Seattle)

Elk Grove Village, Illinois

Savannah, Georgia

Atlanta, Georgia

North Liberty, Indiana

Saledad, California

Here is a link to my workshop calendar where you can see all of my travel schedule and to get info on beginner and advanced Brayer workshops:   https://zindorf.splitcoaststampers.com/workshop-calendar 

Link to my Stampin’ Up website where you can order all of your must have Stampin’ Up products from me 24-7:  https://michellezindorf.stampinup.net

Frequently asked questions answers:  https://zindorf.splitcoaststampers.com/frequently-asked-questions/ 

Tool Time – Stamp-a-ma-jig

dsc01815.JPG

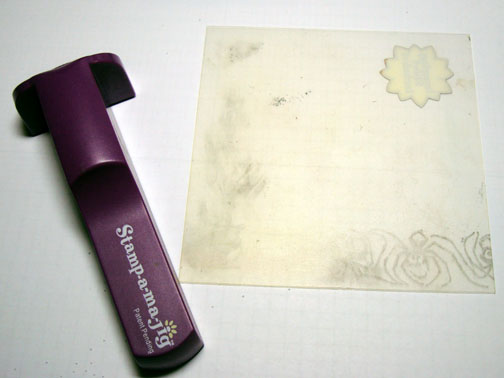
In this little tool time post, I am going to demonstrate how to use a Stamp-a-ma-jig, Stampin’ Up! item number 101049, $11.95.  This little tool has saved me from trashing many a project.  🙂  I do not stamp a sentiment any more without using this tool.  The Stamp-a-ma-jig helps you to stamp right where you want to on your project.   There is nothing worse than putting together a great scene and then go an stamp a crooked sentiment on it.    This tool will keep you from doing that.  Gotta love it.   The Stamp-a-ma-jig comes with the plastic sheet and the handle.

As you see above in the picture, my Stamp-a-ma-jig has seen lots and lots of use and the clear plastic sheet does get stained over time.  This is one of the tools I keep within reaching distance on my desk.  So I feel it is a tool worthy of a tool time post.

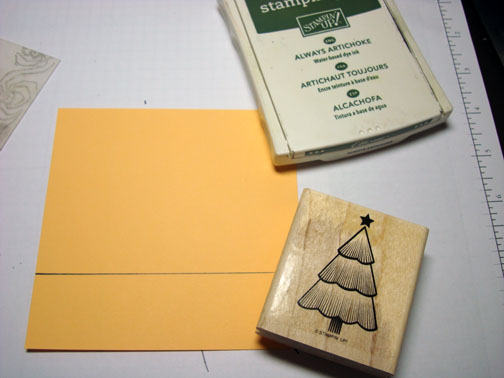
What I am stamping is for demonstration purposes only.  I picked a piece of colored card stock and drew a straight line across just so you could see it well in the demonstration.  You do not need to draw a line on your projects.

Let’s get started. . . . . . . .
dsc01816.JPG

You take the plastic sheet that comes with the Stamp-a-ma-jig handle and put it against the handle as shown below.  Make sure it is against the handle on the left side and the bottom.
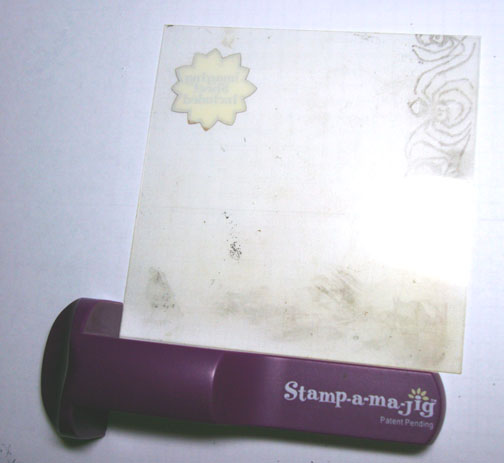
dsc01817.JPG

Take your stamp and load it with ink and then place it against the handle on the left and bottom and then lower it down to the plastic.
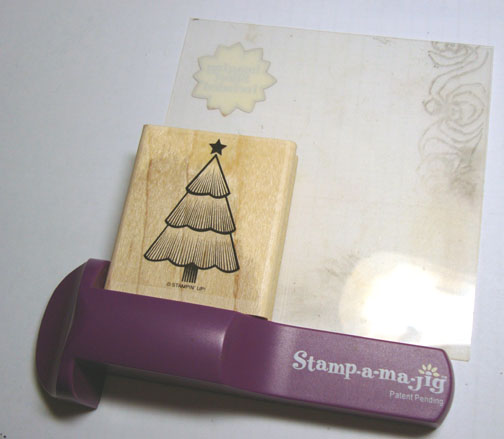
dsc01818.JPG

Lift the stamp up and you will see you have the image now stamped the the clear plastic.
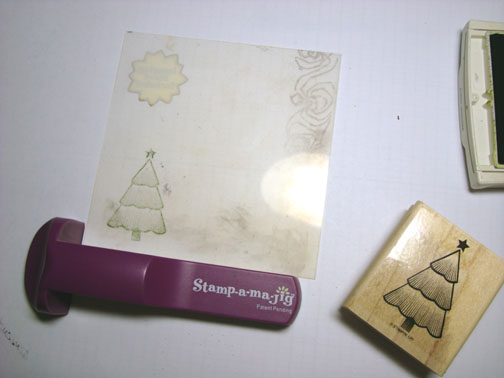
dsc01819.JPG

Take the clear plastic and put it on your project so the image is where you want it to be.
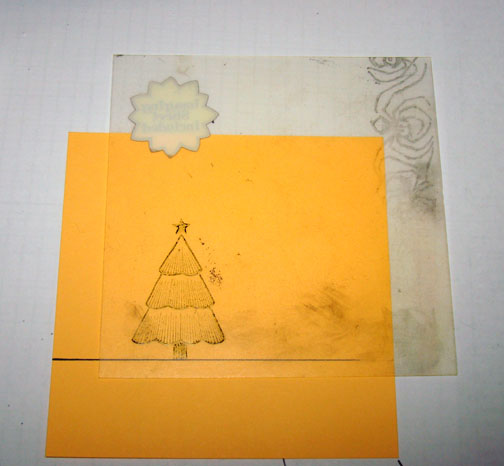
dsc01820.JPG

Hold the plastic in that position with one hand the put the handle against the plastic with the other hand.  Make sure the plastic is against the handle at the left and bottom.  Do this by moving the handle, not the plastic.
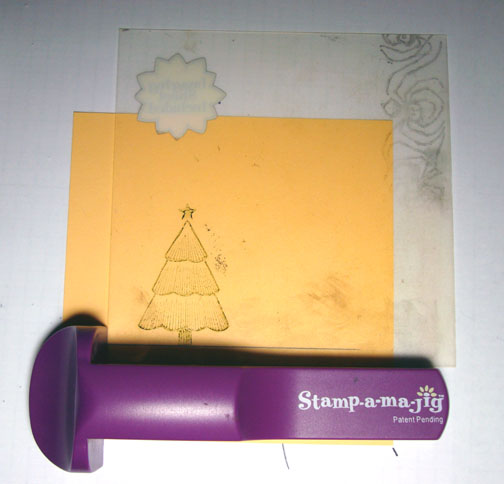
dsc01821.JPG

Hold the handle in place and remove the plastic.   Put the stamp against the handle so it is against the left and bottom then lower down to the card stock and stamp your image.
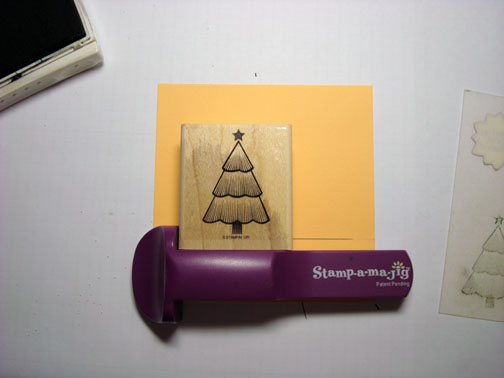
dsc01822.JPG

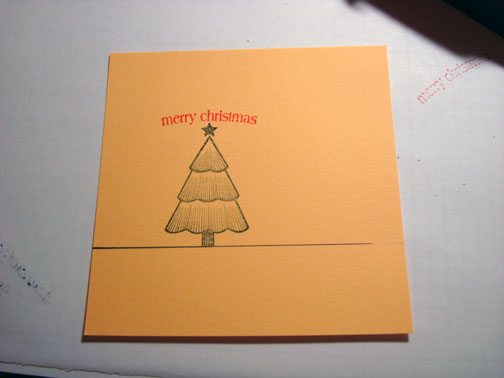
You can get really precise with stamping your images with this tool.  See I stamped the tree right on the line I had drawn.  See it’s a miracle!  My tree isn’t leaning to one side or anything, lol.
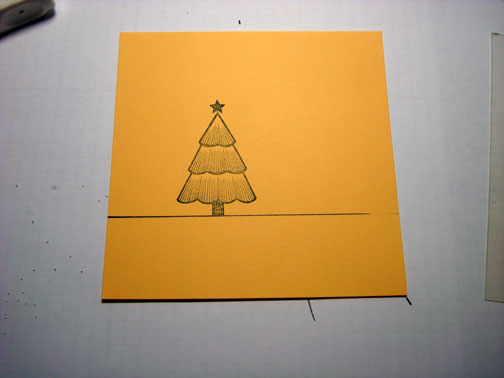
dsc01823.JPG

Now to stamp a sentiment over the tree. 

Wipe the tree image off of the plastic sheet.
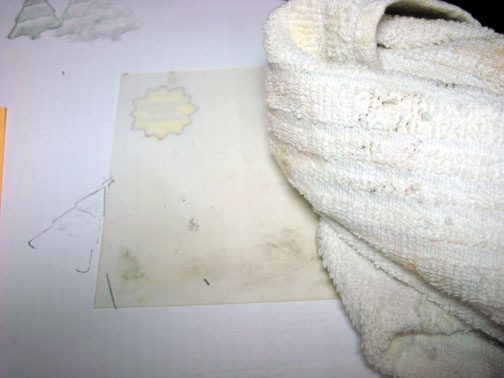
dsc01824.JPG

Line the plastic sheet up against the left and bottom of the handle.  Ink your stamp and lower your stamp down to the plastic sheet while your stamp is against the left and bottom of the handle.
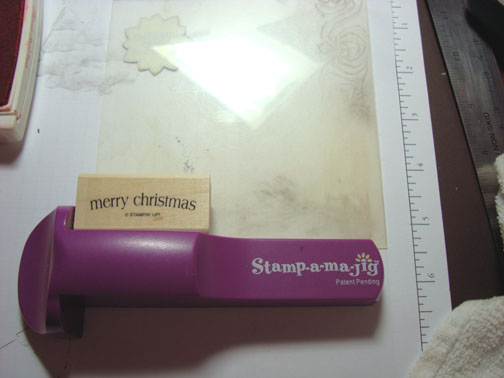
dsc01825.JPG

Now you have your image on the plastic sheet.
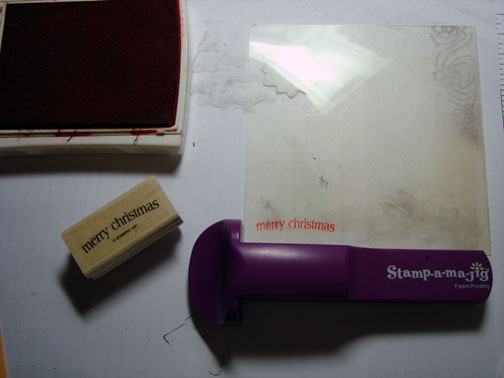
dsc01826.JPG

Take the plastic sheet and and put it over you project.  Move it around until you find just where you want your image to be.
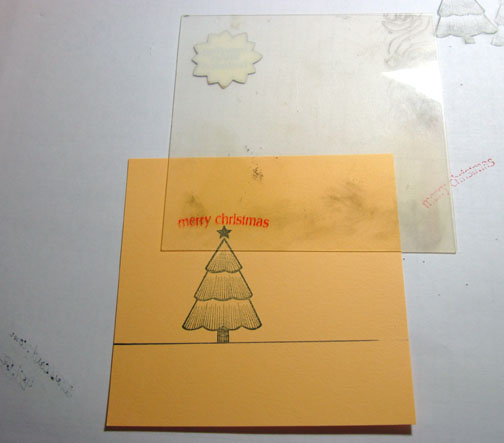
dsc01827.JPG

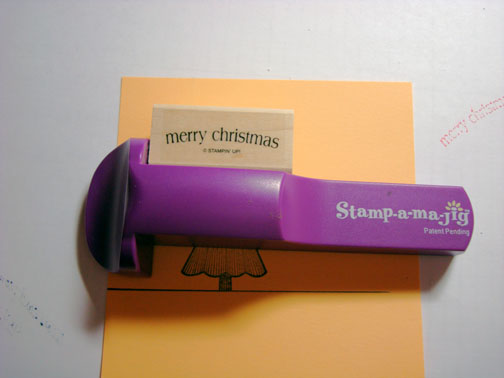
Hold the plastic piece in place and line the handle up against the bottom and left side of the plastic.
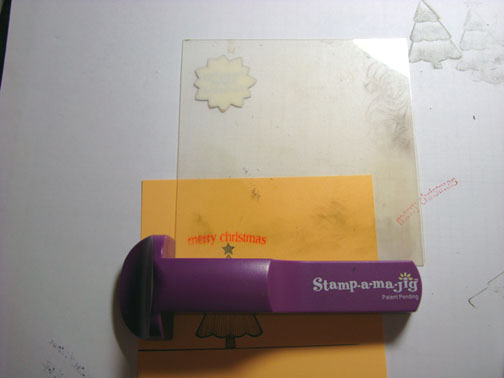
dsc01828.JPG

Remove the plastic without moving the handle.   Lower your stamp down on the handle so it is against the left and bottom of the handle, then lower it onto the card stock and make your impression.
dsc01829.JPG

There is my sentiment, right where I wanted it.
dsc01830.JPG

The Stamp-a-ma-jig, just like my hero, Martha would say “It’s a good thing”.

dsc01815.JPG

The sun is shining and it is going to reach 50 degrees here in Ohio today.  With all the traveling I have been doing I have yet to do my Autumn clean up in my gardens, so off I go to work outside.

May you also feel the warmth of the sun on your face today.

Huge Hugs,

Michelle
dsc00599.jpg  Get ready for Brayer Workshops!  I am coming to:

2010

Dayton, Ohio at Marco Paper

Phoenix, Arizona

Monroe, Louisiana

Jacksonville, Florida

 St. Louis, Missouri

Mechanicsville, Virginia

Raleigh, North Carolina 

Colleyville, Texas

Colorado Springs, Colorado

 Boise area of Meridian, Idaho

Riverside, California (Southern California)

Salem, Oregon

Wheaton, Illinois

St. Cloud, Minnesota

Rockville, Maryland

North Chili, New York (near Rochester)

New Johnsonville, Tennessee

Kenova (Huntington), West Virginia

Helena, Montana

Middleburg Heights, Ohio

Venice, Florida

Grinnell, Iowa

Piedmont, Alabama (Near GA border close to Cedartown)

Auburn, Washington (near Seattle)

Elk Grove Village, Illinois

Savannah, Georgia

Atlanta, Georgia

Saledad, California

Here is a link to my workshop calendar where you can see all of my travel schedule and to get info on beginner and advanced Brayer workshops:   https://zindorf.splitcoaststampers.com/workshop-calendar 

Link to my Stampin’ Up website where you can order all of your must have Stampin’ Up products from me 24-7:  https://michellezindorf.stampinup.net

Frequently asked questions answers:  https://zindorf.splitcoaststampers.com/frequently-asked-questions/ 
Sponges – Tool Time

dsc01437.JPG

Sponges, sponges and more sponges.  If you are a stamper, you probably use them and use a lot of them.   I am currently using Stampin’ Up! sponges in my stamping.  They come in a pack of 3.  I cut each sponge into 12 pieces.  Yes, that’s right, 12 pieces!  I have seen stampers use very large chunks of sponge, like 1/4 of a whole sponge.  I find it is much easier to control the ink on a littler piece of sponge.  Granted, my fingers get inky when using the smaller pieces of sponge, but they are inky anyway, lol.

I don’t have a sponge dedicated to each ink color that I have either.  That is way too time consuming for me to keep track of, or I am just to lazy to do so, lol.  I’ll let you decide.  🙂

I use a piece of sponge for a color and then throw it in a basket I keep at my work space. 

dsc01438.JPG

When I have enough inky sponges I put them in a lingerie bag and send them through the washing machine.  By themselves of course!   They will come out stained, but the color will not transfer to the next project they are used on.    This is my way of currently staying “Green” at home in regards to sponges.  🙂

dsc01439.JPG

What is your sponge system?  Inspiring stampers want to know.  🙂

Until my next post. . . .  .

Huge Hugs,

Michelle

dsc01434.jpg  Get ready for Brayer Workshops!  I am coming to:

Portland, Michigan  (Only 2 beginner workshop spots left)

2010

Dayton, Ohio at Marco Paper

Phoenix, Arizona

Monroe, Louisiana

Jacksonville, Florida

 St. Louis, Missouri

Mechanicsville, Virginia

Raleigh, North Carolina 

Colleyville, Texas

Colorado Springs, Colorado

 Boise area of Meridian, Idaho

Riverside, California (Southern California)

Salem, Oregon

Wheaton, Illinois

St. Cloud, Minnesota

Rockville, Maryland

North Chili, New York (near Rochester)

New Johnsonville, Tennessee

Kenova, West Virginia

Helena, Montana

Middleburg Heights, Ohio

Venice, Florida

Grinnell, Iowa

Piedmont, Alabama

Auburn, Washington (near Seattle)

Elk Grove Village, Illinois

Savannah, Georgia

Atlanta, Georgia

Soledad, California

Here is a link to my workshop calendar where you can see all of my travel schedule and to get info on beginner and advanced Brayer workshops:   https://zindorf.splitcoaststampers.com/workshop-calendar 

Link to my Stampin’ Up website where you can order all of your must have Stampin’ Up products from me 24-7:  https://michellezindorf.stampinup.net

Frequently asked questions answers:  https://zindorf.splitcoaststampers.com/frequently-asked-questions/ 

Tool Time – Unmounting Wheels

dsc00156.JPG

I haven’t posted a “Tool Time” post in quite some time, so when I was unmounting my Wheels (GASP) yesterday afternoon it dawned on me that I should be sharing this with you.

For some reason my wheels don’t get used at all.  Somehow I just cannot rap my head around when to use them.  With that in mind I made the leap and unmounted them so I could then use them as I would any unmounted stamp.  Especially since I love, love, love the wheel images.  Now this is my preference, I am sure there are tons of people that would never ever think about unmounting their wheels and you use them all the time.  If you are one of those people, please don’t get mad at me for dissecting mine.  🙂

Here is how it is done.  First, take an Exacto Knife and cut right through the seam of the stamp when it is on the wheel.  Next peel the stamp off of the wheel.  I was very surprised at how easy they come off.  If there is glue stuck to the back of the stamp, peel it off.  I found I could just roll the glue off with my finger.

dsc00159.JPG

I took a permanent marker “Sharpie” and wrote the name on the back of the stamp.

Apply a thin coat of Aleene’s Tack it Over & Over Glue on the back of the stamp with a small paint brush, right over the name I wrote on.  The glue dries clear so you can still see the name.

Let this glue dry for about 1 hour, at least.  The Glue stays tacky so your stamps will now stick to an acrylic block (I use a 4.5″ x 7″ block) and you can take them on and off.  You will not have to apply this tacky glue to the stamp again until you have used this stamp about 50 times.

dsc00160.JPG

dsc00162.JPG

I store them in a large zip lock baggie. They stick right to the inside of the bag.   You can clearly see the name of the stamp through the baggie.   I also put a reference sheet in the bag with them and a reference sheet in my stamp binder.

dsc00163.JPG

If you unmount a bunch at one time you can stamp a few at one time on plain paper to make your reference sheets.

dsc00165.JPG

Photo of my Current Stampin’ Up Stamp binder.  This binder holds a reference sheet for all of my Stampin’ Up stamps.   When I get a new set of Stampin’ Up stamps I copy the sticker sheet before I assemble my stamps to the blocks and the copy gets put in my binder.  Takes very little time.  The binder is so nice to have to flip through to see what I have.  🙂

dsc00168.JPG

I hope you have found this tool time tip helpful.

Here is a link to all of my Tool Time posts:  https://zindorf.splitcoaststampers.com/category/tools/

Until my next post. . . . . . ..

Hugs,

Michelle