Tag Archives: Rubber Stamping tutorials

Christmas Faux Wood Wall – Tutortial #472

Hey There,

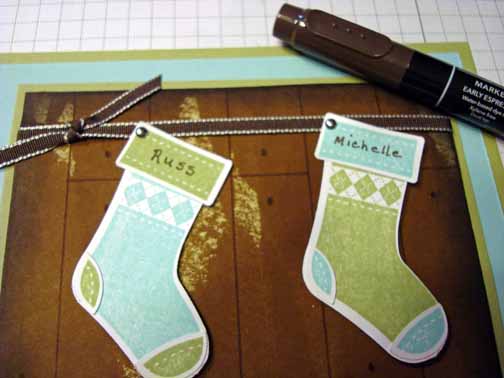
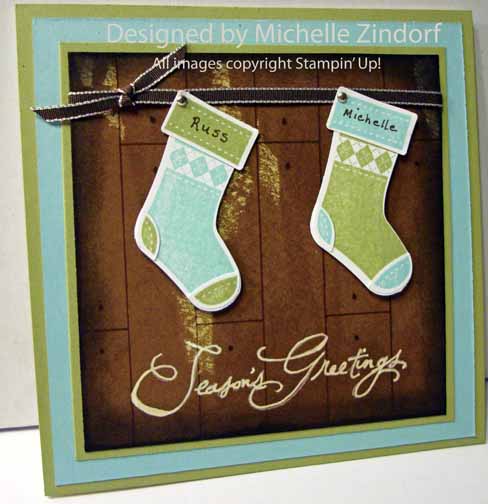
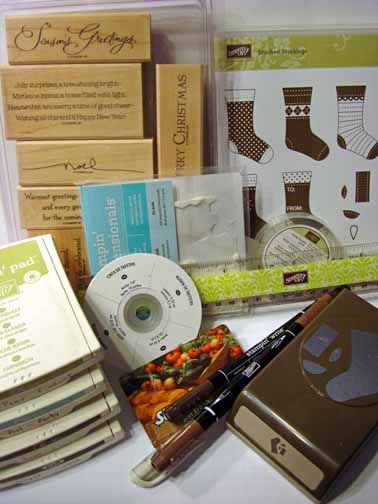
If you are like me you are scrambling trying to get those holiday cards all made.  Today’s tutorial below shows you how to put a faux wood wall in your Christmas scene.     This tutorial also highlights the cute Stampin’ Up! set Stitched Stockings and the matching punch (Click here to see them in the Stampin’ Up! Holiday Mini Catalog).   Love it when I don’t have to do any tedious cutting out of images.   The punch really mades quick work of it.   Check it out.

************************************************************

Reminders:

Click here to check out the stamp set give away.  The drawing is tomorrow, Saturday, December 3, 2011.

**********************************************************************

Also, here is the details for my Stampin’ Up! monthly Customer Giveaway.  Don’t miss out!

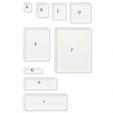
My drawing for December 2011 is a full set of Stampin’ Up! Clear Mount Acrylic Blocks and a rockin’ Stampin’ Up! Clear Block Storage Caddy to store them in.  The block set includes 9 different block sizes.    Total prize package is an $86.90 value.    How do you enter?   For the month of December, 2o11, when you place a Stampin’ Up!  order using me as your Demonstrator,  you will receive one entry toward this months prize for each $25 increment in merchandise purchased.  Place an order for $50 and get two chances and so on and so on.    CLICK HERE TO PLACE AN ORDER OR TO BROWSE.   Your order will be shipped directly to you from Stampin’ Up!.

Clear Block Bundle - by Stampin' Up!

If you stamp with clear-mount stamps, you’ll need a clear block to adhere your stamps to. Stampin’ Up’s blocks are a clear choice. Made from high-quality, sturdy acrylic, these blocks can hold one stamp or multiple stamps if you want to create a collage of images.

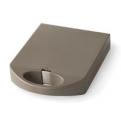
Clear Block Storage Caddy - by Stampin' Up!

This compact storage caddy holds one of each size of our clear-mount blocks. The foam insert securely holds the blocks in place; an additional foam insert sits between the blocks to protect them when the caddy is closed.

■ Opens flat for easy access
■ Locks shut
■ Built-in handle makes it easy to carry
■ 8-1/16″ x 10-5/8″ x 1-13/16″

I will use a random number generator to determine the winner on January 1, 2012.

*****************************************************************************

Now on with the tutorial. . . . .

Supplies:

Stamps:  Stampin’ Up!  Stitched Stockings and Many Merry Messages

Card Stock: Stampin’ Up! Pear Pizzazz, Pool Party, Whisper White and River Rock

Ink:  Stampin’ Up! Basic Black, Pear Pizzazz, Pool Party, Whisper White and Soft Suede

Accessories:  Stampin’ Up!  Mini Brads, Early Espresso Taffeta Ribbon, Stampin’ Dimensional, White Gel Pen, Chocolate Chip Marker, Ruler, credit card, Stockings Punch.

Want a free copy of the brand new Stampin’ Up! Holiday Mini Catalog?  Just e-mail your address and I will get one right out to you.  Get your copy of the new 2011-2012 Stampin’ Up! Idea Book & Catalog by sending $9.95 to me at P.O. box 116, West Alexandria, Ohio 45381 or via paypal to [email protected], shipping is free.      Are you getting inspiration from this blog?   One way you can help support it is to order your Stampin’ Up products through me.   Click HEREto place an order and have your ordered delivered directly to your door step from Stampin’ Up!    Want to become a Stampin’ Up Demonstrator , receive a 20% discount on product and earn instant income on orders?  Consider being part of my Stampin’ Up Team and start your own business or become a Hobby Demo just for the discount.  Click HERE for more information.

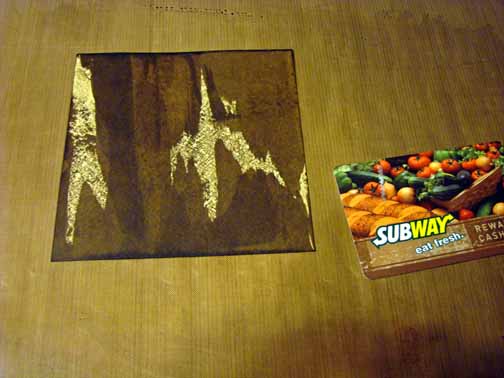
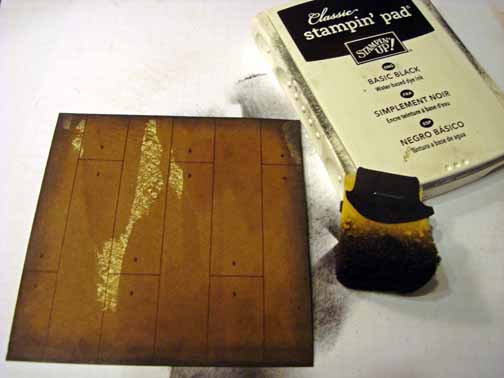
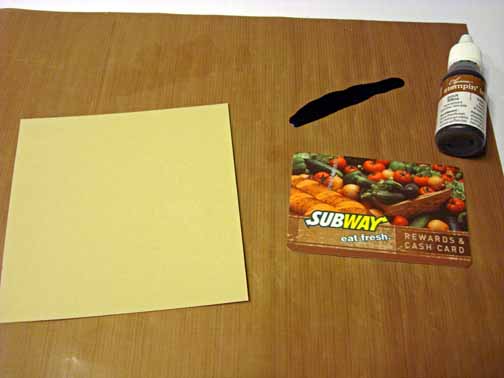
Working on a non porous surface, put a little Soft Suede Re-inker on in a line, dip the edge of a credit card, or in my case my Subway card, lol, in the ink and then drag it from the top down the card stock.  Keep applying the ink until you get the look you want.  I like to leave a bit of my card stock showing through.   (You can also turn the card stock and work from the bottom edge up to fill the card stock in).

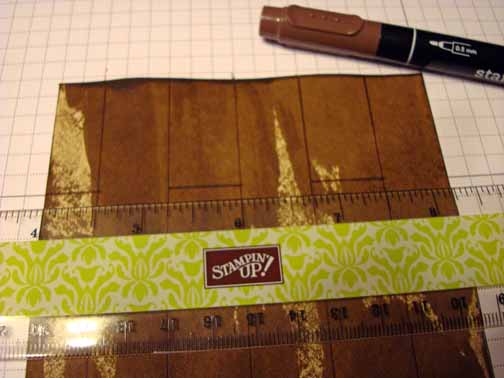
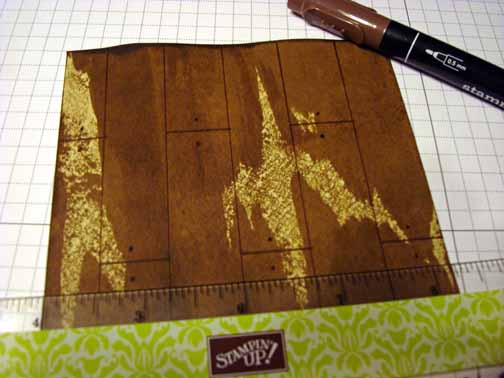
Using a ruler and lining things up with my grid pad below my card stock, made lines from the top of the card stock to the bottom every 3/4″.   Next made lines about 2″ from the top across every other section.   Moved the ruler down and and made a line across the sections I did not do above.

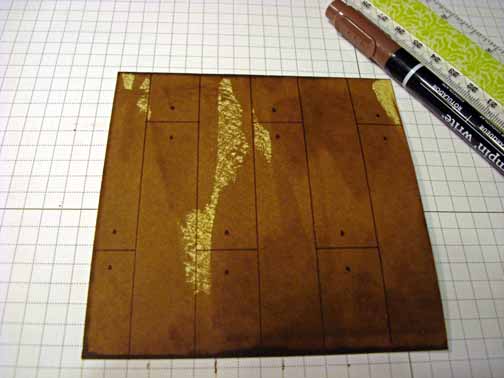
Added dots to simulate nail holes.

Sponged Basic Black ink around the edges to distress it.

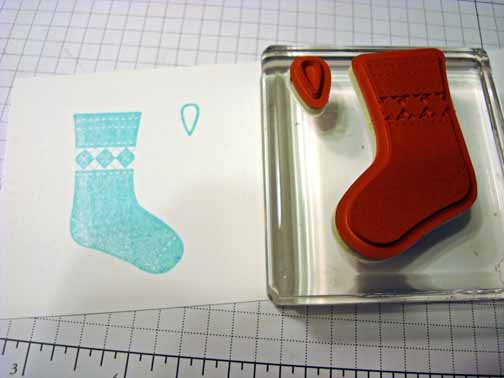
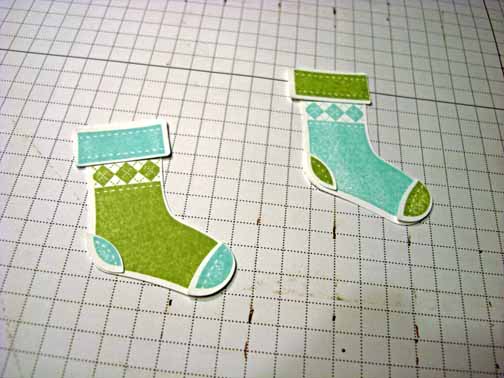
Stamped the stocking with Pool Party and with Pear Pizzazz on a scrap piece of Whisper White card stock.

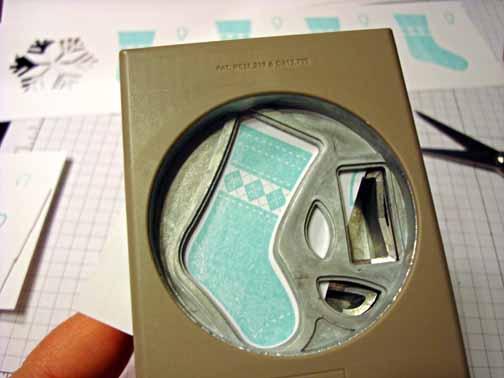
Punched the stockings out.  If you look from the bottom of the punch it is super easy to line things up.  🙂

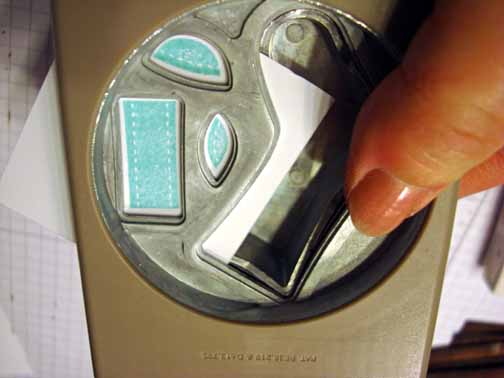
Stamped the toe, heel and band using Pear Pizzazz and Pool Party on Whisper White card stock.  Punch the images out.

Assembled my stockings.

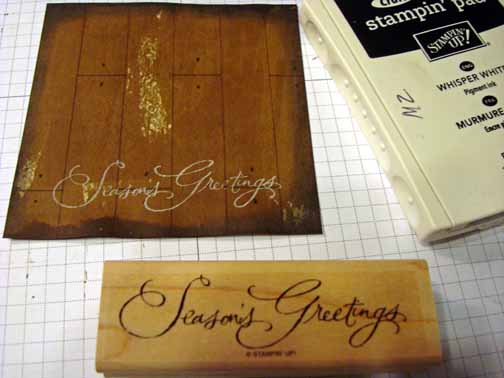
Stamped the Stampin’ Up! Many Merry Messages using Whisper White ink.

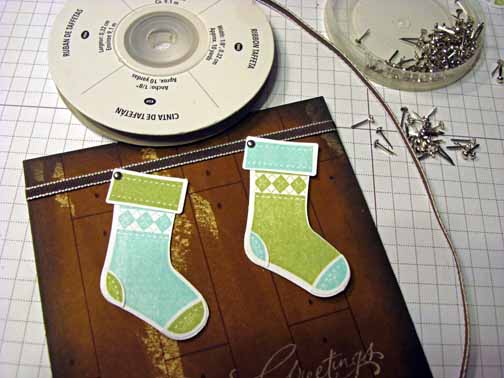
Added mini brads, Ribbon and a Stampin’ Dimensional under the toe of the stockings for some lift.

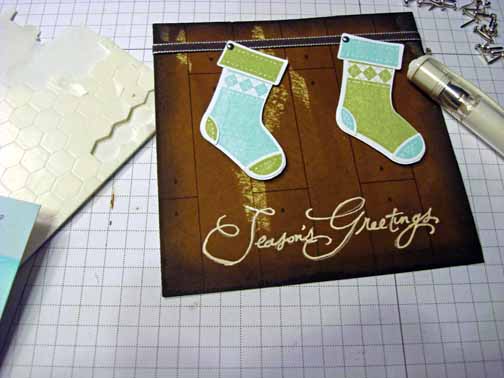
My sentiment wasn’t popping enough so I traced it using a White Gel pen.  Yep, now it pops!

Added 2 Pear Pizzazz layers and a Pool Party layer.  Also added Russ and my name using an Early Espresso marker.

Here is the finished card  measuring 5.25″ square.

May your day be filled with the spirit of the holidays.

Until my next post. . . . .

Hugs,
   Get ready for Brayer and Direct to Paper Workshops!  I am coming to the following locations, click the location name for more information.    

Dayton, Ohio – Direct to Paper Workshops 

Las Vegas, Nevada    

Austin, Texas 

Seattle, Washington

 Greeneville, Tennessee 

Indianapolis, Indiana 

Indiana, Pennsylvania 

Sparta, New Jersey 

Piedmont, Alabama

Post Falls, Idaho (outside of Coeurd’Alene)

 Sand Lake, Michigan (just North of Grand Rapids)

Lawrence, Kansas 

Elizabethtown, Kentucky

West Bend, Wisconsin 

Longmont (Gunbarrel), Colorado 

Orange, Massachusetts

Sacramento, California

Staley, North Carolina

 
Here is a link to my workshop calendar where you can see all of my travel schedule and to get info on beginner and advanced Brayer workshops, along with the newly added Direct to Paper Workshop: https://zindorf.splitcoaststampers.com/workshop-calendar        
 

Don’t see a workshop in your State?  Interested in hosting the workshops in your area   Click HERE to get hostess information.       
 

Link to my Stampin’ Up website where you can order all of your must have Stampin’ Up products from me 24-7:  https://michellezindorf.stampinup.net

Any Hooooo – Tutorial #409

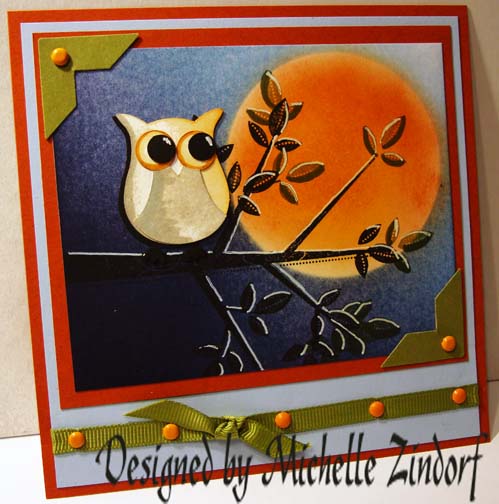
How stink’in cute is this punched owl?   This is the first time I used this punch and my mind is now racing with future ideas for it’s use.

Let’s get right into the tutorial today. . . . . .

Supplies:

Stamps: Stampin’ Up! Season of Friendship
Paper: Stampin’ Up! Whisper White, Cajun Craze and Bashful Blue
Ink: Stampin’ Up! Old Olive, Sahara Sand, Basic Black, Cajun Craze, More Mustard, and Concord Crush, Night of Navy and Not Quite Navy
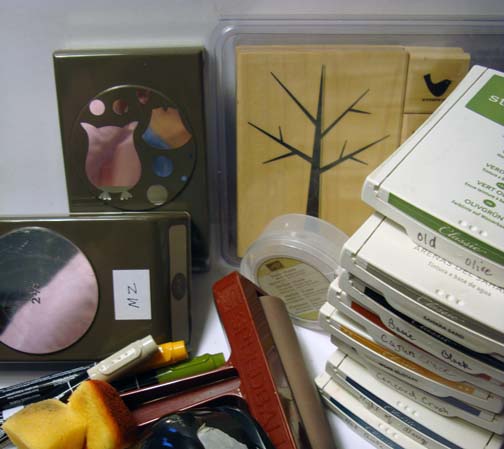
Accessories: Stampin’ Up! Owl, 2.5″ circle and Photo corner punches, Brads, Sponges, Brayer, Old Olive Ribbon, White Gel Pen, Sahara Sand, Old Olive and More Mustard Markers, Post it Note
Techniques: Brayering, Punch art


  My Stampin’ Up customers that order $50 in Stampin’ Up merchandise will receive this handmade card though March 31, 2011.

Don’t forget it is Sale-a-bration time at Stampin’ Up.  Receive a free Sale-a-bration set for each $50 in merchandise purchased.   Click HERE to place an order.   Your order will be shipped directly to your door step from Stampin’ Up!

The Stampin’ Up USA Idea book and Catalog is here.   For your copy, please send a check for $9.95 to Michelle Zindorf, P.O. Box 116, West Alexandria, OH 45381 or send it via paypal to [email protected] USA only.     My current customers will receive a new Occasions Mini Catalog automatically from me.   Not a current customer and want a free copy of the new Occasions Mini Catalog ?  E-mail your mailing address to [email protected] and I will get one in the mail to you.  )  Are you getting inspiration from this blog?   One way you can help support it is to order your Stampin’ Up products through me.   Click HERE to place an order.    Want to become a Stampin’ Up Demonstrator , receive a 20% discount on product and earn instant income on orders?  Consider being part of my Stampin’ Up Team and start your own business or become a Hobby Demo just for the discount.  Click HERE for more information.

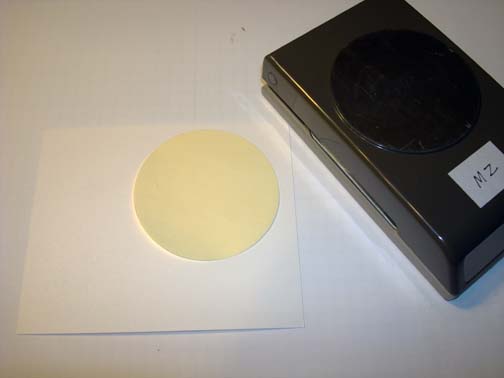
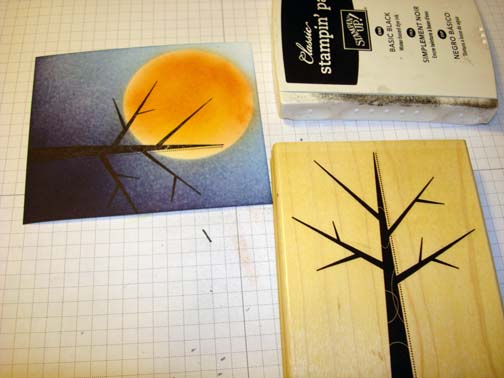
Punched a 2.5″ circle from the sticky part of a post it note and used it as a moon mask on a 3.5″ x 4.5″ piece of Whisper White card stock.

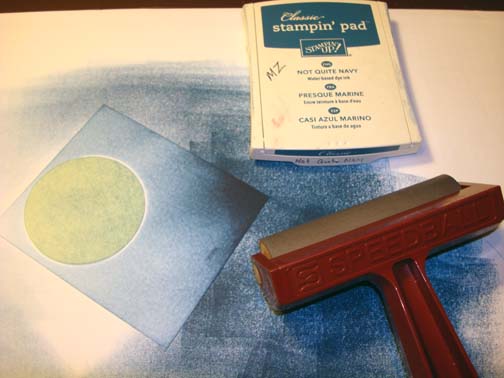
Brayered Not Quite Navy ink at an angle, starting at the bottom left corner.

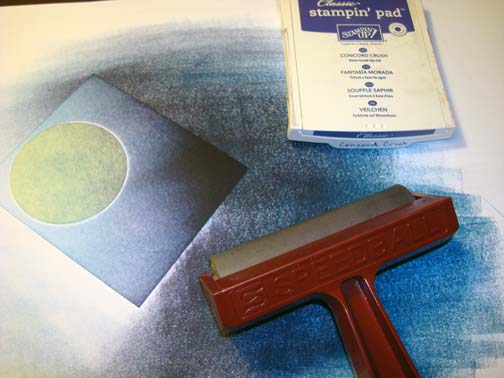
Brayered Night of Navy ink at the same angle, not covering all of the Not Quite Navy ink.

Added Concord Crush ink at the same angle not covering the Night of Navy ink entirely.

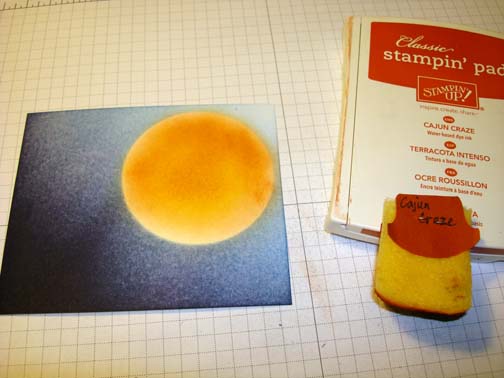
Removed the mask and sponge More Mustard ink in the moon.

Sponged some Cajun Craze ink in the moon area leaving the More Mustard ink showing in the middle.

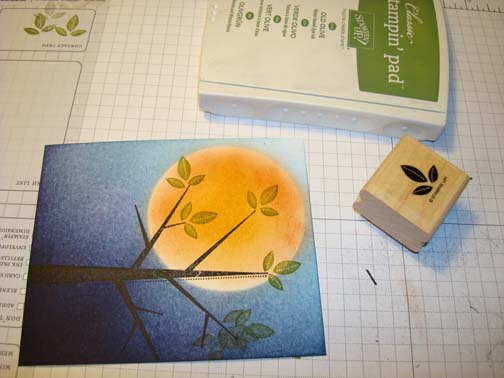
Stamped the tree from the Stampin’ Up Seasons of Friendship tree stamp sideways using Basic Black ink.

Stamped the leaves using Old Olive ink.

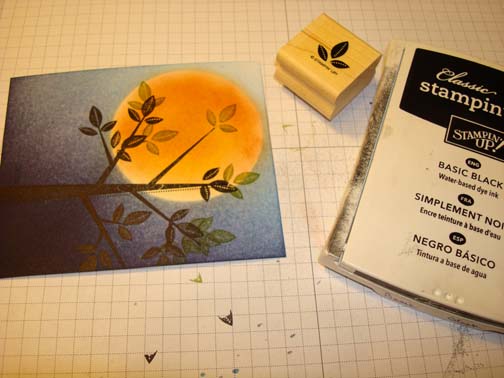
Stamped more leaves using Basic Black ink.

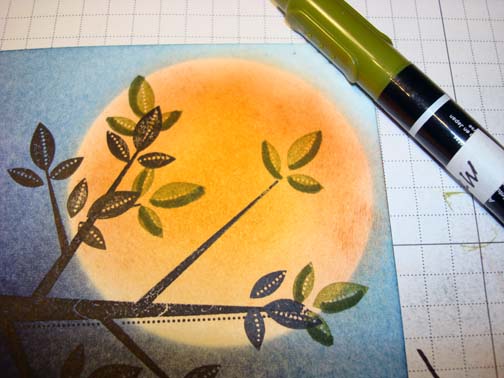
Added a shadow on the Old Olive leaves using an Old Olive Marker.

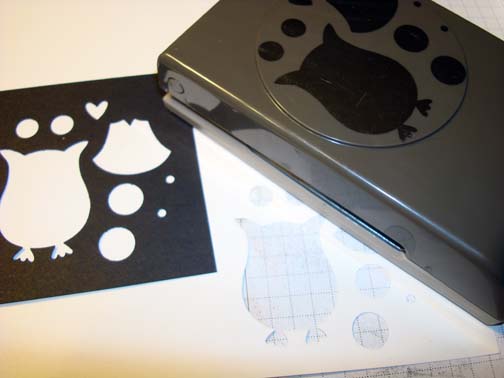
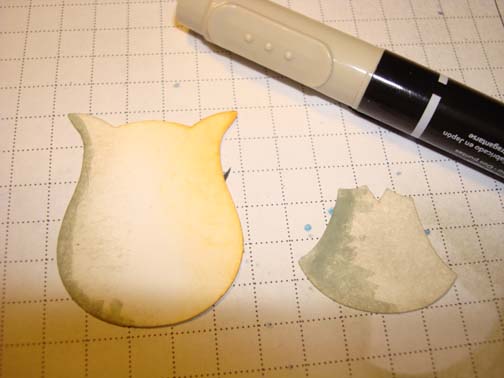
Punched the Owl out of Whisper White and Basic Black card stock.

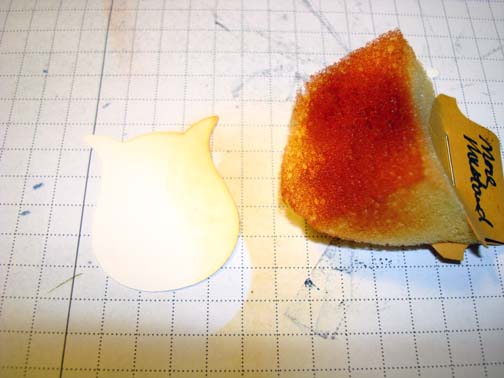
Sponged More Mustard ink on the right side of the white owl.

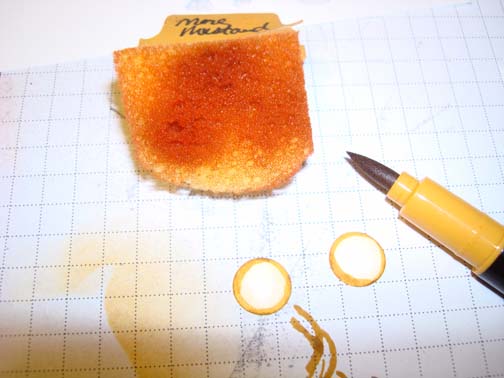
Sponged More Mustard ink on the edges of the large eye circles and then edged then using a More Mustard marker.

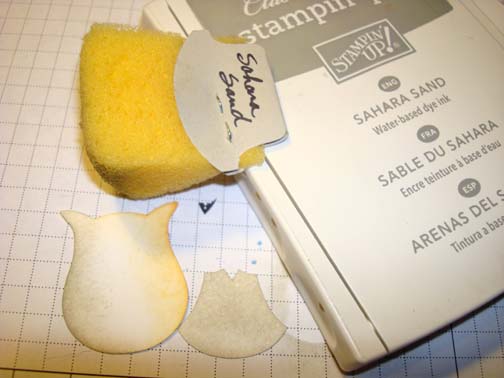
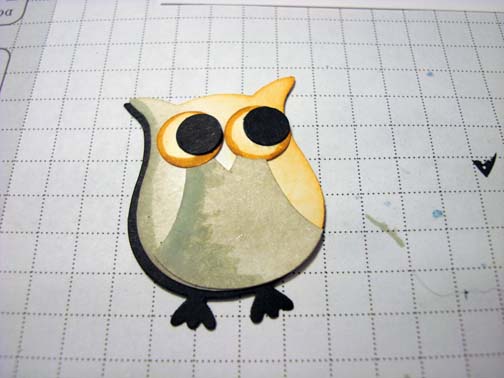
Sponged Sahara Sand ink on the belly and then on just the left side of the white owl.

Added a bit of shadow on the owl and belly using a Sahara Sand marker, only on the left side.

Cut the feet off of the White owl and layered it with the Basic Black owl punch so part of the Basic Black owl shows at the left side.  Added the belly and eyes.

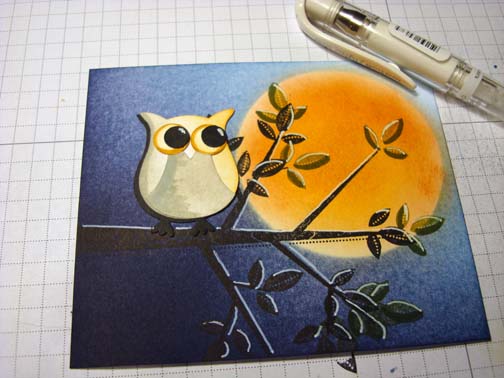
Adhered the owl to the branch and added white gel pen highlights to the owl’s eyes, leaves and branch.

Assembled card adding Cajun Craze and Bashful Blue Panels, Old Olive ribbon and photo corner punches, also added some orange brads.

Here is the finished card measuring 5.5″ square.

May your day be one of your best ever!

Until my next post. . . . . . . . . .

Huge Hugs,

Michelle

   Get ready for Brayer Workshops!  I am coming to the following locations, click the location name for more information.       

Syracuse (Bridgeport), New York      

St. Peters, Missouri       

La Porte, Indiana       

Orlando (Davenport), Florida       

St. Cloud, Minnesota       

Colorado Springs, Colorado       

Ottumwa, Iowa       

Owings Mills, Maryland (Baltimore Area)      

Cleveland (Euclid), Ohio       

Staley , North Carolina (South of Greensboro)       

Monroe, Connecticut       

Dayton, Ohio     

Leesburg, Florida       

Montreal, Wisconsin       

Savannah, Georgia       

Lincoln, Illinois       

Jefferson, Louisiana (New Orleans Area)       

Here is a link to my workshop calendar where you can see all of my travel schedule and to get info on beginner and advanced Brayer workshops:   https://zindorf.splitcoaststampers.com/workshop-calendar        

Don’t see a workshop in your State?  Interested in hosting the workshops in your area in 2012?   Click HERE to get hostess information.       

Link to my Stampin’ Up website where you can order all of your must have Stampin’ Up products from me 24-7:  https://michellezindorf.stampinup.net   
 Link to my Scentsy website where you can order the best smelling, safest wickless candles from me 24-7:  https://zindorf.scentsy.us/Home   

 Donate cards to the Give Thanks Project and help out Cancer Patients.   CLICK HERE TO HELP

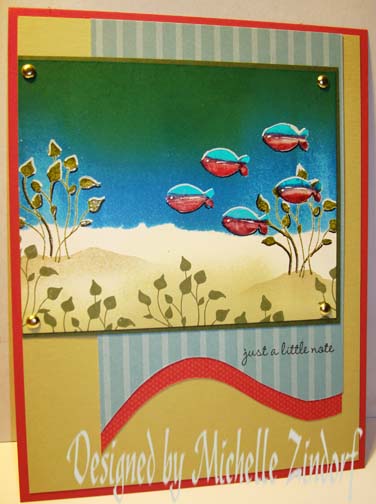
It’s a Little Fishy – Tutorial #400

Here I am at tutorial #400.   Thanks for hanging out with me so far.  Hopefully, I will be around to create many, many more.  It is always so shocking to hit a big milestone though.   If you have missed any of the previous tutorials and want a quick way to look through them, click on the tab at the top of my blog that says “Tutorials”.    You will find thumbnail size pics that you can click on that will take you straight to the tutorial you are looking for.  🙂  Check it out.

Inspiration comes to me from many places.  I never thought it would be from the  pet store though.  But here it is, I was inspired by a fish tank full of Neon Fish.  🙂

Now on with tutorial #400!

Supplies:

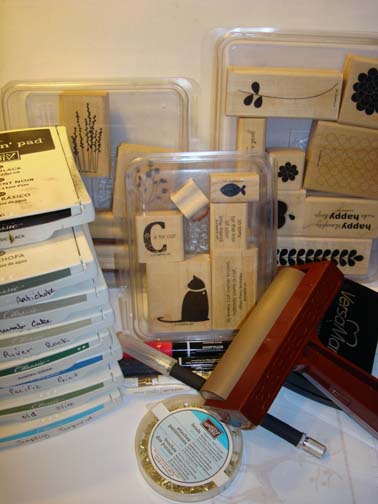
Stamps: Stampin’ Up! C is for Cat, Pocket Silhouettes and Apple Blossoms
Paper: Stampin’ Up Desiger paper, Whisper White, Always Artichoke, River Rock and Rose Red card stock
Ink: Stampin’ Up! Pacific Point, Garden Green, Tempting Turquoise, River Rock, Basic Black, Crumb Cake and Always Artichoke
Accessories: Stampin’ Up! Gold Brads, Brayer, Sponge, White Gel Pen, Basic Black marker, Hobby Blade, Versamark Pad, Rose Red Marker, Post it Notes, Clear Embossing Powder and Heat Gun


  My Stampin’ Up customers that order $50 in Stampin’ Up merchandise will receive this handmade card though March 31, 2011.

Don’t forget it is Sale-a-bration time at Stampin’ Up.  Receive a free Sale-a-bration set for each $50 in merchandise purchased.   Click HERE to place an order.   Your order will be shipped directly to your door step from Stampin’ Up!

The Stampin’ Up USA Idea book and Catalog is here.   For your copy, please send a check for $9.95 to Michelle Zindorf, P.O. Box 116, West Alexandria, OH 45381 or send it via paypal to [email protected] USA only.     My current customers will receive a new Occasions Mini Catalog automatically from me.   Not a current customer and want a free copy of the new Occasions Mini Catalog ?  E-mail your mailing address to [email protected] and I will get one in the mail to you.  )  Are you getting inspiration from this blog?   One way you can help support it is to order your Stampin’ Up products through me.   Click HERE to place an order.    Want to become a Stampin’ Up Demonstrator , receive a 20% discount on product and earn instant income on orders?  Consider being part of my Stampin’ Up Team and start your own business or become a Hobby Demo just for the discount.  Click HERE for more information.

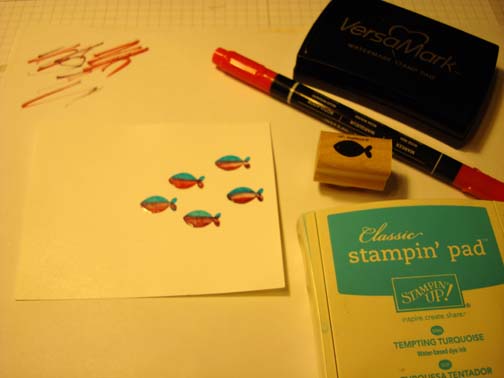
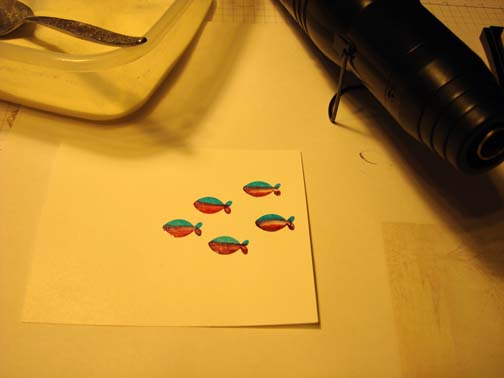
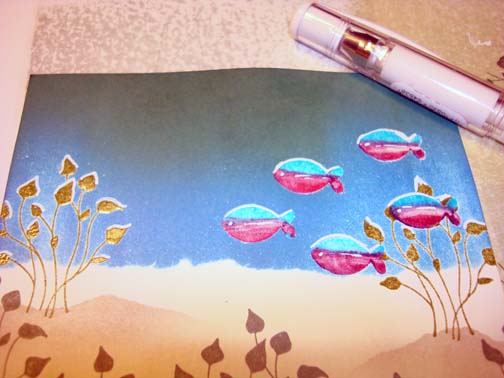
Please bare with me through the first few pictures, lol.  I apparently had hit a setting I should not have on my camera.  🙂  Yep, I’m only human.

Loaded the fish stamp from the Stampin’ Up set C is for Cat with Versamark, Tempting Turquoise ink and then used the brush end of a Rose Red Marker on the bottom half of the fish before stamping it.   Yes that is right, load Versamark, ink and marker all before stamping it.  🙂

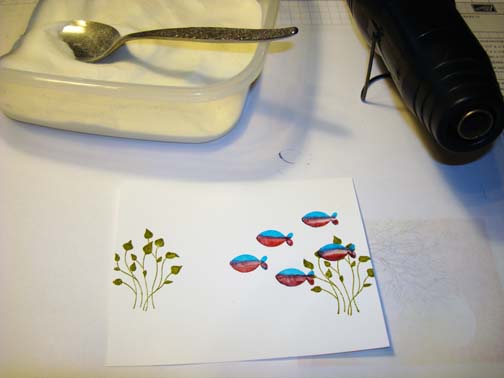
Heat emboss the images using Clear embossing powder and a heat gun.

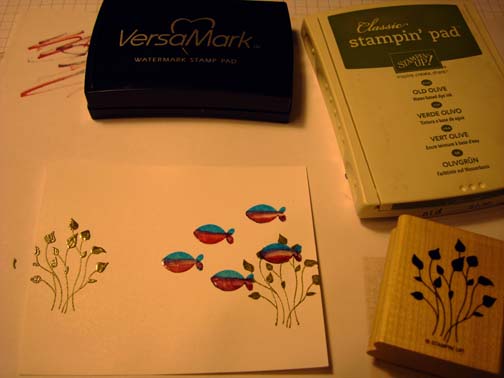
Loaded the Plant from the Stampin’ Up set “Pocket Silhouettes” with Versamark and Old Olive ink before stamping it.  Reloaded for the second stamping.

Heat embossed the images using clear embossing powder and a heat gun.   Ahh, now my pictures are looking better, lol.

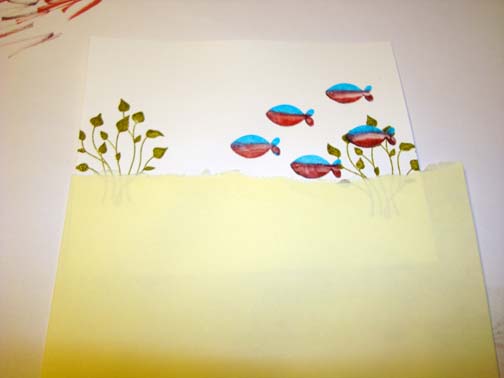
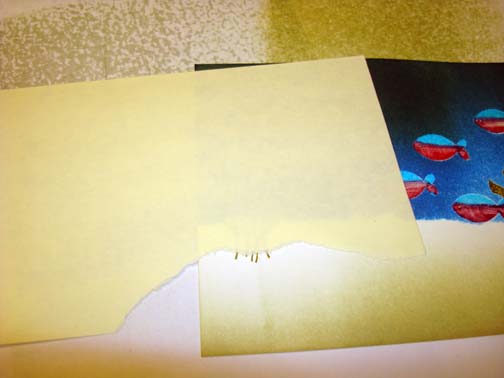
Ripped a post it note and used it as a mask for the sand.

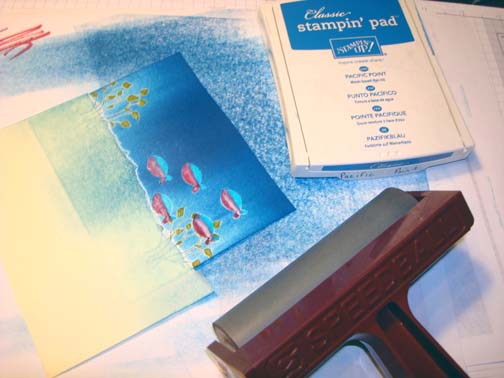
Brayered Pacific Point ink at the top of the card stock.

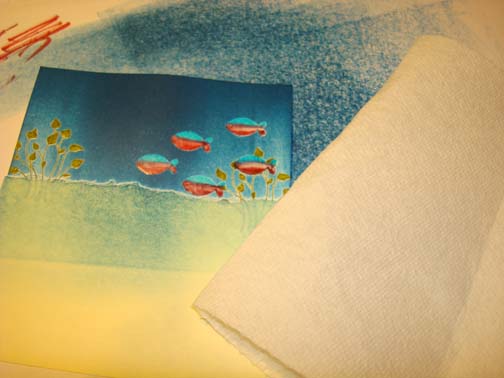
Be sure to lightly buff off your embossed images with a paper towel after putting ink over them.  Be careful not to scrub them.

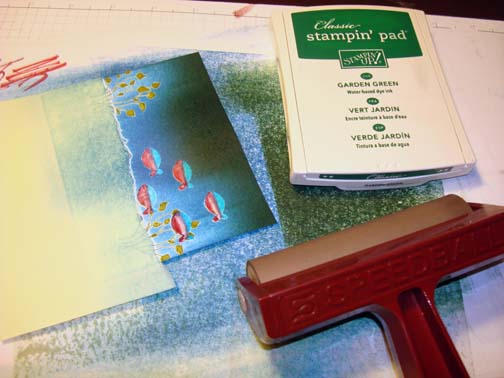
Brayered Garden Green ink at the top of the card stock, not covering the Pacific Point ink entirely.

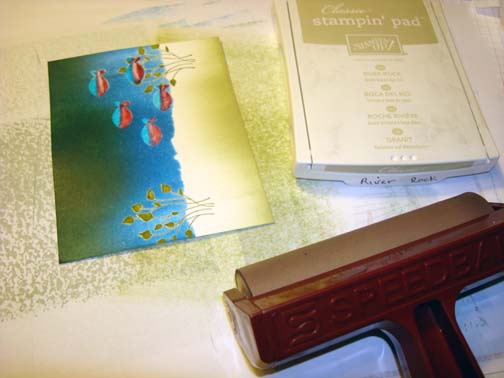
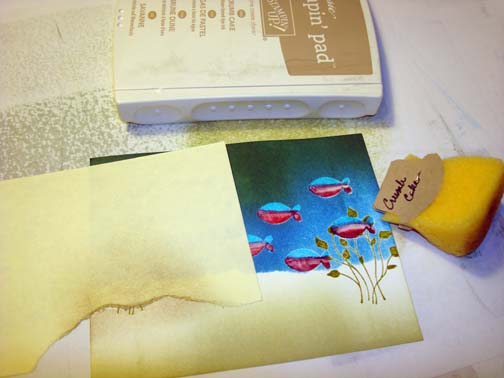
Removed the sand mask and brayered River Rock ink at the bottom of the card stock.

Ripped a post it note in a hill shape and used it as a mask.

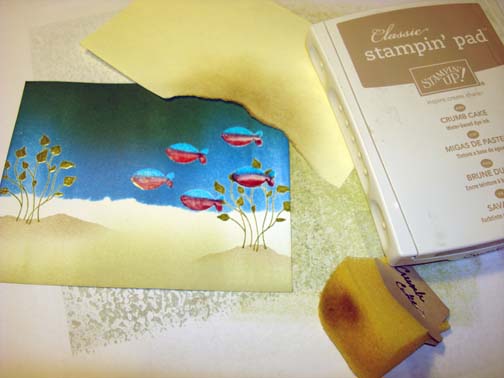
Sponged Crumb Cake ink at the post it note edge.

Moved the post it note and put in a second little hill.

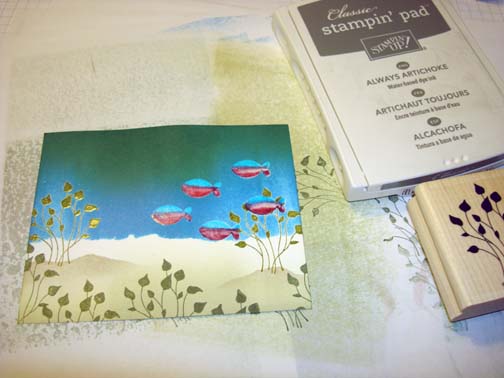
Stamped the plant using Always Artichoke ink along the bottom of the card stock.

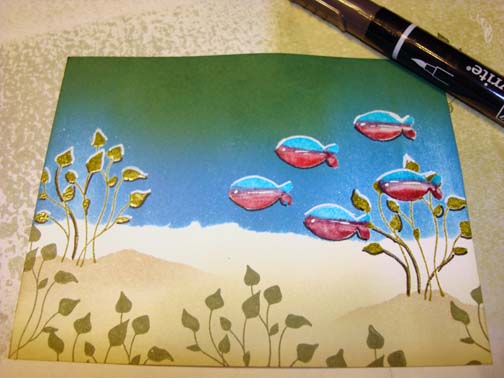
Added White Gel Pen highlights to the tops of the plants and fish.

Added Basic Black marker underneath the leaves and a few of the fish, being careful not to get the marker on the embossed images.

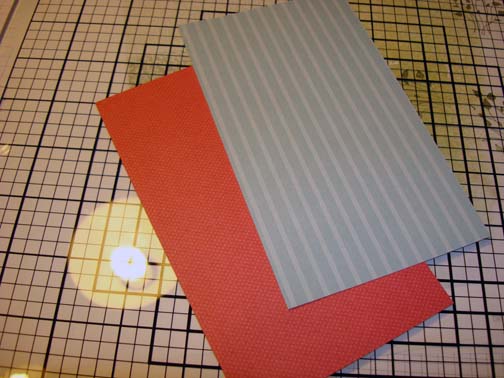
Cut 2 pieces of designer paper 3.5″ x 5.75″.

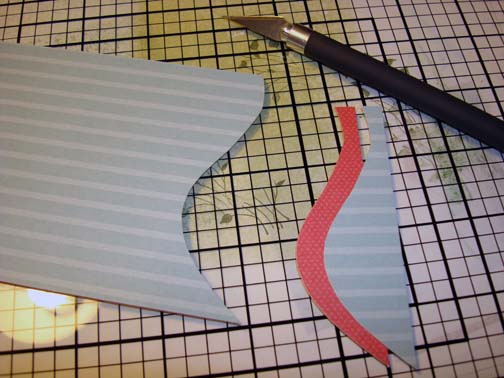
Put them on a Stampin’ Up glass cutting mat and used my Hobby Blade to cut the two pieces of paper at one time.  This keeps the lay edges the same shape so you can stagger them.

Added an Always Artichoke panel and a River Rock panel.  Stamped the sentiment from the Stampin’ Up set Apple Blossoms using Basic Black ink.

Added a 5″ x 6.5″ Rose Red card stock panel and Gold Brads.   Here is my finished card measuring 5″ x 6.5″. 

I am off to Houston, TX tomorrow to have a grand time teaching my brayering techinques.  You all have a super weekend!

Until my next post. . .  . . . .

Hugs,

Michelle

   Get ready for Brayer Workshops!  I am coming to the following locations, click the location name for more information.  

Houston, Texas  

Wichita, Kansas  

Syracuse (Bridgeport), New York  

St. Peters, Missouri  

La Porte, Indiana  

Orlando (Davenport), Florida  

St. Cloud, Minnesota  

Colorado Springs, Colorado  

Ottumwa, Iowa  

Owings Mills, Maryland (Baltimore Area) 

Cleveland (Euclid), Ohio  

Staley , North Carolina (South of Greensboro)  

Monroe, Connecticut  

Dayton, Ohio

Leesburg, Florida  

Montreal, Wisconsin  

Savannah, Georgia  

Lincoln, Illinois  

Jefferson, Louisiana (New Orleans Area)  

Here is a link to my workshop calendar where you can see all of my travel schedule and to get info on beginner and advanced Brayer workshops:   https://zindorf.splitcoaststampers.com/workshop-calendar   

Don’t see a workshop in your State?  Interested in hosting the workshops in your area in 2012?   Click HERE to get hostess information.  

Link to my Stampin’ Up website where you can order all of your must have Stampin’ Up products from me 24-7:  https://michellezindorf.stampinup.net
Windy Tree – Tutorial #262 and a Blog Candy Winner!

dsc00927.JPG

Happy First Day of Autumn!   In the spirit of Fall here is a card using Stampin’ Up ink pads and the direct to paper technique to swipe in the background quickly.  But before we get into today’s tutorial let me congratulate the lastest blog candy winner.

dsc09913.JPG  Congratulations Carole Philpot who wrote:  “I love your blog, it has been such an inspiration to me. I have been a “technique junkie” for years of cardmaking, mostly folds, never stamped much until I signed up for your blog and now I am attempting to brayer and sponge backgrounds and stamp! Thanks for all the good tutorials”

Carole, please e-mail your mailing address to [email protected] within 30 days and I will put this great set in the mail to you.  🙂

Thank you to everyone that played along.

Now on with this mornings Autumn themed tutorial. . . . .

Supplies:

Stamps: Stampin’ Up Branch Out & Baroque Motifs
Paper: Stampin’ Up Whisper White, Bashful Blue & Old Olive
Ink: Stampin’ Up Basic Black, Really Rust, Old Olive, Always Artichoke & Bashful Blue
Accessories: Silver Brads, Sponge, White Gel Pen

Want a free 39 page, Stampin’ Up Mini catalog?  If you are a resident of the United States,  just e-mail your mailing address to me and I will get one in the mail to you.  Are you inspired by this Blog?  One way you can help support this blog is by ordering your Stampin’ Up products through me.   You can order from me 24-7 from this link:  https://michellezindorf.stampinup.net or e-mail me at [email protected]  If you are within the United States.  Want a copy of the brand new 2009-2010 Stampin’ Up Catalog for $9.95 with free shipping, just e-mail me at [email protected] and I will get one in the mail to you.  Want to become a Stampin’ Up Demonstrator and earn instant income?  Consider being part of my Stampin’ Up Team.  Also check out the Stampin’ Up specials, click this link to check it out:  https://www.stampinup.net/esuite/home/michellezindorf/promotions

dsc00928.JPG

On a 3.5″ x 5″ piece of Whisper White card stock, smeared Bashful Blue Ink on using the short end of the ink pad.

dsc00912.JPG

Stamped the Flourish from the Stampin’ Up Baroque Motifs set with Bashful Blue ink.

dsc00913.JPG

Smeared Bashful Blue ink at the bottom of the card stock.

dsc00914.JPG

Smeared Old Olive ink at the bottom of the card stock.

dsc00915.JPG

Turned the card stock up side down and smeared Always Artichoke ink from the ground toward the sky using the edge of the ink pad.

dsc00916.JPG

Stamped the Stampin’ Up Branch Out sets Tree using Basic Black ink.

dsc00917.JPG

Stamped leaves using Old Olive and Really Rust ink on the tree and to the side of the tree.

dsc00918.JPG

Added White Gel Pen highlights to the Flourish to bring it a bit forward in the scene.

dsc00919.JPG

Sponged Old Olive ink around the outside edges of the card stock.

dsc00920.JPG

Sponged Basic Black ink around the outside edges of the card stock, not covering the Old Olive sponged ink entirely.

dsc00921.JPG

Added Whisper White, Bashful Blue and Old Olive card stock panels.

dsc00922.JPG

Added Silver Brads in the corners of the main image panel using a piercing tool to start the brads.

dsc00923.JPG

Here is the finished card measuring 5″ x 6.5″.

dsc00927.JPG

I just got home last night after spending the weekend in Yardley, PA teaching my brayering techniques to totally terrific groups of ladies.  My drive there and back was wonderful.  I found myself in some very scenic country in Ohio, West Virginia, Maryland and Pennsylvania.

Here is one photo taken just as the sun was rising as I was driving along yesterday morning.

dsc00869.JPG

The traffic was a bit slow going through Philly so I was able to take this photo in bumper to bumper traffic.  

dsc00892.JPG

May your day be smooth sailing!

Until my next post. . . . .

Huge Hugs,

Michelle

moon-glow-edited-7-tiny.jpg  Get ready for Brayer Workshops!  I am coming to:

Knox, Maine

Akron, Ohio

Broomfield, Colorado

Moore, Oklahoma

Nashville, Indiana

Portland, Michigan

2010

Dayton, Ohio at Marco Paper

Phoenix, Arizona

Monroe, Louisiana

Jacksonville, Florida

St. Louis, Missouri

Mechanicsville, Virginia

Raleigh, North Carolina 

Colleyville, Texas

Colorado Springs, Colorado

Boise area of Meridian, Idaho

Riverside, California (Southern California)

Salem, Oregon

Wheaton, Illinois

St. Cloud, Minnesota

Rockville, Maryland

North Chili, New York (near Rochester)

New Johnsonville, Tennessee

Kenova, West Virginia

Helena, Montana

Middleburg Heights, Ohio

Venice, Florida

Ginnell, Iowa

Piedmont, Alabama

Auburn, Washington

Elk Grove Village, Illinois

Here is a link to my workshop calendar where you can see all of my travel schedule and to get info on beginner and advanced Brayer workshops: 

 https://zindorf.splitcoaststampers.com/workshop-calendar 

Link to my Stampin’ Up website where you can order all of your must have Stampin’ Up products from me 24-7: 

 https://michellezindorf.stampinup.net
Frequently asked questions answers: 

 https://zindorf.splitcoaststampers.com/frequently-asked-questions/

Going Batty – Tutorial #259

dsc00808.JPG

Before I hop on a plane to head to sunny Castro Valley, California to teach this weekend I sat down to create another Halloween card.  California, ready or not here I come. . . .

Autumn is my very favorite season to create cards for.  I think it is all the earthy colors, browns, greens, yellows, reds etc. 

Today’s tutorial uses two fun sets that are must haves for Autumn from Stampin’ Up.  First there is the Stampin’ Up creepy set “From the Crypt”  and then there is the Stampin’ Up set “Branched Out” with it’s wonderful naked tree that can be used any season since it has a leaf stamp and snowflake stamp included with it.  Branched out is on the dormant list, but you can still order it with item number 113200.  I know I am such the enabler.  🙂

Today’s card does have deep purple ribbon on it that decided to do a disappearing act when I photographed it, Spooky, lol.

Before we get going today I have an announcement to make.  I have added two wonderful brayer workshop locations to my calendar.  I will be teaching beginner and advanced brayer workshops in Grinnell, Iowa on August 28-29, 2010 and then Piedmont, Alabama September 11-12, 2010.  Join me, won’t you for some great projects and fun.  🙂

Now on with the tutorial. . . . .

Supplies:

Stamps: Stampin’ Up From the Crypt and Branch Out
Paper: Stampin’ Up Whisper White, Old Olive, Lavender Lace and Basic Black
Ink: Stampin’ Up Basic Gray, Soft Suede, Sahara Sand, Going Gray and Basic Black
Accessories: Stampin’ Up 1 3/4″ Circle Punch, Post it Note, Sponges, Deep Purple Ribbon and Gold Brads

Want a free 39 page, Stampin’ Up Mini catalog?  If you are a resident of the United States,  just e-mail your mailing address to me and I will get one in the mail to you.  Are you inspired by this Blog?  One way you can help support this blog is by ordering your Stampin’ Up products through me.   You can order from me 24-7 from this link:  https://michellezindorf.stampinup.net or e-mail me at [email protected]  If you are within the United States.  Want a copy of the brand new 2009-2010 Stampin’ Up Catalog for $9.95, just e-mail me at [email protected] and I will get one in the mail to you.  Want to become a Stampin’ Up Demonstrator and earn instant income?  Consider being part of my Stampin’ Up Team.  Also check out the Stampin’ Up specials, click this link to check it out:  https://www.stampinup.net/esuite/home/michellezindorf/promotions

dsc00813.JPG

Using a Stampin’ Up 1 3/4″ circle punch, punched a circle from the sticky part of a post it note and used it as the mask for the moon.

dsc00796.JPG

Put the moon mask on a 3.5″ x 5.5″ piece of Whisper White card stock.

Sponged Going Gray ink on the card stock with a Sponge using a pouncing motion.

dsc00797.JPG

Sponged Sahara Sand ink at the bottom of the card stock using a pouncing motion.

dsc00798.JPG

Sponged Soft Suede ink at the bottom of the card stock using a pouncing motion.

dsc00799.JPG

Sponged Basic Gray ink at the top of the card stock using a pouncing motion.

dsc00800.JPG

Sponged Basic Black ink at the very top of the card stock using a pouncing motion.

dsc00801.JPG

Removed the moon mask and stamped the trees at the bottom of the card stock using Basic Black ink.

dsc00802.JPG

Stamped the bats on using Basic Black ink.

dsc00803.JPG

Sponged Basic Black ink around the outside edge of the card stock.

dsc00804.JPG

Added some simple card stock panels in Old Olive, Lavender Lace and Basic Black, Gold Brads and a deep purple ribbon. 

Here is the finished card measuring 5″ x 6.5″.

dsc00808.JPG

May your day be anything but creepy unless, you are creating Halloween cards.  🙂

Until my next post. . . . .

Huge Hugs,

Michelle

moon-glow-edited-7-tiny.jpg  Get ready for Brayer Workshops!  I am coming to:

Castro Valley, California 

Yardley, Pennsylvania (near Philadelphia) 

Knox, Maine

Akron, Ohio

Broomfield, Colorado

Moore, Oklahoma

Nashville, Indiana

Portland, Michigan

2010

Dayton, Ohio at Marco Paper

Phoenix, Arizona

Monroe, Louisiana

Jacksonville, Florida

St. Louis, Missouri

Mechanicsville, Virginia

Raleigh, North Carolina 

Colleyville, Texas

Colorado Springs, Colorado

Boise area of Meridian, Idaho

Riverside, California (Southern California)

Salem, Oregon

Wheaton, Illinois

St. Cloud, Minnesota

Rockville, Maryland

North Chili, New York (near Rochester)

New Johnsonville, Tennessee

Helena, Montana

Middleburg Heights, Ohio

Venice, Florida

Grinnell, Iowa

Piedmont, Alabama

Here is a link to my workshop calendar where you can see all of my travel schedule and to get info on beginner and advanced Brayer workshops: 

 https://zindorf.splitcoaststampers.com/workshop-calendar 

Link to my Stampin’ Up website were you can order all of your must have Stampin’ Up products from me 24-7: 

 https://michellezindorf.stampinup.net
Frequently asked questions answers: 

 https://zindorf.splitcoaststampers.com/frequently-asked-questions/

To Our Heros – Tutorial #256

dsc00756.JPG

This card is dedicated to those brave men and women who are serving our Country. 

Let’s get out our Stampin’ Up Markers and color a while.  That is what I do when I have a ruff day.  Coloring makes me relax. . . . . .Ahhhh.  🙂    I notice during my workshops when my students are coloring they get very quite.  Coloring takes concentration.  I think that is why it is relaxing.  When you are concentrating on coloring you cannot be concentrating on anything else.

If you are like me you have the matching ink pad, marker and card stock for every Stampin’ Up color they have.  It makes it so very easy to coordinate your projects.

Hang out a while with me and relax while I take you through this project.

Supplies:

Stamps: Stampin’ Up Courage and Unmounted Wheel Hero
Paper: Stampin’ Up Whisper White and Bravo Burgundy
Ink: Stampin’ Up Basic Black, Night of Navy, Not Quite Navy, Apricot Appeal and Craft White
Accessories: Stampin’ Up Markers, Not Quite Navy, Bravo Burgundy, Creamy Caramel, Close to Cocoa and Chocolate Chip, Brayer, White Gel Pen, Not Quite Navy Brads

Want a free 39 page, Stampin’ Up Mini catalog?  If you are a resident of the United States,  just e-mail your mailing address to me and I will get one in the mail to you. 

Are you inspired by this Blog?  One way you can help support this blog is by ordering your Stampin’ Up products through me.   You can order from me 24-7 from this link:  https://michellezindorf.stampinup.net or e-mail me at [email protected]  If you are within the United States.  Want a copy of the brand new 2009-2010 Stampin’ Up Catalog for $9.95, just e-mail me at [email protected] and I will get one in the mail to you.  Want to become a Stampin’ Up Demonstrator and earn instant income?  Consider being part of my Stampin’ Up Team.  Also check out the Stampin’ Up specials, click this link to check it out:  https://www.stampinup.net/esuite/home/michellezindorf/promotions

dsc00759.JPG

Brayered Apricot Appeal ink at an angle on a 4.5″ square piece of Whisper White.

dsc00737.JPG

Brayered Not Quite Navy ink at the same angle, not covering the Apricot Appeal ink entirely.

dsc00738.JPG

Stamped the Courage Stamp with Basic Black ink.

dsc00739.JPG

Colored The Soldier’s skin, plane, ship and suluting soldier in with Creamy Caramel marker.

dsc00740.JPG

Colored part of the flag with Not Quite Navy marker and then added White Gel pen to the stars and stripes on the flags.

dsc00741.JPG

Colored the other stripes on the flags in with a Bravo Burgundy Marker.

dsc00744.JPG

Colored the Soldier’s helmet and uniform in with a Close to Cocoa Marker.

dsc00745.JPG

Colored the water in with the Not Quite Navy Marker.

dsc00746.JPG

Added Chocolate Chip marker to the creases in the uniform, the goggles, bottom of the airplane and the ship.

dsc00747.JPG

Added Creamy Caramel to the darker places of the Soldier’s face and hands.

Note:  You can shade with these markers by coloring with the same colored marker twice letting the marker dry in between the colorings.

dsc00748.JPG

Sponged Night of Navy ink around the edge of the card stock.

dsc00749.JPG

Sponged Basic Black ink around the edge of the card stock, not covering the Night of Navy ink entirely.

dsc00750.JPG

Stamped the unmounted Hero Wheel with Craft White ink.

If you want to know about the unmounted wheels, here is a link about it:    https://zindorf.splitcoaststampers.com/2009/07/28/tool-time-unmounting-wheels/

dsc00751.JPG

Outlined the word “Bravery” with a White Gel Pen so it would stand out more.

dsc00753.JPG

Assembled card front and added Not Quite Navy Brads in each corner of the main image panel.

Here is the assembled card measuring 5.25″.

dsc00756.JPG

Until my next post. . . . .

Huge Hugs,

Michelle

dsc04306-tiny.jpg Get ready for Brayer Workshops!  I am coming to:

Castro Valley, California 

Yardley, Pennsylvania (near Philadelphia) 

Knox, Maine

Akron, Ohio

Broomfield, Colorado

Moore, Oklahoma

Nashville, Indiana

Portland, Michigan

2010

Dayton, Ohio at Marco Paper

Phoenix, Arizona

Monroe, Louisiana

Jacksonville, Florida

St. Louis, Missouri

Mechanicsville, Virginia

Raleigh, North Carolina 

Colleyville, Texas

Colorado Springs, Colorado

Boise area of Meridian, Idaho

Riverside, California (Southern California)

Salem, Oregon

Wheaton, Illinois

St. Cloud, Minnesota

Rockville, Maryland

North Chili, New York (near Rochester)New Johnsonville, TennesseeHelena, MontanaMiddleburg Heights, OhioVenice, Florida

Here is a link to my workshop calendar where you can see all of my travel schedule and to get info on beginner and advanced Brayer workshops:  https://zindorf.splitcoaststampers.com/workshop-calendar

Link to my Stampin’ Up website were you can order all of your must have Stampin’ Up products from me 24-7:  https://michellezindorf.stampinup.net
Frequently asked questions answers:  https://zindorf.splitcoaststampers.com/frequently-asked-questions/

Pink & Blue Floral – Tutorial #201 and a Blog Candy Winner

dsc08670.JPG

Hey there everyone,  I’m back from Arkansas.  Thank you Linda Carson for hosting me while I was there.  Also thank you to the wonderful ladies that attended my workshops.  I had a great time.

arkansas-1.jpg     arkansas-2.jpg

I drove 12 hours to reach Arkansas. Here are a few sites that I seen along the way.  A couple of these where taken as I was doing 70 miles an hour down the Inter State, lol.  Don’t do this!

St. Louis

dsc08579.JPG

Maramec Springs Park in Missouri

dsc08623.JPG

dsc08640.JPG

Open Road . . .  . . . . . .

dsc08650.JPG

I took lots and lots of pictures, but I will not bore you with them.  Let’s get on to more important stuff like the Blog Candy winner. . . .

The random number generator selected. . . . . . . . . . . . .. . . . . .

Dawn Frost who wrote “Have fun driving for 12 hours tomorrow. I hate driving more than 2 hours at a time! My hat goes off to you. Thank you so much for a chance to win some blog candy. Have fun at your workshop.”

Congratulations Dawn, please e-mail your address to mzindorf@ aim.com and I will pop these in the mail to you.

dsc08572.JPG

Thanks to all 435 of you that played along!  As always I wish I had a set to send each of you.

Now on with the tutorial 🙂

Supplies:

Stamps: Stampin’ Up Friends 24-7
Paper: Stampin’ Up Baja Breeze, Not Quite Navy and Whisper White
Ink: Stampin’ Up Not Quite Navy, Baja Breeze, Always Artichoke
Accessories: Brayer, Clear embossing powder, Heat Gun, Stampin’ Up Markers, Piercing Tools and Stampin’ Up Mat Pack, Versmark Marker and Pad, Photo Corner Punch, Brads

Please don’t forget you can order your Stampin’ Up products from me 24-7 from this link:  https://michellezindorf.stampinup.net or e-mail me at [email protected] if you are within the United States.  Also, please consider being part of my Stampin’ Up Team.  We have valuable monthly meetings in Miamisburg, Ohio.

 dsc08671.JPG

Stamped Flourish 5 times with Versamark only on a 3.25″ x 5.5″ piece of Whisper White card stock.  Heat embossed embossed the images using clear embossing powder and a heat gun. 

dsc08652.JPG

dsc08653.JPG

Stamped the flowers twice by first loading the stamp with Versamark and then Always Artichoke ink before stamping.

dsc08654.JPG

Heat embossed the flower images using clear embossing powder and a heat gun.  Colored the stems and leaves with an Old Olive marker.

dsc08655.JPG

Colored the flowers in with a Blush Blossom marker.

dsc08656.JPG

Added Rose Red marker to the flowers.

dsc08657.JPG

Went over the flowers again with the Blush Blossom marker to blend the two colors together.

dsc08658.JPG

Colored over the flowers, leaves and stems with a Versamark marker and then heat embossed the images using clear embossing powder and a heat gun.

dsc08659.JPG

dsc08660.JPG

Brayered Baja Breeze ink on the card stock at an angle.

dsc08661.JPG

Brayered Not Quite Navy ink on the card stock at an angle, not covering the Baja Breeze ink entirely.

dsc08662.JPG

Wiped the ink off of my embossed images with an old cotton cloth.

dsc08663.JPG

Extended my flower stem with an Old Olive Marker.

dsc08664.JPG

Assembled card front and added a white punched Photo Corner, brads and pierced along each side of my white panel using a piercing tool and Stampin’ Up Mat Pack.

dsc08665.JPG

Here is the finished card measuring 5″ x 6.5″.

dsc08670.JPG

May your day be full of sweet smelling blossoms!

Until my next post. . . . . . . . . . . . .

Hugs,

Michelle

Get ready for Brayer Workshops!  I am coming to:

3-small.jpg

Dayton, Ohio

Savannah, Georgia

Covington, Indiana

Buffalo, Minnesota

Webster, New York

New Johnsonville, Tennessee

Stoughton, Wisconsin

Castro Valley, California

Yardley, Pennsylvania (near Philadelphia)

Knox, Maine

Broomfield, Colorado

Lynchburg, Virginia

Columbia, Missouri

Portland, Michigan

Here is a link to my workshop calendar where you can see all of my travel schedule and to get info on beginner and advanced Brayer workshops:  https://zindorf.splitcoaststampers.com/workshop-calendar

Link to my Stampin’ Up website were you can order all of your must have Stampin’ Up products from me 24-7:  https://michellezindorf.stampinup.net
Here is a link to all of my tutorials:  https://zindorf.splitcoaststampers.com/tutorials-ive-written/

Frequently asked questions answers:  https://zindorf.splitcoaststampers.com/frequently-asked-questions/