Tag Archives: stamping

Pumpkin Patch – Tutorial #271

dsc01242-2.jpg

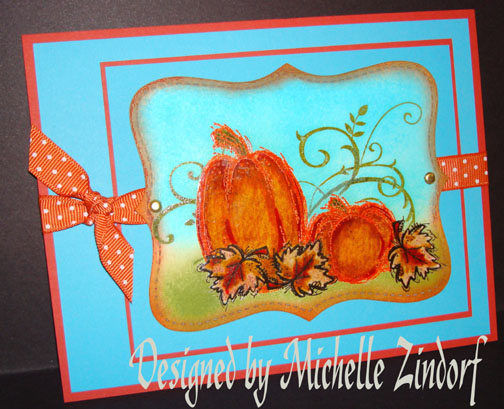
I have a little Autumn scene for you today.  The main set used today is a Stampin’ Up set Autumn Harvest, item number 110372, $17.95.  I teamed it up with a Stampin’ Up set Baroque Motifs and used the flourish as pumpkin vines.  Check it out.  🙂

Let’s get started. . . .

Supplies:

Stamps: Stampin’ Up Autumn Harvest & Baroque Motifs
Paper: Stampin’ Up Whisper White, Dusty Durango & Tempting Turquoise
Ink: Stampin’ UP Dusty Durango, Tempting Turquoise, Old Olive & Basic Black
Accessories: Stampin’ Up Markers, Sponges, Piercing Tool, Gold Brads, Dusty Durango Polka Dot Ribbon, Big Shot Die Cut Machine, Top Note Die, Versamark Pad & Marker, Clear embossing Powder, Heat Gun

Want a free 39 page, Stampin’ Up Mini catalog?  If you are a resident of the United States,  just e-mail your mailing address to me and I will get one in the mail to you.  Are you inspired by this Blog?  One way you can help support this blog is by ordering your Stampin’ Up products through me.   You can order from me 24-7 from this link:  https://michellezindorf.stampinup.net or e-mail me at [email protected]  If you are within the United States.  Want a copy of the brand new 2009-2010 Stampin’ Up Catalog for $9.95 with free shipping, just e-mail me at [email protected] and I will get one in the mail to you.  Want to become a Stampin’ Up Demonstrator and earn instant income?  Consider being part of my Stampin’ Up Team.  Also check out the Stampin’ Up specials, click this link to check it out:  https://www.stampinup.net/esuite/home/michellezindorf/promotions

dsc01236.JPG

Used my Big Shot Dye Cut Machine and the Top Note Die to cut out this shape with Whisper White Card stock.

dsc01205.JPG

Stamped the leaf from the Autumn Harvest set by first loading my stamp with Versamark and then with Basic Black ink before stamping it on the card stock.  Stamped all three images loading the stamp each time with Versamark and ink.   Heat embossed the images using clear embossing powder and a heat gun.

dsc01206.JPG

dsc01207.JPG

Colored the leaves in with a Creamy Caramel marker.

dsc01208.JPG

Added More Mustard marker to the leaves.

dsc01209.JPG

Added a bit of Real Red Marker to the center of the leaves.

dsc01210.JPG

Colored over the leaves, staying within the embossed lines with a Versamark marker.  Heat embossed the images using clear embossing powder and a heat gun.

dsc01211.JPG

dsc01212.JPG

Stamped the two pumpkins from the Autumn Harvest set by first loading the stamps with Versamark and then with Dusty Durango ink before stamping them.  Heat embossed the images using clear embossing powder and a heat gun.

dsc01213.JPG

dsc01214.JPG

Colored in the pumpkins with a More Mustard marker.

dsc01215.JPG

Added Pumpkin Pie Marker.

dsc01216.JPG

Added Real Red marker.

dsc01219.JPG

Colored in the Pumpkin stems with an Old Olive marker.

dsc01220.JPG

I wanted to brighten up the Pumpkins a bit so I colored over the pumpkins with a Summer Sun marker.

dsc01221.JPG

Colored over the pumpkins with a Versamark marker and heat embossed the images using clear embossing powder and a heat gun.

dsc01222.JPG

dsc01223.JPG

Masked the bottom of the card stock with a post it note.  Stamped the Flourish from the Stampin’ Up set Baroque Motifs by first loading the stamp with Versamark and then with Old Olive ink before stamping it.  Heat embossed the image using clear embossing powder and a heat gun.  Note I kept the post it note on while heat embossing to keep the embossing powder from sticking to the residue left by the post it note.

dsc01224.JPG

dsc01225.JPG

Sponged Old Olive ink at the bottom of the card stock.

dsc01226.JPG

Sponged Tempting Turquoise ink at the top of the card stock.

dsc01227.JPG

Sponged Dusty Durango ink around the outside edge of the card stock.

dsc01228.JPG

Added Tempting Turquoise and Dusty Durango panels, Dusty Durango Polka Dot Ribbon and two Gold Brads.  Here is the finished card measuring 5″ x 6.5″.

dsc01242-2.jpg

May your day be one of the happiest of your life.

Until my next post. . . . . .

Huge Hugs,

Michelle
tiny-bird.jpg  Get ready for Brayer Workshops!  I am coming to:

Broomfield, Colorado

Moore, Oklahoma

Nashville, Indiana

Portland, Michigan

2010

Dayton, Ohio at Marco Paper

Phoenix, Arizona

Monroe, Louisiana

Jacksonville, Florida St. Louis, MissouriMechanicsville, VirginiaRaleigh, North Carolina Colleyville, Texas

Colorado Springs, Colorado

Boise area of Meridian, Idaho

Riverside, California (Southern California)

 Salem, Oregon

Wheaton, Illinois

St. Cloud, Minnesota

Rockville, Maryland

North Chili, New York (near Rochester)

New Johnsonville, Tennessee

Kenova, West Virginia

Helena, Montana

Middleburg Heights, Ohio

Venice, Florida

Ginnell, Iowa

Piedmont, Alabama

Auburn, Washington (near Seattle)

Elk Grove Village, Illinois

Here is a link to my workshop calendar where you can see all of my travel schedule and to get info on beginner and advanced Brayer workshops:   https://zindorf.splitcoaststampers.com/workshop-calendar 

Link to my Stampin’ Up website where you can order all of your must have Stampin’ Up products from me 24-7:  https://michellezindorf.stampinup.net

Frequently asked questions answers:  https://zindorf.splitcoaststampers.com/frequently-asked-questions/ 

Toile Blossoms Scene – Tutorial

dsc05046.JPG

Today’s piece is dedicated to all the Stampin’ Up stamp hoarders.  Now you know who you are, a few of you have even asked me to use some of my old, but loved stamps in projects.  I was a hobby demo so I never felt the need to get rid of my old stamps when new ones came out.  So I have around 300 Stampin’ Up sets, that is what is left after weeding out sets that weren’t my style.  We won’t talk about my unmounted stamp collections in this same post. You all will think I’m a stamp junkie or something, lol. 

Let me hear about your stamp collections/addiction in the comments section of this post.  If you are getting this by e-mail update, click this link to leave me your comment:

https://zindorf.splitcoaststampers.com/2008/07/09/toil-blossoms-scene-tutorial/

I know I’m not the only one that will chose new stamps over new shoes, let me hear from you.  🙂

Anyway, I have used Stampin’ Up sets “Toile Blossoms” &  “Lovely as a Tree” in today’s piece. 

Let’s get started on the tutorial.  🙂

Supplies:

Stamps: Stampin’ UP Toile Blossoms & Lovely as a Tree
Paper: Stampin’ Up Whisper White, Not Quite Navy and Soft Sky
Ink: Stampin’ Up Soft Sky, More Mustard, Not Quite Navy, Basic Black & Old Olive, Palette Noir Black
Accessories: Piercing Tools, Prismacolor Markers, Going Gray marker, White Gel Pen, Black marker, Ticket Corner Punch, Sponges, Brayer, Clear Embossing Powder, Heat Gun, Versamark Marker, Gold Brads

dsc05051.JPG

Stamped Toile Blossom images on a piece of 5″ x 5″ Whisper White card stock with Palette Noir Black ink.

dsc05025.JPG

dsc05026.JPG

Colored the center of the flower petals with a Prismacolor Deco Pink marker.

dsc05027.JPG

Added just a little Prismacolor Magenta marker to the flower petal centers.

dsc05028.JPG

Colored the leaves with a Prismacolor Chartreuse marker.

dsc05029.JPG

Colored the shadow (dark side) of the leaves with a Prismacolor Light Olive Green marker.

dsc05030.JPG

Colored over the leaves and flowers with a Versamark marker.

Note:  Be careful to color the white parts first and then the colored parts so the color doesn’t smear onto the white part of your image.  You can clean the tip of your Versamark marker my coloring on scrap paper for a second.

dsc05031.JPG

Heat emboss the images using clear embossing powder and a heat gun.

dsc05032.JPG

Brayered Soft Sky ink at the top of the card stock.

dsc05033.JPG

Brayered Not Quite Navy ink at the very top of the card stock, not covering the Soft Sky ink entirely.

dsc05034.JPG

Stamped Tree image with Palette Noir Black ink.

dsc05035.JPG

Sponged More Mustard ink on the bottom of the card stock. 

Note:  The embossed images resist the ink.  Just wipe the ink off the images with a paper towel.

dsc05036.JPG

Sponged Old Olive ink at the bottom of the card stock using a swiping motion from the bottom let corner toward the top right.  This was done to simulate grasses.  Also, sponged Old Olive Green ink in the leaf area of the tree.

dsc05037.JPG

Added just a bit of Black ink to the very bottom of the card stock.

dsc05038.JPG

Colored the tree trunk with a Going Gray Marker and added some grasses at the base of the tree with a Prismacolor Light Olive Green marker.

dsc05039.JPG

Sponged a bit of Basic Black ink on the right side of the leaf area of the tree and just a faint hint of black under the tree for a shadow.

dsc05040.JPG

Added White highlights (specks) on the left side of the leaf area of the tree with a white gel pen.

dsc05041.JPG

Sponged heavily some Not Quite Navy ink at the top of the card stock to give the sky some interest.

dsc05042.JPG

Used a black fine line marker and traced along the bottom side of the flowers and leaves to create the look of a shadow.  Also colored along the right side of the tree trunk with the black marker.

Used the ticket corner punch on the main image panel and the Not Quite Navy panel.

dsc05043.JPG

Used my piercing tools and a fine tip black marker to do some faux stitching all the way around the card stock.

dsc05044.JPG

dsc05045.JPG

Added some gold brads and here is the completed card measuring 5.25″ x 5.25″.

dsc05046.JPG

Hope your day is filled with blooming flower gardens and shade trees.

Until my next post. . . . . . .

Michelle

Party Dresses – Tutorial

dsc04943.JPG

Happy Fourth of July Everyone!

This morning I decided to make my Granddaughter’s Birthday card.  She is a girlie, girl for sure.  Loves, loves, loves pink!   So what do you put on a Girlie Girl’s card, pink dresses, of course. 

These images are from Rupa Shevde’s set “Retro Boutique” that can be purchased from Gina K. Design’s online store found here:  https://www.ginakdesigns.com/

Let’s get started on the tutorial.  🙂

Supplies:

Stamps: Rupa Shevde’s “Retro Boutique” from Gina K. Designs
Paper: Stampin’ Up Whisper White, Basic Black, Old Olive Cameo Coral
Ink: Stampin’ Up Basic Black, Old Olive & Always Artichoke, Palette Noir Black, Adirondack Lettuce
Accessories: Prismacolor Markers, White Gel Pen, Versamark marker, clear embossing powder, heat gun, Going Grey marker, Black marker, Sponge, Adhesive Rhinestones

dsc04951.JPG

Stamped the dresses on a 6″x 6″ piece of Whisper White Card stock with Palette Noir Black ink.

dsc04923.JPG

Stamped the four purses using Palette Noir Black ink.

dsc04924.JPG

Used my Curvy Cutter and cut it out into a 5″ circle.

dsc04925.JPG

dsc04926.JPG

Colored the dresses on at a time using these 3 colors of Prismacolor Markers in this order, Light Peach, Deco Peach, Blush Pink.  With solvent based markers, you want to work fast to try to avoid hard lines.  If you do get a hard line, try going over the hard line with the lightest color to blend it some.

dsc04927.JPG

I blended my hard lines between the Blush Pink & Deco Peach by going over it with Deco Peach again.

dsc04928.JPG

Colored the purses with Light Peach.

dsc04929.JPG

Added Blush pink to the purse flowers.

dsc04930.JPG

Colored the leaves on the purse with Light Olive Green.

dsc04931.JPG

Colored all the images with Versamark marker and heat embossed the using clear embossing powder and a heat gun.  I found it is easiest to work one image at a time, coloring with Versamark and then heat embossing before going to the next image.

dsc04933.JPG

dsc04934.JPG

Now that your images are heat embossed they will resist ink.

Sponged in a circular motion, Lettuce ink in the center of the card stock.

dsc04935.JPG

Sponged in a circular motion, Old Olive ink, not covering the Lettuce ink entirely. 

dsc04936.JPG

Sponged in a circular motion, Always Artichoke ink at the edge of the card stock.

dsc04937.JPG

Wanted the edge to be very dark, so I sponged Black ink at the edge.  Be careful when you are using black ink over embossed images, it will turn your light colors gray, yuck!  If you do get it on the light colors, wipe it off immediately.

dsc04938.JPG

Now my image looks flat and I want to give it some life.  Using the brush point of a Stampin’ Up Going Grey marker, I traced a thick line at both sides of the dresses and under the purses creating a shadow.

dsc04939.JPG

To bring the images forward more, I traced a line down the sides of the dresses and under the purses.  Now that added some more life.

dsc04940.JPG

Can’t forget the bling, assembled the card and added some Brenda Walton Adhesive olive colored Rhinestones that I got from GinaKDesigns.com.

dsc04941.JPG

Put dotes in the corners of the card with a white gel pen.

dsc04942.JPG

Here is the card all finished measuring 5.25″ x 5.25″

dsc04943.JPG

Hope you will try this emboss resist tutorial.

May your day be filled with fireworks and party dresses.

Until my next post. . . . . .

Michelle

Chickadee in the Woods – Tutorial

dsc04915.JPG

Here it is Thursday already!  Wow, the older I get the faster time flies.  Am I the only one that feels this way?

Anyway, today I got back to nature with the Stampin’ Up’s Set “Touch of Nature”.  I love this little Chickadee.  Isn’t he the cutest little bird?  I have Chickadees all over my yard.  They are such happy little souls.  I can’t help but smile when I see and hear them.

Also, today I’m giving BLOG CANDY!  Anyone miss out on the Studio G Series 8 stamps?  I have 12 packs here just waiting for some lucky stamper.

Well here is your chance to get them.  All you need to do to enter is leave me a comment here on this post.  If you are getting this blog update by e-mail and you wish to comment, please click this link that will take you to my blog so you can comment for a chance to win these stamps:  https://zindorf.splitcoaststampers.com/2008/07/03/chickadee-in-the-woods-tutorial/

I’ll use a random number generator to pick a number on Saturday morning, July 5th.

dsc04921.JPG

Ready for the tutorial?  Let’s get started 🙂

Supplies:

Stamps: Stampin’ Up Touch of Nature
Paper: Stampin’ Up Whisper White, Basic Black, Old Olive & Bordering Blue
Ink: Stampin’ Up Bordering Blue, Old Olive & Blue Bayou, Palette Noir Black
Accessories: Prismacolor Markers, White Gel Pen, Versamark Marker, Clear embossing Powder, Sponge, heat tool, Black maker

dsc04920.JPG

Stamped the bird with Palette Noir Black ink on a piece of 3.5″ x 5″ Whisper White card stock.  I’m using the Palette ink because it doesn’t smear with the Solvent based Prismacolor markers.

dsc04895.JPG

Colored the bottom of the birds belly with a Buff marker.

dsc04896.JPG

Extended the limb to the edge of the card stock with a Fabe Castell black marker.

dsc04897.JPG

Colored the birds head, very bottom of the belly and back with a Cool Grey 30% marker.

dsc04898.JPG

Colored the dark parts of the leaves with a Light Olive Green marker.

dsc04899.JPG

Colored the Branch with a Buff colored marker.

dsc04900.JPG

Added some Cool Grey 80% colored marker to the dark parts of the birds head and back.

dsc04901.JPG

Added a bit more Buff marker to the birds belly.

dsc04902.JPG

Colored over the bird with a Versamark marker, being very careful to stay within the lines.

dsc04903.JPG

Heat embossed using clear embossing powder and a heat gun.

dsc04904.JPG

Sponged Bordering Blue ink in a pouncing motion all over the card stock.  I want it to look splotchy.

dsc04905.JPG

Stamped leaves by first loading my stamp with Old Olive ink and then misting the stamp a tiny bit so it would look a bit out of focus when I stamp it.  Note:  I tried this out on scrap paper first to see how much misting to do for the effect I wanted.

dsc04906.JPG

dsc04907.JPG

Stamped some Bordering Blue Leaves, some I misted, some I didn’t.

dsc04908.JPG

Sponged Bordering Blue ink at the right side of the card stock using a circular motion for good coverage.

dsc04909.JPG

Stamped a few leaves using Blue Bayou ink at the right side of the card stock.

dsc04910.JPG

Sponged Blue Bayou ink at the right side of the card stock, not covering all of the Bordering Blue ink. 

dsc04911.JPG

Traced the underside of the Bird and the branch with a Black marker.

dsc04912.JPG

Added White Gel pen highlights to the leaves on the branch and a dot on the birds eye.

dsc04913.JPG

Assembled card and here it is finished measuring 5″ x 6.5″.

dsc04915.JPG

Don’t forget to comment to enter to win the blog candy for today.  🙂

Hope your day is filled with the sights and sounds of birds singing their happy little tunes.

Until my next post. . . . . . .

Michelle

Artsy Victorian Sneak Peek – Tutorial

dsc04463.JPG

I wanted to show in my tutorial today how you can use just one stamp and make something that is beautiful and dramatic.  Of course, it helps to start with a beautiful image.  This one is a Sneak Peek image from Innovative Stamp Creations soon to be released Stamp Sheet “Artsy Victorian”.  This set with be release on June 13, 2008.  Here is a link to their online store:  https://www.innovativestampcreations.com/ischomepage.html

Let’s get going on the tutorial.  🙂

Supplies:

Stamps: Innovative Stamp Creations – Artsy Victorian
Paper: Stampin’ UP Whisper White, Orchid Opulence & Basic Black
Ink: Stampin’ Up Basic Black, Orchid Opulence, Tempting Turquoise & Elegant Eggplant, Adirondack Purple Twilight
Accessories: Versamark pad and marker, clear embossing powder, Sponge, Stamp-a-ma-jig

dsc04466.JPG

Stamped flourish, at a diagonal,  on Whisper White card stock by first loading the stamp with Versamark then Tempting Turquoise before stamping.   Heat embossed the image using clear embossing powder and a heat gun.

dsc04451.JPG

I cropped the card stock at this point so the image would go all the way to the top and bottom of the card stock. 

dsc04452.JPG

Colored the white card stock where it was showing through the  image with a Versamark marker and heat embossed it with clear embossing powder and a heat gun.  This step is necessary to retain the white in the image.

dsc04453.JPG

dsc04454.JPG

Using a Stamp-A-Ma-Jig for placement, over stamped the image with Purple Twilight ink just left of the original image to create a shadow.

dsc04455.JPG

dsc04456.JPG

Sponged Orchid Opulence in a circular motion all over the card stock.

dsc04457.JPG

Sponged Purple Twilight ink to the left side of the flourish using a circular motion.

dsc04458.JPG

Sponged Elegant Eggplant ink on the left side of the card stock, not completely covering the Purple Twilight ink.

dsc04459.JPG

Getting darker yet, sponged black ink at the left corners of the card stock.

Assembled card and here it is finished measuring 5.25″ x 5.25″.

dsc04463.JPG

Thanks so much for joining me today for this tutorial.  Give it a try.  I think you will be happy with the results.

Hope your day is on the light side of life. 🙂

Until my next post.. . . . . . .

Michelle